nodejs 进阶
1.开始
1.1 创建项目
简单设置:
- 下载脚手架:
npm i -g koa-generator - 创建项目(
-e指以 ejs 模板进行开发):koa2 -e koa2-weibo-code - git 初始化:
git init - 创建源(coding.netopen in new window):
git remote add origin git@e.coding.net:yuanke2/koa2-weibo-code/koa2-weibo-code.git - 输入:
git status=> 用于显示工作目录和暂存区的状态。使用此命令能看到那些修改被暂存到了, 哪些没有, 哪些文件没有被 Git tracked 到 - 将远程主机 origin 的 master 分支拉取过来,将远程的 .gitignore 文件成功拉取到本地项目中:
git pull origin master - 添加当前目录下的所有文件到暂存区:
git add . - 将本地修改过的文件提交到本地库中:
git commit -m "init project"(如果做了代码结构重构,就可以用git commit -m "refactor: 调整目录结构"这种声明;如果新增了功能,则把refactor改成feat即可;修改了 bug 用fix,修改了文档用doc;做了 eslint 用lint) - 将本地库中的最新信息发送给远程库:
git push origin master - 用于显示提交日志信息:
git log - 查看修改了什么:
git diff
ssh 简单设置:
ssh-keygen -m PEM -t ed25519 -C "your.email@example.com":创建新的 SSH 私钥与公钥秘钥对,输入邮箱作为标签(id_rsa.pub 是公钥,id_rsa 是私钥,当执行 git clone xxx 时,公钥传给服务器进行权限校验,来与本地私钥进行匹配)。此外,在执行该命令时,可以设置多个公钥- 若步骤 1 设置了多个公钥,就需要 code ~/.ssh/config 去修改配置(挺简单的)
- 验证是否成功连接 ssh:
ssh -T git@e.coding.net
简单介绍 app.js:
src/app.js:
const Koa = require('koa')
const app = new Koa()
const views = require('koa-views')
const json = require('koa-json')
const onerror = require('koa-onerror')
const bodyparser = require('koa-bodyparser')
const logger = require('koa-logger')

const index = require('./routes/index')
const users = require('./routes/users')

// error handler
onerror(app)

// middlewares
// bodyparser 和 json() 是解析 post 数据的
app.use(bodyparser({
  enableTypes:['json', 'form', 'text']
}))
app.use(json())
app.use(logger())
// 只要访问 localhost:3000/stylesheets/style.css 就能访问该文件内容了
app.use(require('koa-static')(__dirname + '/public'))

app.use(views(__dirname + '/views', {
  extension: 'ejs'
}))

// // logger,手写的一个写日志的功能(中间件的演示)
// app.use(async (ctx, next) => {
//   const start = new Date()
//   await next()
//   const ms = new Date() - start
//   console.log(`${ctx.method} ${ctx.url} - ${ms}ms`)
// })

// routes
app.use(index.routes(), index.allowedMethods())
app.use(users.routes(), users.allowedMethods())

// error-handling
app.on('error', (err, ctx) => {
  console.error('server error', err, ctx)
});

module.exports = app
2
3
4
5
6
7
8
9
10
11
12
13
14
15
16
17
18
19
20
21
22
23
24
25
26
27
28
29
30
31
32
33
34
35
36
37
38
39
40
41
42
43
44
45
46
1.2 演示路由
动态参数:
- 访问 localhost:3000/profile/zhangsan 会触发:
router.get('/profile/:userName', async (ctx, next) => {
  const { userName } = ctx.params
  ctx.body = {
    title: 'this is a profile page',
    userName
  }
})
2
3
4
5
6
7
- 访问 localhost:3000/loadMore/lisi/2:
router.get('/loadMore/:userName/:pageIndex', async (ctx, next) => {
  const { userName, pageIndex } = ctx.params
  ctx.body = {
    title: 'this is a loadMore API',
    userName,
    pageIndex
  }
})
2
3
4
5
6
7
8
1.3 ejs - 变量和判断
知识点:
- 变量
- 判断和循环
- 引用组件
变量 && if 判断:
src/routes/index.js:
router.get('/', async (ctx, next) => {
  await ctx.render('index', {
    title: 'Hello Koa 2!',
    msg: 'nihao',
    isMe: false
  })
})
2
3
4
5
6
7
src/views/index.ejs:
<!DOCTYPE html>
<html>
  <head>
    <title><%= title %></title>
    <link rel='stylesheet' href='/stylesheets/style.css' />
  </head>
  <body>
    <h1><%= title %></h1>
    <p>EJS Welcome to <%= title %></p>
    <p><%= msg %></p>
    <!-- 由于没有传 name 变量,下面加上 locals. 就不会报错了 -->
    <p><%= locals.name%></p>

    <!-- if 判断 -->
    <div>
      <% if (isMe) { %>
      	<a href="#">@ 提到我的(3)</a>
      <% } else { %>
      	<button>关注</button>
      <% } %>
    </div>
  </body>
</html>
2
3
4
5
6
7
8
9
10
11
12
13
14
15
16
17
18
19
20
21
22
23
组件化:
src/views/index.ejs:
<%- include('widgets/user-info', {
  isMe
})%>
2
3
src/views/widget/user-info.ejs:
<div>
  <% if (isMe) { %>
    <a href="#">@ 提到我的(3)</a>
  <% } else { %>
    <button>关注</button>
  <% } %>
</div>
2
3
4
5
6
7
循环:
src/routes/index.js:
router.get('/', async (ctx, next) => {
  await ctx.render('index', {
    title: 'Hello Koa 2!',
    isMe: true,
    blogList: [
      {
        id: 1,
        title: 'aaa'
      },
      {
        id: 2,
        title: 'bbb'
      },
      {
        id: 3,
        title: 'ccc'
      },
      {
        id: 4,
        title: 'ddd'
      }
    ]
  })
})
2
3
4
5
6
7
8
9
10
11
12
13
14
15
16
17
18
19
20
21
22
23
24
src/views/index.ejs:
<%- include('widgets/blog-list', {
  blogList
}) %>
2
3
src/views/widgets/blog-list.ejs:
<ul>
  <% blogList.forEach(blog => { %>
    <li data-id="<%= blog.id %>"><%= blog.title %></li>
  <% }) %>
</ul>

<script>
  console.log(100)
</script>
2
3
4
5
6
7
8
9
2.mysql
2.0 一些基本知识补充
只修改列的数据类型方法:alter table blogs modify column username varchar(20)
同时修改列名和列的数据类型的方法:alter table blogs change column username name varchar(30)
2.1 mysql - 前置准备
- 建立一个
users表,分别有id、username、password、nickname - 建立一个
blogs表,分别有id、title、content、userId
2.2 mysql - 外键
外键使数据库更加严谨,不会出错,不会出现垃圾数据
求总数和分页:
select count(id) as 'count' from blogs;:查找 总数select * from blogs order by id desc limit 2 offset 2;:每次查询只能返回两行数据,第二次查询将会跳过前两行数据,达到 分页 效果
创建外键:(设置了更新规则和删除规则都为 cascade 之后,假定删除了 users 表中的 id=1 的行,则 blogs 表中所有行中含 id=1 的数据都将会被删除)
alter table blogs
    add constraint userid
        foreign key (userid) references users (id)
            on update cascade on delete cascade;
2
3
4
2.3 mysql - 连表查询
简单的连表查询:(不一定非要有外键,即下面的 blogs.userid=users.id 与外键无关)
select blogs.*,users.username,users.nickname,users.password from blogs
    inner join users on blogs.userid=users.id
        where  users.username='lisi'
2
3
2.4 sequelize 介绍
ORM - Object Relational Mapping 对象关系映射
简单介绍:
- 数据表,用 JS 中的模型(class 或对象)代替
- 一条或多条记录,用 JS 中的一个对象或数组代替
- sql 语句,用对象方法代替
代码写法:
src/seq.js:
const { Sequelize } = require('sequelize')

const conf = {
  host: 'localhost',
  dialect: 'mysql'
}

const seq = new Sequelize('koa2_weibo_db', 'root', '123456', conf)

module.exports = seq
2
3
4
5
6
7
8
9
10
src/model.js:
const { DataTypes } = require('sequelize')
const seq = require('./seq')

// 创建 User 模型,user 是表的名字,会自动转为 users
const User = seq.define('user', {
  // id 会自动创建,并设为主键、自增
  userName: {
    type: DataTypes.STRING, // varchar(255)
    allowNull: false
  },
  password: {
    type: DataTypes.STRING,
    allowNull: false
  },
  nickName: {
    type: DataTypes.STRING,
    comment: '昵称'
  }
  // 自动创建:createdAt 和 updateAt
})

// 创建 Blog 模型

// 外键关联

module.exports = {
  User
}
2
3
4
5
6
7
8
9
10
11
12
13
14
15
16
17
18
19
20
21
22
23
24
25
26
27
28
src/sync.js:
const seq = require('./seq')

require('./model')

// 测试连接
seq.authenticate().then(() => {
  console.log('ok')
}).catch(() => {
  console.log('err')
})

// 执行同步
seq.sync({ force: true }).then(() => {
  console.log('用户模型表刚刚创建!')
  process.exit()
})
2
3
4
5
6
7
8
9
10
11
12
13
14
15
16
2.5 创建关联
不推荐的写法:
src/model.js:
Blog.belongTo(User) // 这样写就不要写 Blog 中的 userId 了,会隐式创建 Blog 中的 userId 并关联与 User.id
写法一:
// 外键关联
Blog.belongsTo(User, {
  // 创建外键 Blog.userId -> User.id
  foreignKey: 'userId'
})
2
3
4
5
写法二:
User.hasMany(Blog, {
  foreignKey: 'userId'
})
2
3
写法三(推荐):
// 下面两个一起写有利于表查询
Blog.belongsTo(User, {
  // 创建外键 Blog.userId -> User.id
  foreignKey: 'userId'
})
User.hasMany(Blog, {
  foreignKey: 'userId'
})
2
3
4
5
6
7
8
2.6 查询数据
node src/select.js就可以进行查询
src/select.js:
const { Blog, User } = require('./model')

!(async () => {
  // // 查询一条记录
  // const zhangsan = await User.findOne({
  //   where: {
  //     userName: 'zhangsan'
  //   }
  // })
  // console.log('zhangsan', zhangsan.toJSON())

  // // 查询特定的列
  // const zhangsanName = await User.findOne({
  //   attributes: ['userName', 'nickName'],
  //   where: {
  //     userName: 'zhangsan'
  //   }
  // })
  // console.log('zhangsanName', zhangsanName.toJSON())

  // // 查询一个列表
  // const zhangsanBlogList = await Blog.findAll({
  //   where: {
  //     userId: 1
  //   },
  //   order: [
  //     ['id', 'desc']
  //   ]
  // })
  // console.log('zhangsanBlogList', zhangsanBlogList.map(blog => blog.toJSON()))

  // // 分页
  // const blogPageList = await Blog.findAll({
  //   limit: 2, // 限制本次查询两条
  //   offset: 0, // 跳过多少条
  //   order: [
  //     ['id', 'desc']
  //   ]
  // })
  // console.log(
  //   'blogPageList',
  //   blogPageList.map(blog => blog.toJSON())
  // )

  // 查询总数
  const blogListAndCount = await Blog.findAndCountAll({
    limit: 2,
    offset: 0,
    order: [
      ['id', 'desc']
    ]
  })
  console.log(
    'blogListAndCount',
    blogListAndCount.count, // 所有的总数
    blogListAndCount.rows.map(blog => blog.toJSON())
  )
})()
2
3
4
5
6
7
8
9
10
11
12
13
14
15
16
17
18
19
20
21
22
23
24
25
26
27
28
29
30
31
32
33
34
35
36
37
38
39
40
41
42
43
44
45
46
47
48
49
50
51
52
53
54
55
56
57
58
2.7 连表查询
必须要在 src/model.js 定义了
Blog.belongTo()之后才能在 src/select.js 发起Blog.findAndCountAll()的连表查询
src/select.js:
// 连表查询1
const blogListWithUser = await Blog.findAndCountAll({
  order: [
    ['id', 'desc']
  ],
  include: [
    {
      model: User,
      attributes: ['userName', 'nickName'],
      where: {
        userName: 'zhangsan'
      }
    }
  ]
})
console.log(
  'blogListWithUser',
  blogListWithUser.count,
  blogListWithUser.rows.map(blog => blog.toJSON())
)
// 结果:
// blogListWithUser 2 [
//   {
//     id: 2,
//     title: '标题2',
//     content: '内容2',
//     userId: 1,
//     createdAt: 2022-07-18T02:56:52.000Z,
//     updatedAt: 2022-07-18T02:56:52.000Z,
//     user: { userName: 'zhangsan', nickName: '张三' }
//   },
//   {
//     id: 1,
//     title: '标题1',
//     content: '内容1',
//     userId: 1,
//     createdAt: 2022-07-18T02:56:52.000Z,
//     updatedAt: 2022-07-18T02:56:52.000Z,
//     user: { userName: 'zhangsan', nickName: '张三' }
//   }
// ]

  // 连表查询2
  const userListWithUser = await User.findAndCountAll({
    attributes: ['userName', 'nickName'],
    include: [
      {
        model: Blog
      }
    ]
  })
  console.log(
    'userListWithUser',
    userListWithUser.count,
    userListWithUser.rows.map(user => JSON.stringify(user, null, 2))
  )
2
3
4
5
6
7
8
9
10
11
12
13
14
15
16
17
18
19
20
21
22
23
24
25
26
27
28
29
30
31
32
33
34
35
36
37
38
39
40
41
42
43
44
45
46
47
48
49
50
51
52
53
54
55
56
2.8 删除和修改
修改:
src/update.js:
const { User } = require('./model')

!(async () => {
  const updateRes = await User.update({
    nickName: '张三',
  }, {
    where: {
      userName: 'zhangsan'
    }
  })
  console.log('updateRes...', updateRes[0])
})()
2
3
4
5
6
7
8
9
10
11
12
删除:
src/delete.js:
const { User, Blog } = require('./model')

!(async () => {
  // // 删除一条博客
  // const delBlogRes = await Blog.destroy({
  //   where: {
  //     id: 4
  //   }
  // })
  // console.log(delBlogRes)

  // 删除一个用户
  const delUserRes = await User.destroy({
    where: {
      id: 1
    }
  })
  console.log(delUserRes)
})()
2
3
4
5
6
7
8
9
10
11
12
13
14
15
16
17
18
19
2.9 连接池
src/seq.js:
const { Sequelize } = require('sequelize')

const conf = {
  host: 'localhost',
  dialect: 'mysql'
}

// 线上环境,使用连接池
conf.pool = {
  max: 5, // 连接池最大的连接数量
  min: 0,
  idle: 10000, // 如果一个连接池 10s 之内没有被使用则释放
}

const seq = new Sequelize('koa2_weibo_db', 'root', '123456', conf)

module.exports = seq
2
3
4
5
6
7
8
9
10
11
12
13
14
15
16
17
3.redis、session、jest、eslint、jwt
3.1 redis 基本配置
src/conf/db.js:
/**
 * @description 存储配置
 * @author yuanke
 */

const { isProd } = require('../utils/env')

let REDIS_CONF = {
  port: 6379,
  host: '127.0.0.1'
}

if (isProd) {
  REDIS_CONF = {
    // 线上的 redis 配置
    port: 6379,
    host: '127.0.0.1'
  }
}

module.exports = {
  REDIS_CONF
}
2
3
4
5
6
7
8
9
10
11
12
13
14
15
16
17
18
19
20
21
22
23
src/cache/_redis.js:
/**
 * @description 连接 redis 的方法 get set
 * @author yuanke
 */

const { createClient } = require('redis')
const { REDIS_CONF } = require('../conf/db')

// 创建客户端
const redisClient = createClient({
  url: `redis://${REDIS_CONF.host}:${REDIS_CONF.port}`
})
redisClient.on('error', (err) => console.log('Redis Client Error', err))

!(async () => {
  await redisClient.connect()
})()

/**
 * redis set
 * @param {string} key 键
 * @param {string} val 值
 * @param {number} timeout 过期时间,单位 s
 */
const set = async (key, val, timeout = 60 * 60) => {
  if (typeof val === 'object') {
    val = JSON.stringify(val)
  }
  await redisClient.set(key, val)
  await redisClient.expire(key, timeout)
}

/**
 * redis get
 * @param {string} key 键
 */
const get = async (key) => {
  let res = await redisClient.get(key)
  if (res) {
    try {
      res = JSON.parse(res)
      return res
    } catch (ex) {
      return res
    }
  }
  return null
}

module.exports = {
  set,
  get
}
2
3
4
5
6
7
8
9
10
11
12
13
14
15
16
17
18
19
20
21
22
23
24
25
26
27
28
29
30
31
32
33
34
35
36
37
38
39
40
41
42
43
44
45
46
47
48
49
50
51
52
53
完成后提交代码:
git diff:查看不同git add.git commit -m "feat: redis 操作"git push origin master
3.2 session、redis 的一些问题
为什么不能直接用 session 存储,而是要配合 redis?
- 操作系统会限制一个进程的最大可用内存
- nodejs 启动多进程时,进程之间是数据隔离的,各个进程的 session 也就是相互独立的。当用户登录时,如果命中一个与之前不同的进程,就找不到之前的 session,就要重新登录了。显然,这是非常不妥的
为什么 session 更适合用 redis?
- session 访问频繁,对性能要求极高
- session 可不考虑断电丢失的问题(内存的硬伤)
- session 数据量不会太大(相比于 mysql 中存储的数据)
为什么网站数据不适合用 redis?
- 操作频率不是太高(相比于 session 操作)
- 断电不能丢失,必须保留
- 数据量太大,内存成本太高
3.3 koa2 配置 session
- 安装:
npm i koa-redis koa-generic-session -D - src/app.js:
const session = require('koa-generic-session')
const redisStore = require('koa-redis')

// session 配置
app.keys = ['UIssdf_712%###39;]
app.use(session({
  key: 'weibo.sid', // cookie name 默认是 `koa.sid`
  prefix: 'weibo:sess:', // redis key 的前缀,默认是 `koa:sess`
  cookie: {
    path: '/',
    httpOnly: true,
    maxAge: 24 * 60 * 60 * 1000, // ms
  },
  // ttl: 24 * 60 * 60 * 1000, // redis 的过期时间是自动配好的
  store: redisStore({
    all: `${REDIS_CONF.host}:${REDIS_CONF.port}`
  })
}))
2
3
4
5
6
7
8
9
10
11
12
13
14
15
16
17
18
src/routes/index.js:
只有访问了 localhost/json 路由,才会记录 cookie 并同步到 session、redis
router.get('/json', async (ctx, next) => {
  const session = ctx.session
  if (session.viewNum == null) {
    session.viewNum = 0
  }
  session.viewNum += 1

  ctx.body = {
    title: 'koa2 json',
    viewNum: session.viewNum
  }
})
2
3
4
5
6
7
8
9
10
11
12
3.4 单元测试 jest
必须是 *.test.js 作为结尾
单元测试:
- 单个功能或接口,给定输入,得到输出。看输出是否符合要求
- 需要手动编写用例代码,然后统一执行
- 意义:能一次性执行所有单测,短时间内验证所有功能是否正常
安装:
npm i -D jest,运行:npm run test
package.json:
"test": "cross-env NODE_ENV=test jest --runInBand --forceExit --colors"
test/demo.test.js:
/**
 * @description test demo
 * @author yuanke
 */

const sum = (a, b) => {
  return a + b
}

test('10 + 20 应该等于 30', () => {
  const res = sum(10, 20)
  expect(res).toBe(30)
})

test('10 + 20 不应该等于 40', () => {
  const res = sum(10, 20)
  expect(res).not.toBe(40)
})
2
3
4
5
6
7
8
9
10
11
12
13
14
15
16
17
18
3.5 测试 http 请求
安装:
npm i -D supertest
test/json.test.js:
/**
 * @description json test
 * @author yuanke
 */

const server = require('./server')

test('json 接口返回数据格式正确', async () => {
  const res = await server.get('/json')
  expect(res.body).toEqual({
    title: 'koa2 json'
  })
  expect(res.body.title).toBe('koa2 json')
})

// test('post 请求返回数据格式正确', async () => {
//   const res = await server.post('/login').send({
//     userName: 'zhangsan',
//     password: '123'
//   })
//   expect(res.body.code).toBe(20)
// })
2
3
4
5
6
7
8
9
10
11
12
13
14
15
16
17
18
19
20
21
22
3.6 eslint
- 安装:
npm i -S mysql2 sequelize - 安装:
npm i -D eslint - 使用:
eslint --init
.eslintignore:
node_modules
test
src/public
2
3
.eslintrc.json:
{
    "env": {
        "node": true,
        "commonjs": true,
        "es2021": true
    },
    "extends": "eslint:recommended",
    "parserOptions": {
        "requireConfigFile": true
    },
    "rules": {
        "indent": ["error", 2],
        "quotes": [
            "error",
            "single",
            {
                "allowTemplateLiterals": true
            }
        ],
        "semi": [
            "error",
            "never"
        ]
    }
}
2
3
4
5
6
7
8
9
10
11
12
13
14
15
16
17
18
19
20
21
22
23
24
25
使用 eslint 到项目中:
- 安装:
npm i -D pre-commit - 配置 package.json,使之在每次
commit之前都要运行一遍npm run lint
package.json:
"scripts": {
  "lint": "eslint --ext .js ./src"
}
"pre-commit": [
  "lint"
]
2
3
4
5
6
3.7 inspect 调试
- 修改 package.json:
"dev": "cross-env NODE_ENV=dev nodemon --inspect=9229 bin/www"
npm run dev后,访问 edge://inspect/#devices,点击 inspect- 在代码某处另起一行写上
debugger(例如在进入 /json 路由后),然后访问 localhost:3000/json 就会自动进入路由里面了
3.8 404和错误页
404:
src/routes/views/404.ejs:
<%- include('layout/header', { title: '微博 - 404', isNav: true })%>

<div class="container margin-top-20">
  <div class="row">
      <!-- 左侧 -->
      <div class="col-8">
          <h4 class="margin-bottom-20 padding-bottom-10 border-bottom">404</h4>
          <p>该网页未找到,请<a href="/">返回首页</a></p>
      </div>
  </div>
</div>

<%- include('layout/footer')%>
2
3
4
5
6
7
8
9
10
11
12
13
src/routes/views/error.ejs:
/**
 * @description error 404 路由
 * @author yuanke
 */

const router = require('koa-router')()

// error
router.get('/error', async (ctx, next) => {
  await ctx.render('error')
})

// 404
router.get('*', async (ctx, next) => {
  await ctx.render('404')
})

module.exports = router
2
3
4
5
6
7
8
9
10
11
12
13
14
15
16
17
18
src/app.js:
// 引入路由
const index = require('./routes/index')
const users = require('./routes/users')
const errorViewRouter = require('./routes/view/error')

// 注册路由
app.use(index.routes(), index.allowedMethods())
app.use(users.routes(), users.allowedMethods())
// 404 路由注册到最下面
app.use(errorViewRouter.routes(), errorViewRouter.allowedMethods())
2
3
4
5
6
7
8
9
10
错误页:
src/routes/index.js:
router.get('/json', async (ctx) => {
  throw Error()
  ctx.body = {
    title: 'koa2 json',
  }
})
2
3
4
5
6
src/app.js:
// error handler
let oneerrorConf = {}
if (isProd) {
  oneerrorConf = {
    redirect: '/error'
  }
}
onerror(app, oneerrorConf)
2
3
4
5
6
7
8
3.9 jwt
简介:
jwt:json web token,用户认证成功之后,server 端返回一个加密的 token 给客户端,客户端后续每次请求都会携带 token,以示当前的用户身份
步骤:
- 安装:
npm i -S koa-jwt jsonwebtoken - 实现 server 端返回一个加密的 token 给客户端:
conf/constants.js:
module.exports = {
  SECRET: 'YuanKe4zaishi!!taIshuaiLe@'
}
2
3
app.js:
const { SECRET } = require('./conf/constants')

// error handler
onerror(app)

// 验证 jwt 的 koa 中间价
app.use(jwtKoa({
  secret: SECRET
}).unless({
  path: [/^\/users\/login/] // 自定义哪些路由忽略 jwt 验证(登录页可能就是没有 token)
}))
2
3
4
5
6
7
8
9
10
11
routes/users.js:
const router = require('koa-router')()
const jwt = require('jsonwebtoken')
const { SECRET } = require('../conf/constants')

router.prefix('/users')

// 模拟登录
router.post('/login', async (ctx, next) => {
  const { userName, password } = ctx.request.body
  let userInfo
  if (userName === 'zhangsan' && password === 'abc') {
    // 登录成功,获取用户信息
    userInfo = {
      userId: 1,
      userName: 'zhangsan',
      nickName: 'zhangsan',
      gender: 1 // 男
    }
  }

  // 加密 userInfo
  let token
  if (userInfo) {
    token = jwt.sign(userInfo, SECRET, {
      expiresIn: '1h'
    })
  }

  if (userInfo == null) {
    ctx.body = {
      errno: -1,
      msg: '登录失败'
    }
    return
  }
  ctx.body = {
    errno: 0,
    data: token
  }
})

module.exports = router
2
3
4
5
6
7
8
9
10
11
12
13
14
15
16
17
18
19
20
21
22
23
24
25
26
27
28
29
30
31
32
33
34
35
36
37
38
39
40
41
42
- 访问 localhost:3000/users/getUserInfo 路由,在 postman 中的 header 处填入
Key: Authorization --- Value: Bearer xxx(xxx 为访问 localhost:3000/users/login)登录后产生的加密的 token:
routes/user.js:
// 获取用户信息
router.get('/getUserInfo', async (ctx, next) => {
  const token = ctx.header.authorization
  // 解析
  try {
    const payload = await verify(token.split(' ')[1], SECRET)
    ctx.body = {
      errno: 0,
      userInfo: payload
    }
  } catch (ex) {
    ctx.body = {
      errno: -1,
      msg: 'verify token failed'
    }
  }
})
2
3
4
5
6
7
8
9
10
11
12
13
14
15
16
17
4.技术方案设计
4.1 页面与 API
凡 API 都有 /api 的前缀
总领:
- 原型图演示
- 页面汇总(模板、路由、组件)
- API 汇总
原型图演示:
- 原型图 - 注册:http://www.weibo.com/register
- 注册:/api/user/register
- 用户名是否存在:/api/user/isExist
- 原型图 - 登录:http://www.weibo.com/login
- 登录:/api/user/login
- 原型图 - 设置:http://www.weibo.com/setting
- 修改用户信息 表单:
- 修改个人信息:/api/user/changeInfo
- 图片上传:/api/utils/upload
- 修改密码 表单:
- 修改密码:/api/user/changePassword
- 退出登录:
- 退出登录:/api/user/logout
- 修改用户信息 表单:
- 原型图 - 首页:http://www.weibo.com
- 导航
- 发布微博的输入框:
- 创建微博:api/blog/create
- 图片上传:api/utils/upload
- 个人信息(当前登录用户)
- 粉丝列表
- 微博列表
- 加载更多:
- 加载更多:/api/blog/loadMore/:pageIndex
- 关注人列表
- 原型图 - 个人主页:http://www.weibo.com/profile/zhangsan
- 导航
- 微博列表
- 粉丝列表
- 关主任列表
- 个人信息(自己或他人):
- 关注:/api/profile/follow
- 取消关注:/api/profile/unFollow
- 加载更多:
- 加载更多:/api/profile/loadMore/:userName/:pageIndex
- 原型图 - 广场:http://www.weibo.com/square
- 导航
- 微博列表
- 加载更多:
- 加载更多:/api/square/loadMore/:pageIndex
- 原型图 - @ 我的:http://www.weibo.com/atMe
- 导航
- 发布微博的输入框:
- 创建微博:/api/blog/create
- 图片上传:/api/utils/upload
- 微博列表
- 加载更多
- 加载更多:/api/atMe/loadMore/:pageIndex
- 原型图 - 错误页:http://www.weibo.com/error
- 导航
- error 信息
4.2 数据模型设计
- 回顾 ER 图
- 关系型数据库 三大范式
- 数据模型设计
关系型数据库三大范式:
- 属性的原子性:每一列都不可再拆解
- 记录的唯一性:有唯一标识(主键),其他属性都依赖于主键
- 字段的冗余性:不存在数据冗余和传递依赖
三大范式好处:
- 数据规范严谨,不易出错
- 占用空间更小
- 访问速度更快
5.API 接口开发
5.1 创建页面
分支的相关知识:
查看已有分支:
git branch -a创建分支:
git branch 分支名字切换分支:
git checkout 分支名字创建并切换分支:
git checkout -b 分支名称合并分支:第一步,切换到 master 分支:
git checkout master;第二步,将分支合并到 master:git merge 分支(或者使用git pull 远程主机名 远程分支名:本地分支名,如果如果远程分支要与当前分支合并,则可以忽略冒号后面部分)删除:
git branch -d 分支名称恢复分支:第一步,
git log查出分支的提交号;第二步:git branch 分支名字 提交号查看分支图:
git log --graph --pretty=oneline --abbrev-commit重命名分支:
git branch -m
- 拉取分支:
git checkout -b feature-login - 在 src/routes/view/user.js:,并且在 src/app.js 注册声明路由
/**
 * @description user view 路由
 * @author yuanke
 */

const router = require('koa-router')()

router.get('/login', async (ctx, next) => {
  await ctx.render('login', {})
})

router.get('/register', async (ctx, next) => {
  await ctx.render('register', {})
})

module.exports = router
2
3
4
5
6
7
8
9
10
11
12
13
14
15
16
src/views/login.ejs:
<%- include('layout/header', { title: '微博 - 登录', isNarrow: true })%>
<h1>登录</h1>
<% if (locals.isLogin) { %>
<p><%= locals.userName%> 您已成功登录,请直接访问<a href="/">首页</a></p>
<% } else { %>
<form>
<div class="form-group">
<input type="text" class="form-control" id="input-username" placeholder="请输入用户名">
</div>
<div class="form-group">
<input type="password" class="form-control" id="input-password" placeholder="请输入密码">
</div>
<button type="submit" class="btn btn-primary" id="btn-submit">登录</button>
<a href="/register">注册账号>></a>
</form>
<script>
$(function() {
var $inputUserName = $('#input-username')
var $inputPassword = $('#input-password')
$('#btn-submit').click(function(e) {
// 阻止默认的提交表单行为
e.preventDefault()
const userName = $inputUserName.val()
const password = $inputPassword.val()
// 提交数据
ajax.post('/api/user/login', {
userName,
password
}, function(err, data) {
if (err) {
alert(err)
return
}
// 跳转到指定 url 或首页
var redirectUrl = $.query.get('url') || '/'
location.href = redirectUrl
})
})
})
</script>
<% } %>
<%- include('layout/footer')%>
2
3
4
5
6
7
8
9
10
11
12
13
14
15
16
17
18
19
20
21
22
23
24
25
26
27
28
29
30
31
32
33
34
35
36
37
38
39
40
41
42
43
44
45
46
47
src/views/register.ejs:
<%- include('layout/header', { title: '微博 - 注册', isNarrow: true })%>
<h1>注册</h1>
<% if (locals.isLogin) { %>
<p><%= locals.userName%> 您已成功登录,请直接访问<a href="/">首页</a></p>
<% } else { %>
<form>
<div class="form-group">
<input type="text" class="form-control" id="input-username" placeholder="请输入用户名">
<small id="span-username-info" class="form-text text-muted"></small>
</div>
<div class="form-group">
<input type="password" class="form-control" id="input-password" placeholder="请输入密码">
</div>
<div class="form-group">
<input type="password" class="form-control" id="input-password-repeat" placeholder="重新输入密码">
<small id="span-password-repeat-info" class="form-text text-muted"></small>
</div>
<div class="form-group">
<select class="form-control" id="select-gender">
<option value="1">男</option>
<option value="2">女</option>
<option value="3">保密</option>
</select>
</div>
<button type="submit" class="btn btn-primary" id="btn-submit">注册</button>
<a href="/login">已有账号,返回登录>></a>
</form>
<script>
$(function() {
var $inputUserName = $('#input-username')
var $spanUserNameInfo = $('#span-username-info')
var $inputPassword = $('#input-password')
var $inputPasswordRepeat = $('#input-password-repeat')
var $spanPasswordRepeatInfo = $('#span-password-repeat-info')
var $selectGender = $('#select-gender')
var userNameTimeoutId
var passwordTimeoutId
var isPasswordSame = false // 默认两次密码不一致
var isUserNameExist = true // 默认用户名已存在
// 监听用户名输入
$inputUserName.on('input', function() {
// 做一个简单的防抖
if (userNameTimeoutId) {
clearTimeout(userNameTimeoutId)
}
userNameTimeoutId = setTimeout(function() {
// 判断用户名是否已存在
var userName = $inputUserName.val()
ajax.post('/api/user/isExist', {
userName
}, function(err, data) {
$spanUserNameInfo.show()
if (err) {
$spanUserNameInfo.text('用户名可用')
isUserNameExist = false
} else {
$spanUserNameInfo.text('用户名已存在!')
isUserNameExist = true
}
})
}, 500)
})
// 监听验证密码输入
$inputPasswordRepeat.on('input', function () {
// 做一个简单的防抖
if (passwordTimeoutId) {
clearTimeout(passwordTimeoutId)
}
passwordTimeoutId = setTimeout(function() {
var password = $inputPassword.val()
var passwordRepeat = $inputPasswordRepeat.val()
$spanPasswordRepeatInfo.show()
if (password === passwordRepeat) {
$spanPasswordRepeatInfo.text('两次密码一致')
isPasswordSame = true
} else {
$spanPasswordRepeatInfo.text('两次密码不一致!')
isPasswordSame = false
}
}, 500)
})
// 注册事件
$('#btn-submit').click(function(e) {
// 阻止默认的提交表单行为
e.preventDefault()
// 验证
if (isUserNameExist) {
alert('用户名已存在')
return
}
if (!isPasswordSame) {
alert('两次密码不一致')
return
}
var userName = $inputUserName.val()
var password = $inputPassword.val()
var gender = parseInt($selectGender.val())
// 提交数据
ajax.post('/api/user/register', {
userName,
password,
gender
}, function(err, data) {
if (err) {
alert(err)
return
}
alert('注册成功,请登录')
location.href = '/login'
})
})
})
</script>
<% } %>
<%- include('layout/footer')%>
2
3
4
5
6
7
8
9
10
11
12
13
14
15
16
17
18
19
20
21
22
23
24
25
26
27
28
29
30
31
32
33
34
35
36
37
38
39
40
41
42
43
44
45
46
47
48
49
50
51
52
53
54
55
56
57
58
59
60
61
62
63
64
65
66
67
68
69
70
71
72
73
74
75
76
77
78
79
80
81
82
83
84
85
86
87
88
89
90
91
92
93
94
95
96
97
98
99
100
101
102
103
104
105
106
107
108
109
110
111
112
113
114
115
116
117
118
119
120
121
122
123
124
125
5.2 数据建模
终端输入:
node src/db/sync.js就可以完成建模
src/db/types.js:
/**
 * @description 封装 sequelize 数据类型
 * @author yuanke
 */

const { DataTypes } = require('sequelize/types')

module.exports = {
  STRING: DataTypes.STRING,
  DECIMAL: DataTypes.DECIMAL,
  TEXT: DataTypes.TEXT,
  INTEGER: DataTypes.INTEGER,
  BOOLEAN: DataTypes.BOOLEAN
}
2
3
4
5
6
7
8
9
10
11
12
13
14
src/db/model/User.js:
/**
 * @description 用户数据模型
 * @author yuanke
 */

const seq = require('../seq')
const { STRING, DECIMAL } = require('../types')

// users
const User = seq.define('user', {
  userName: {
    type: STRING,
    allowNull: false,
    unique: true,
    comment: '用户名,唯一'
  },
  password: {
    type: STRING,
    allowNull: false,
    comment: '密码'
  },
  nickName: {
    type: STRING,
    allowNull: true,
    comment: '昵称'
  },
  gender: {
    type: DECIMAL,
    allowNull: false,
    defaultValue: 3,
    comment: '性别 (1 男性,2 女性,3 保密)'
  },
  picture: {
    type: STRING,
    comment: '头像,图片地址'
  },
  city: {
    type: STRING,
    comment: '城市'
  }
})

module.exports = User
2
3
4
5
6
7
8
9
10
11
12
13
14
15
16
17
18
19
20
21
22
23
24
25
26
27
28
29
30
31
32
33
34
35
36
37
38
39
40
41
42
43
src/db/sync.js:
/**
 * @description sequelize 同步数据库
 * @author yuanke
 */

const seq = require('./seq')
require('./model/index')

// 测试连接
seq.authenticate().then(() => {
  console.log('auth ok')
}).catch(() => {
  console.log('auth err')
})

// 执行同步
seq.sync({ force: true }).then(() => {
  console.log('sync ok')
  process.exit()
})
2
3
4
5
6
7
8
9
10
11
12
13
14
15
16
17
18
19
20
5.3 注册 API - 路由和分层
开发注册功能:
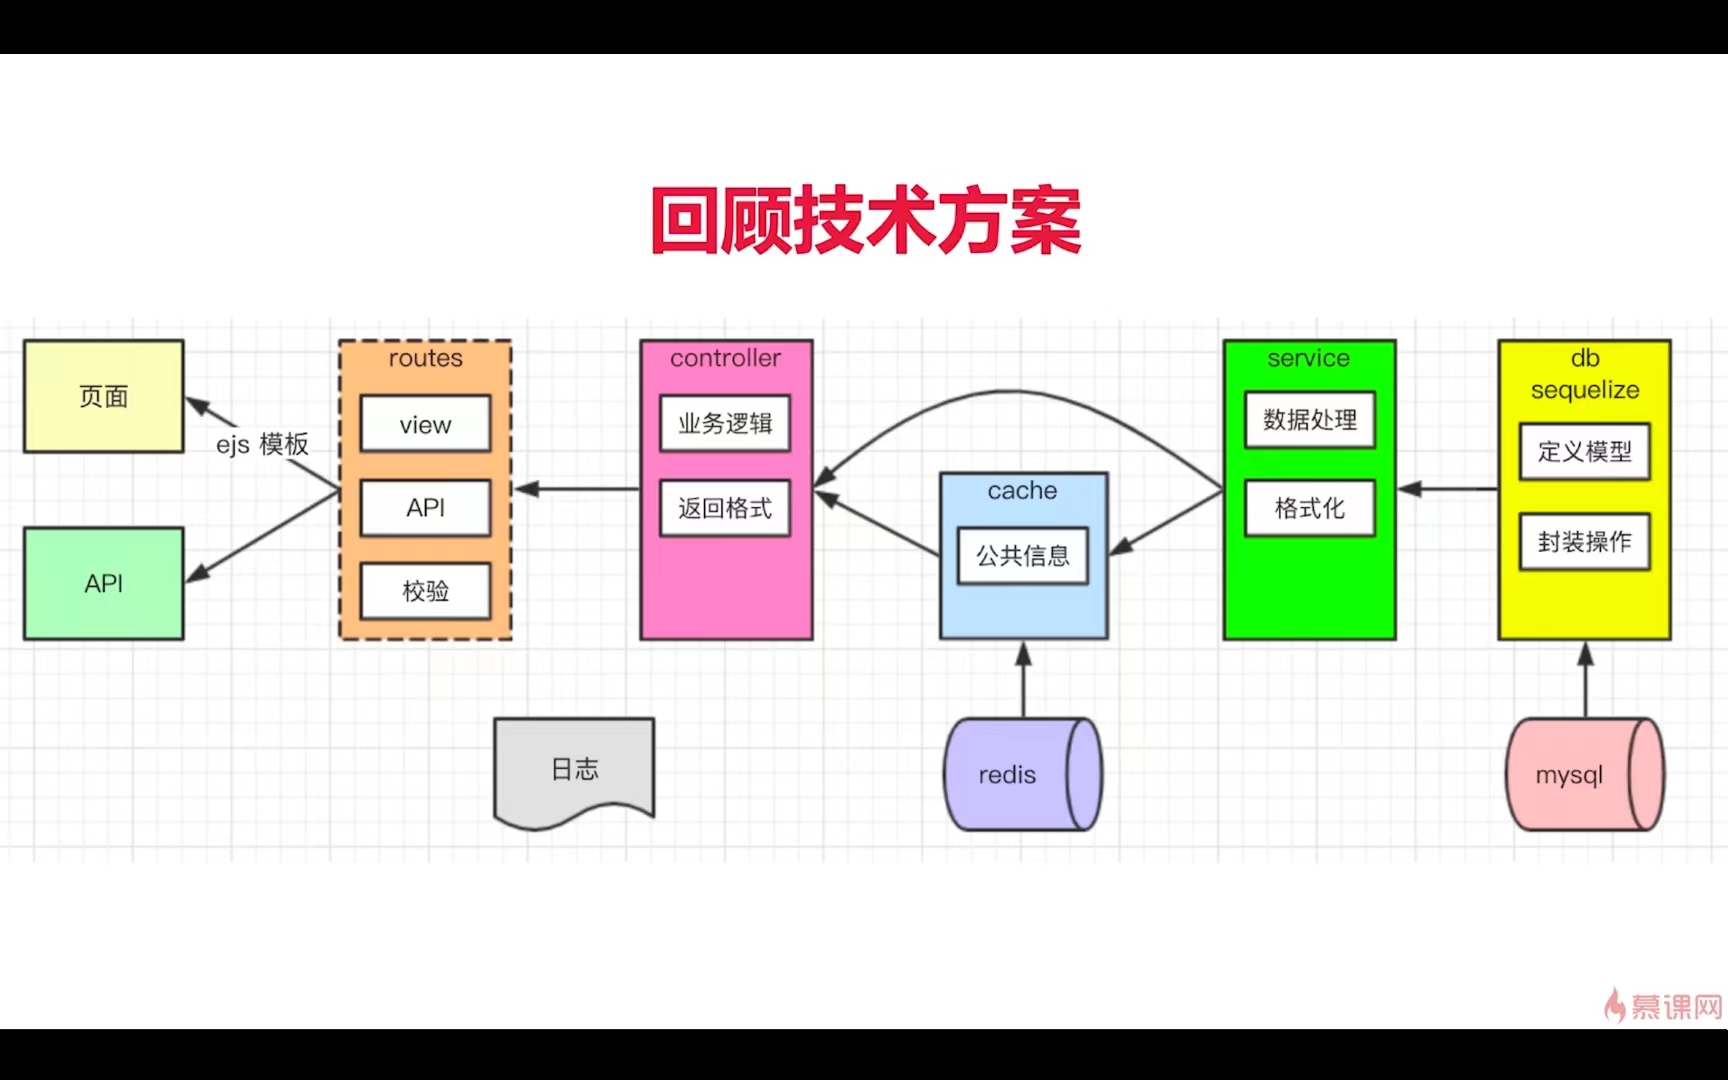
- 回顾技术方案
- 开发注册接口
- 密码加密 & 用户信息验证
src/routes/view/user.js:routes 层中的 view
/**
 * @description user view 路由
 * @author yuanke
 */

const router = require('koa-router')()

router.get('/login', async (ctx, next) => {
  await ctx.render('login', {})
})
router.get('/register', async (ctx, next) => {
  await ctx.render('register', {})
})

module.exports = router
2
3
4
5
6
7
8
9
10
11
12
13
14
15
src/routes/api/user.js:routes 层中的 API
/**
 * @description user 路由
 * @author yuanke
 */

const router = require('koa-router')()

router.prefix('/api/user')

// 注册路由
router.post('/register', async (ctx, next) => {

})

// 用户名是否存在
router.post('/isExist', async (ctx, next) => {
  const { userName } = ctx.request.body
})

module.exports = router
2
3
4
5
6
7
8
9
10
11
12
13
14
15
16
17
18
19
20
src/controller/user.js:controller 层
/**
 * @description user controller
 * @author yuanke
 */

/**
 * 用户名是否存在
 * @param {string} userName 用户名
 */
const isExist = async (userName) => {
  // 业务逻辑处理
  // 调用 services 层获取数据
  // 统一返回格式
}

module.exports = {
  isExist
}
2
3
4
5
6
7
8
9
10
11
12
13
14
15
16
17
18
src/service/user.js:service 层
/**
 * @description user service
 * @author yuanke
 */

const { User } = require('../db/model/index')

/**
 * 获取用户信息
 * @param {string} userName 用户名
 * @param {string} password 密码
 */
const getUserInfo = async (userName, password) => {

}
2
3
4
5
6
7
8
9
10
11
12
13
14
15
5.4 注册 API - 格式化用户信息
src/routes/api/user.js:routes 层
/**
 * @description user 路由
 * @author yuanke
 */

const router = require('koa-router')()
const { isExist } = require('../../controller/user')

router.prefix('/api/user')

// 注册路由
router.post('/register', async (ctx, next) => {

})

// 用户名是否存在
router.post('/isExist', async (ctx, next) => {
  const { userName } = ctx.request.body
  ctx.body = await isExist(userName)
})

module.exports = router
2
3
4
5
6
7
8
9
10
11
12
13
14
15
16
17
18
19
20
21
22
src/controller/user.js:controller 层
/**
 * @description user controller
 * @author yuanke
 */

const { getUserInfo } = require('../service/user')
const { SuccessModel, ErrorModel } = require('../model/ResModel')

/**
 * 用户名是否存在
 * @param {string} userName 用户名
 */
const isExist = async (userName) => {
  const userInfo = await getUserInfo(userName)
  if (userInfo) {
    // 已存在
    return new SuccessModel(userInfo)
  } else {
    // 不存在
    return new ErrorModel({
      errno: 10003,
      message: '用户名已存在'
    })
  }
}

module.exports = {
  isExist
}
2
3
4
5
6
7
8
9
10
11
12
13
14
15
16
17
18
19
20
21
22
23
24
25
26
27
28
29
src/service/user.js:service 层
/**
 * @description user service
 * @author yuanke
 */

const { User } = require('../db/model/index')
const { formatUser } = require('./_format')

/**
 * 获取用户信息
 * @param {string} userName 用户名
 * @param {string} password 密码
 */
const getUserInfo = async (userName, password) => {
  // 查询条件
  const whereOpt = {
    userName
  }
  if (password) {
    Object.assign(whereOpt, { password })
  }
  // 查询
  const result = await User.findOne({
    attributes: ['id', 'userName', 'nickName', 'picture', 'city'],
    where: whereOpt
  })
  if (result == null) {
    // 未找到
    return result
  }
  // 格式化
  const formatRes = formatUser(result.toJSON())
  return formatRes
}

module.exports = {
  getUserInfo
}
2
3
4
5
6
7
8
9
10
11
12
13
14
15
16
17
18
19
20
21
22
23
24
25
26
27
28
29
30
31
32
33
34
35
36
37
38
src/model/ResModel.js:
/**
 * @description res 的数据模型
 * @author yuanke
 */

// 基础模块
class BaseModel {
  constructor({ errno, data, message }) {
    this.errno = errno
    if (data) {
      this.data = data
    }
    if (message) {
      this.message = message
    }
  }
}

/**
 * 成功的数据模型
 */
class SuccessModel extends BaseModel {
  constructor(data = {}) {
    super({
      errno: 0,
      data
    })
  }
}

/**
 * 失败的数据模型
 */
class ErrorModel extends BaseModel {
  constructor({ errno, message }) {
    super({
      errno,
      message
    })
  }
}

module.exports = {
  SuccessModel,
  ErrorModel
}
2
3
4
5
6
7
8
9
10
11
12
13
14
15
16
17
18
19
20
21
22
23
24
25
26
27
28
29
30
31
32
33
34
35
36
37
38
39
40
41
42
43
44
45
46
src/service/_format.js:
/**
 * @description 数据格式化
 * @author yuanke
 */

const { DEFAULT_PICTURE } = require('../conf/constant')

/**
 * 用户默认头像
 * @param {Object} obj 用户对象
 * @returns 用户对象
 */
const _formatUserPicture = (obj) => {
  if (obj.picture == null) {
    obj.picture = DEFAULT_PICTURE
  }
  return obj
}

/**
 * 格式化用户信息
 * @param {Array|Object} list 用户列表或者单个用户对象
 */
const formatUser = (list) => {
  if (list == null) {
    return list
  }
  if (list instanceof Array) {
    // 数组 用户列表 findMany
    return list.map(_formatUserPicture)
  }
  // 单个对象 findOne
  return _formatUserPicture(list)
}

module.exports = {
  formatUser
}
2
3
4
5
6
7
8
9
10
11
12
13
14
15
16
17
18
19
20
21
22
23
24
25
26
27
28
29
30
31
32
33
34
35
36
37
38
src/conf/constant.js:
/**
 * @description 常量集合
 * @author yuanke
 */

module.exports = {
  DEFAULT_PICTURE: 'https://cn.vuejs.org/images/logo.svg'
}
2
3
4
5
6
7
8
5.5 注册 API - 完成 register
src/routes/api/user.js:
/**
 * @description user 路由
 * @author yuanke
 */

const router = require('koa-router')()
const { isExist, register } = require('../../controller/user')

router.prefix('/api/user')

// 注册路由
router.post('/register', async (ctx, next) => {
  const { userName, password, gender } = ctx.request.body
  // 调用 controller,返回
  ctx.body = await register({
    userName,
    password,
    gender
  })
})

// 用户名是否存在
router.post('/isExist', async (ctx, next) => {
  const { userName } = ctx.request.body
  ctx.body = await isExist(userName)
})

module.exports = router
2
3
4
5
6
7
8
9
10
11
12
13
14
15
16
17
18
19
20
21
22
23
24
25
26
27
28
src/controller/user.js:
/**
 * @description user controller
 * @author yuanke
 */

const { getUserInfo, createUser } = require('../service/user')
const { SuccessModel, ErrorModel } = require('../model/ResModel')
const {
  registerUserNameNotExistInfo,
  registerUserNameExistInfo,
  registerFailInfo
} = require('../model/ErrorInfo')

/**
 * 用户名是否存在
 * @param {string} userName 用户名
 */
const isExist = async (userName) => {
  const userInfo = await getUserInfo(userName)
  if (userInfo) {
    // 已存在
    return new SuccessModel(userInfo)
  } else {
    // 不存在
    return new ErrorModel(registerUserNameNotExistInfo)
  }
}

/**
 * 注册
 * @param {string} userName 用户名
 * @param {string} password 密码
 * @param {number} userName 性别 1男2女3保密
 */
const register = async ({ userName, password, gender }) => {
  const userInfo = await getUserInfo(userName)
  if (userInfo) {
    // 用户名已存在
    return ErrorModel(registerUserNameExistInfo)
  }
  // 注册 service
  try {
    await createUser({
      userName,
      password,
      gender
    })
    return new SuccessModel()
  } catch (ex) {
    console.error(ex.message, ex.stack)
    return new ErrorModel(registerFailInfo)
  }
}

module.exports = {
  isExist,
  register
}
2
3
4
5
6
7
8
9
10
11
12
13
14
15
16
17
18
19
20
21
22
23
24
25
26
27
28
29
30
31
32
33
34
35
36
37
38
39
40
41
42
43
44
45
46
47
48
49
50
51
52
53
54
55
56
57
58
src/service/user.js:
/**
 * @description user service
 * @author yuanke
 */

const { User } = require('../db/model/index')
const { formatUser } = require('./_format')

/**
 * 获取用户信息
 * @param {string} userName 用户名
 * @param {string} password 密码
 */
const getUserInfo = async (userName, password) => {
  // 查询条件
  const whereOpt = {
    userName
  }
  if (password) {
    Object.assign(whereOpt, { password })
  }
  // 查询
  const result = await User.findOne({
    attributes: ['id', 'userName', 'nickName', 'picture', 'city'],
    where: whereOpt
  })
  if (result == null) {
    // 未找到
    return result
  }
  // 格式化
  const formatRes = formatUser(result.toJSON())
  return formatRes
}

/**
 * 创建用户
 * @param {string} userName 用户名
 * @param {string} password 密码
 * @param {number} gender 性别
 * @param {string} nickName 昵称
 */
const createUser = async ({ userName, password, gender = 3, nickName }) => {
  const result = await User.create({
    userName,
    password,
    nickName: nickName ? nickName : userName,
    gender
  })
  return result.toJSON()
}

module.exports = {
  getUserInfo,
  createUser
}
2
3
4
5
6
7
8
9
10
11
12
13
14
15
16
17
18
19
20
21
22
23
24
25
26
27
28
29
30
31
32
33
34
35
36
37
38
39
40
41
42
43
44
45
46
47
48
49
50
51
52
53
54
55
56
5.6 注册 API - 密码加密
src/utils/cryp.js:
/**
 * @description 加密方法
 * @author yuanke
 */

const crypto = require('crypto')
const { CRYPTO_SECRET_KEY } = require('../conf/secretKeys')

/**
 * md5 加密
 * @param {string} content 明文
 */
const _md5 = (content) => {
  const md5 = crypto.createHash('md5')
  return md5.update(content).digest('hex')
}

/**
 * md5 加密
 * @param {string} content 明文
 */
const doCrypto = (content) => {
  const str = `password=${content}&key=${CRYPTO_SECRET_KEY}`
  return _md5(str)
}

module.exports = doCrypto
2
3
4
5
6
7
8
9
10
11
12
13
14
15
16
17
18
19
20
21
22
23
24
25
26
27
src/controller/user.js:(只写了部分代码)
const register = async ({ userName, password, gender }) => {
  const userInfo = await getUserInfo(userName)
  if (userInfo) {
    // 用户名已存在
    return ErrorModel(registerUserNameExistInfo)
  }
  // 注册 service
  try {
    await createUser({
      userName,
      password: doCrypto(password),
      gender
    })
    return new SuccessModel()
  } catch (ex) {
    console.error(ex.message, ex.stack)
    return new ErrorModel(registerFailInfo)
  }
}
2
3
4
5
6
7
8
9
10
11
12
13
14
15
16
17
18
19
5.7 注册 API - 格式校验
安装:
npm i -S ajv
src/routes/api/user.js:
/**
 * @description user 路由
 * @author yuanke
 */

const router = require('koa-router')()
const { isExist, register } = require('../../controller/user')
const userValidate = require('../../validator/user')
const { genValidator } = require('../../middlewares/validator')

router.prefix('/api/user')

// 注册路由
router.post('/register', genValidator(userValidate), async (ctx, next) => {
  const { userName, password, gender } = ctx.request.body
  // 调用 controller,返回
  ctx.body = await register({
    userName,
    password,
    gender
  })
})

// 用户名是否存在
router.post('/isExist', async (ctx, next) => {
  const { userName } = ctx.request.body
  ctx.body = await isExist(userName)
})

module.exports = router
2
3
4
5
6
7
8
9
10
11
12
13
14
15
16
17
18
19
20
21
22
23
24
25
26
27
28
29
30
src/validator/user.js:
/**
 * @description user 数据格式校验
 * @author yuanke
 */

const validate = require('./_validate')

// 校验规则
const SCHEMA = {
  type: 'object',
  properties: {
    userName: {
      type: 'string',
      pattern: '^[a-zA-Z][a-zA-Z0-9_]+#39;,
      maxLength: 255,
      minLength: 2
    },
    password: {
      type: 'string',
      maxLength: 255,
      minLength: 3
    },
    newPassword: {
      type: 'string',
      maxLength: 255,
      minLength: 3
    },
    nickName: {
      type: 'string',
      maxLength: 255
    },
    picture: {
      type: 'string',
      maxLength: 255,
      minLength: 2
    },
    gender: {
      type: 'number',
      minimum: 1,
      maximum: 3
    },
    city: {
      type: 'string',
      maxLength: 255,
      minLength: 2
    }
  }
}

/**
 * 校验用户数据格式
 * @param {Object} data 用户数据
 * @returns
 */
const userValidate = (data = {}) => {
  return validate(SCHEMA, data)
}

module.exports = userValidate
2
3
4
5
6
7
8
9
10
11
12
13
14
15
16
17
18
19
20
21
22
23
24
25
26
27
28
29
30
31
32
33
34
35
36
37
38
39
40
41
42
43
44
45
46
47
48
49
50
51
52
53
54
55
56
57
58
59
src/validator/_validate.js:
/**
 * @description json schema 校验
 * @author yuanke
 */

const Ajv = require('ajv')
const ajv = new Ajv({
  // allErrors: true // 输出所有的错误(比较慢)
})

/**
 * json schema 校验
 * @param {Object} schema json schema 规则
 * @param {Object} data 待校验的数据
 */
const validate = (schema, data = {}) => {
  const valid = ajv.validate(schema, data)
  if (!valid) {
    return ajv.errors[0]
  }
}

module.exports = validate
2
3
4
5
6
7
8
9
10
11
12
13
14
15
16
17
18
19
20
21
22
23
src/middleware/validator.js:
/**
 * @description json schema 验证中间件
 * @author yuanke
 */

const { ErrorModel } = require("../model/ResModel")
const { jsonSchemaFileInfo } = require('../model/ErrorInfo')

/**
 * 生成 json schema 验证的中间件
 * @param {Function} validateFn 验证函数
 * @returns
 */
const genValidator = (validateFn) => {
  // 定义中间件函数
  const validator = async (ctx, next) => {
    const data = ctx.request.body
    const error = validateFn(data)
    if (error) {
      // 验证失败
      ctx.body = new ErrorModel(jsonSchemaFileInfo)
      return
    }
    // 验证成功,继续
    await next()
  }
  // 返回中间件
  return validator
}

module.exports = {
  genValidator
}
2
3
4
5
6
7
8
9
10
11
12
13
14
15
16
17
18
19
20
21
22
23
24
25
26
27
28
29
30
31
32
33
5.8 登录 API
src/routes/api/user.js:
// 登录
router.post('/login', async (ctx, next) => {
  const { userName, password } = ctx.request.body
  ctx.body = await login(ctx, userName, password)
})
2
3
4
5
src/controller/user.js:
/**
 * 登录
 * @param {Object} ctx koa2 ctx
 * @param {string} userName 用户名
 * @param {string} password 密码
 */
const login = async (ctx, userName, password) => {
  // 获取用户信息
  const userInfo = await getUserInfo(userName, doCrypto(password))
  if (!userInfo) {
    // 登录失败
    return new ErrorModel(loginFailInfo)
  }
  // 登录成功
  if (ctx.session.userInfo == null) {
    ctx.session.userInfo = userInfo
  }
  return new SuccessModel()
}
2
3
4
5
6
7
8
9
10
11
12
13
14
15
16
17
18
19
src/routes/view/user.js:
前端判断是否登录:发送一个 get 请求应该即可
/**
 * @description user view 路由
 * @author yuanke
 */

const router = require('koa-router')()

/**
 * 获取登录信息
 * @param {Object} ctx ctx
 */
const getLoginInfo = (ctx) => {
  let data = {
    isLogin: false, // 默认未登录
  }
  const userInfo = ctx.session.userInfo
  if (userInfo) {
    data = {
      isLogin: true,
      userName: userInfo.userName
    }
  }
  return data
}

router.get('/login', async (ctx, next) => {
  await ctx.render('login', getLoginInfo(ctx))
})
router.get('/register', async (ctx, next) => {
  await ctx.render('register', getLoginInfo(ctx))
})

module.exports = router
2
3
4
5
6
7
8
9
10
11
12
13
14
15
16
17
18
19
20
21
22
23
24
25
26
27
28
29
30
31
32
33
5.9 登录验证
浏览器控制台输入:
encodeURIComponent('/setting'),就会得到:%2Fsetting。如果访问 http://localhost:3000/login?url=%2Fsetting,然后登录后会自动跳转到 http://localhost:3000/setting
src/middleware/loginChecks.js:
/**
 * @description 登录验证的中间件
 * @author yuanke
 */

const { loginCheckFailInfo } = require("../model/ErrorInfo")
const { ErrorModel } = require("../model/ResModel")

/**
 * API 登录验证
 * @param {Object} ctx ctx
 * @param {Function} next next
 */
const loginCheck = async (ctx, next) => {
  if (ctx.session?.userInfo) {
    // 已登录
    await next()
    return
  }
  // 未登录
  ctx.body = new ErrorModel(loginCheckFailInfo)
}

/**
 * 页面登录验证
 * @param {Object} ctx ctx
 * @param {Function} next next
 */
const loginRedirect = async (ctx, next) => {
  if (ctx.session?.userInfo) {
    // 已登录
    await next()
    return
  }
  // 未登录
  const curUrl = ctx.url
  ctx.redirect('/login?url=' + encodeURIComponent(curUrl))
}

module.exports = {
  loginCheck,
  loginRedirect
}
2
3
4
5
6
7
8
9
10
11
12
13
14
15
16
17
18
19
20
21
22
23
24
25
26
27
28
29
30
31
32
33
34
35
36
37
38
39
40
41
42
43
5.10 单元测试
测试模型:
test/user/model.test.js:
/**
 * @description user model test
 * @author yuanke
 */

const { User } = require('../../src/db/model/index')

test('User 模型的各个属性,符合预期', () => {
  // build 会构建一个内存的 User 实例,但不会提交到数据库中
  const user = User.build({
    userName: 'zhangsan',
    password: 'p123123',
    nickName: '张三',
    // gender: 1,
    picture: '/xxx.png',
    city: '北京'
  })
  // 验证各个属性
  expect(user.userName).toBe('zhangsan')
  expect(user.password).toBe('p123123')
  expect(user.nickName).toBe('张三')
  expect(user.gender).toBe(3) // 测试 gender 默认值
  expect(user.picture).toBe('/xxx.png')
  expect(user.city).toBe('北京')
})
2
3
4
5
6
7
8
9
10
11
12
13
14
15
16
17
18
19
20
21
22
23
24
25
测试删除当前用户:
src/routes/api/user.js:
// 删除
router.post('/delete', loginCheck , async (ctx, next) => {
  if (isTest) {
    // 测试环境下,测试账号登录之后,删除自己
    const { userName } = ctx.session.userInfo
    ctx.body = await deleteCurUser(userName)
  }
})
2
3
4
5
6
7
8
src/controller/user.js:
/**
 * 删除当前用户
 * @param {string} userName 用户名
 */
const deleteCurUser = async (userName) => {
  const result = await deleteUser(userName)
  if (result) {
    return new SuccessModel()
  }
  return new ErrorModel(deleteUserFailInfo)
}
2
3
4
5
6
7
8
9
10
11
src/service/user.js:
/**
 * 删除用户
 * @param {string} userName 用户名
 */
const deleteUser = async (userName) => {
  const result = await User.destroy({
    where: {
      userName
    }
  })
  return result > 0
}
2
3
4
5
6
7
8
9
10
11
12
5.11 单元测试 - 测试接口
test/user/login.test.js:
/**
 * @description user api test
 * @author yuanke
 */

const server = require('../server')

// 用户信息
const userName = `u_${Date.now()}`
const password = `p_${Date.now()}`
const testUser = {
  userName,
  password,
  nickName: userName,
  gender: 1
}

// 存储 cookie
let COOKIE = ''

// 注册
test('注册一个用户,应该成功', async () => {
  const res = await server
    .post('/api/user/register')
    .send(testUser)
  expect(res.body.errno).toBe(0)
})

// 重复注册
test('重复注册用户,应该失败', async () => {
  const res = await server
    .post('/api/user/register')
    .send(testUser)
  expect(res.body.errno).not.toBe(0)
})

// 查询用户是否存在
test('查询注册的用户名,应该存在', async () => {
  const res = await server
    .post('/api/user/isExist')
    .send({ userName })
  expect(res.body.errno).toBe(0)
})

// json schema 检测
test('json schema 检测,非法的格式,注册应该失败', async () => {
  const res = await server
    .post('/api/user/register')
    .send({
      userName: '123', // 用户名不是字母或下划线开头
      password: 'a', // 最小长度不是 3
      // nickName: '',
      gender: 'mail' // 不是数字
    })
    expect(res.body.errno).not.toBe(0)
})

// 登录
test('登录,应该成功', async () => {
  const res = await server
    .post('/api/user/login')
    .send({
      userName,
      password
    })
    expect(res.body.errno).toBe(0)

    // 获取 cookie
    COOKIE = res.headers['set-cookie'].join(';')
})

// 删除,需要验证 loginCheck,可以通过设置 cookie 规避
test('删除用户,应该成功', async () => {
  const res = await server
    .post('/api/user/delete')
    .set('Cookie', COOKIE)
  expect(res.body.errno).toBe(0)
})

// 再次查询用户,应该不存在
test('删除之后,再次查询注册的用户名,应该不存在', async () => {
  const res = await server
    .post('/api/user/isExist')
    .send({ userName })
  expect(res.body.errno).not.toBe(0)
})
2
3
4
5
6
7
8
9
10
11
12
13
14
15
16
17
18
19
20
21
22
23
24
25
26
27
28
29
30
31
32
33
34
35
36
37
38
39
40
41
42
43
44
45
46
47
48
49
50
51
52
53
54
55
56
57
58
59
60
61
62
63
64
65
66
67
68
69
70
71
72
73
74
75
76
77
78
79
80
81
82
83
84
85
86
git switch master:切换到 master 分支git pull origin master:将本地的 master 分支推送到 origin 主机的 master 分支git merge feature-login:将 feature-login 分支合并到版本库中的 master 分支中
6.fs 的异步操作
6.1 stat - 判断是否为文件 & 文件夹、access - 判断文件 & 文件夹是否存在
判断是否为文件、文件夹:
const fs = require('fs/promises')
const path = require('path')

const fileName = path.resolve(__dirname, 'data.txt')
const directoryName = path.join(__dirname, 'test')

// 判断是否为文件或文件夹
!(async () => {
  try {
    let a = await fs.stat(fileName)
    console.log(a.isFile()) // true
    let b = await fs.stat(directoryName)
    console.log(b.isDirectory()) // true
  } catch (ex) {
    console.log(ex)
  }
})()

fs.stat(fileName).then(res => {
  console.log(res.isFile()) // true
}).catch(ex => {
  console.log(ex)
})
2
3
4
5
6
7
8
9
10
11
12
13
14
15
16
17
18
19
20
21
22
23
判断文件、文件夹是否存在:
const fs = require('fs/promises')
const { constants } = require('fs')
const path = require('path')

const filePath = path.join(__dirname, 'data.txt')

!(async () => {
  try {
    await fs.access(filePath, constants.F_OK)
    console.log('exist')
  } catch (ex) {
    console.log(ex)
  }
})()
2
3
4
5
6
7
8
9
10
11
12
13
14
6.2 mkdir - 创建文件夹、writeFile -写入数据
创建文件夹:
const fs = require('fs/promises')

!(async () => {
  try {
    await fs.mkdir('./css/scs/ssc', {
      recursive: true // 递归创建文件夹
    })
  } catch (ex) {
    console.log(ex)
  }
})()
2
3
4
5
6
7
8
9
10
11
写入数据:
第三个参数是一个对象,key 值是 flag,可选键值:
a -> 追加、w -> 覆盖(默认)
const fs = require('fs/promises')
const path = require('path')
const filePath = path.join(__dirname, 'data.txt')

!(async () => {
  try {
    await fs.writeFile(filePath, `${Date.now()} - ${Date.now() + 12}`)
    // 1658645342247 - 1658645342259
  } catch (ex) {
    console.log(ex)
  }
})()
2
3
4
5
6
7
8
9
10
11
12
6.3 appendFile - 追加内容、readFile - 读取内容
追加内容:
const fs = require('fs/promises')
const path = require('path')
const filePath = path.join(__dirname, 'data.txt')

!(async () => {
  try {
    await fs.appendFile(filePath, 'nihaoya') // 1658645342247 - 1658645342259nihaoya
  } catch (ex) {
    console.log(ex)
  }
})()
2
3
4
5
6
7
8
9
10
11
读取内容:
const fs = require('fs/promises')
const path = require('path')
const filePath = path.join(__dirname, 'data.txt')

!(async () => {
  try {
    let content = await fs.readFile(filePath)
    // 将 buffer 类型数据转为 string
    console.log(content.toString()) // 1658645342247 - 1658645342259nihaoya
  } catch (ex) {
    console.log(ex)
  }
})()
2
3
4
5
6
7
8
9
10
11
12
13
6.4 readDir - 读取文件夹、rename - 修改文件名、rm - 删除文件夹 & 文件
读取文件夹:
const fs = require('fs/promises')
const path = require('path')
const directoryPath = path.join(__dirname, 'test')

!(async () => {
  try {
    let dir = await fs.readdir(directoryPath, {
      withFileTypes: false // 指定是否将文件作为 fs.Dirent 对象返回
    })
    console.log(dir) // [ 'aaa.js' ]
  } catch (ex) {
    console.log(ex)
  }
})()
2
3
4
5
6
7
8
9
10
11
12
13
14
修改文件名:
const fs = require('fs/promises')
const path = require('path')
const directoryPath = path.join(__dirname, 'test')

// 修改文件夹和文件名都没问题
!(async () => {
  try {
    await fs.rename(directoryPath, path.join(directoryPath, '../', 'woshidir'))
  } catch (ex) {
    console.log(ex)
  }
})()
2
3
4
5
6
7
8
9
10
11
12
删除文件夹 & 文件:
const fs = require('fs/promises')
const path = require('path')
const directoryPath = path.join(__dirname, 'woshidir')

!(async () => {
  try {
    await fs.rm(`${directoryPath}/a.js`)
    await fs.rm(directoryPath, {
      recursive: true
    })
  } catch (ex) {
    console.log(ex)
  }
})()
2
3
4
5
6
7
8
9
10
11
12
13
14
6.5 open 的应用 - 文件复制
The following flags are available wherever the flag option takes a string.
'a': Open file for appending. The file is created if it does not exist.'ax': Like'a'but fails if the path exists.'a+': Open file for reading and appending. The file is created if it does not exist.'ax+': Like'a+'but fails if the path exists.'as': Open file for appending in synchronous mode. The file is created if it does not exist.'as+': Open file for reading and appending in synchronous mode. The file is created if it does not exist.'r': Open file for reading. An exception occurs if the file does not exist.'r+': Open file for reading and writing. An exception occurs if the file does not exist.'rs+': Open file for reading and writing in synchronous mode. Instructs the operating system to bypass the local file system cache.This is primarily useful for opening files on NFS mounts as it allows skipping the potentially stale local cache. It has a very real impact on I/O performance so using this flag is not recommended unless it is needed.
This doesn't turn
fs.open()orfsPromises.open()into a synchronous blocking call. If synchronous operation is desired, something likefs.openSync()should be used.'w': Open file for writing. The file is created (if it does not exist) or truncated (if it exists).'wx': Like'w'but fails if the path exists.'w+': Open file for reading and writing. The file is created (if it does not exist) or truncated (if it exists).'wx+': Like'w+'but fails if the path exists.
实现功能:将 data.txt 的内容复制到 data1.txt
const fs = require('fs/promises')
const path = require('path')

const fileName = path.join(__dirname, 'data.txt')
const fileName1 = path.join(__dirname, 'data1.txt')

!(async () => {
  const fd = await fs.open(fileName, 'r+')
  const fd1 = await fs.open(fileName1, 'r+')
  const content = await fd.readFile()
  fd1.writeFile(content)
})()
2
3
4
5
6
7
8
9
10
11
12
6.6 流的入门
使用 node test.js 后,控制台输入啥就输出啥:
const { stdin, stdout } = require('node:process')

stdin.pipe(stdout)
2
3
使用 node test.js 后,postman 里 post 啥返回啥:
const http = require('http')
const server = http.createServer((req, res) => {
  if (req.method === 'POST') {
    req.pipe(res)
  }
})

server.listen(8008)
2
3
4
5
6
7
8
6.7 流的应用
基本使用:
const fs = require('fs')
const path = require('path')
const { pipeline, finished } = require('stream/promises')

const fileName1 = path.join(__dirname, 'data1.txt')
const fileName2 = path.join(__dirname, 'data2.txt')

const readStream = fs.createReadStream(fileName1)
const writeStream = fs.createWriteStream(fileName2, {
  flags: 'a'
})

!(async () => {
  // 将 readStream 内容加入 writeStream 末尾
  await pipeline(readStream, writeStream)
  await finished(readStream)
  console.log('读写流操作完毕!')
})()
2
3
4
5
6
7
8
9
10
11
12
13
14
15
16
17
18
写日志:
const fs = require('fs')
const path = require('path')

const fileName2 = path.join(__dirname, 'data2.txt')

const writeStream = fs.createWriteStream(fileName2, {
  flags: 'a'
})

const addLog = (log) => {
  try {
    writeStream.write(log)
  } catch (ex) {
    console.log(ex)
  }
}

addLog('haha')
addLog('hehe')
2
3
4
5
6
7
8
9
10
11
12
13
14
15
16
17
18
19
7.页面、文件上传、修改密码、退出登录
7.1 创建页面
src/routes/view/user.js 里文件做了修改了,但是还在 master 分区,忘记切换到一个新的分区了。解决方法:1.先
git stash保存 master 的工作状态;2.再新建并切换到新的分支:git switch -c feature-user-setting;3.最后git stash pop将工作状态还原到新的分支上
src/routes/view/user.js:
router.get('/setting', loginRedirect, async (ctx, next) => {
  await ctx.render('setting', ctx.session.userInfo)
})
2
3
7.2 文件上传
安装:
npm i -S koa-body
src/app.js:
const KoaStatic = require('koa-static')

// 只要访问 localhost:3000/stylesheets/style.css 就能访问该文件内容了
app.use(KoaStatic(__dirname + '/public'))
app.use(KoaStatic(path.join(__dirname, '..', 'uploadFiles')))
2
3
4
5
src/routes/api/utils.js:
/**
 * @description utils api 路由
 * @author yuanke
 */

const { saveFile } = require('../../controller/utils')
const { loginCheck } = require('../../middlewares/loginChecks')
const KoaBody = require('koa-body')
const router = require('koa-router')()
const path = require('path')

const koaBodySetting = {
  multipart: true, // 支持多文件上传
  formidable: {
    uploadDir: path.resolve(__dirname, '..', '..'), // 设置文件上传目录
    keepExtensions: true // 保持文件的后缀名
  }
}

router.prefix('/api/utils')

// 上传图片
router.post('/upload', loginCheck, KoaBody(koaBodySetting), async (ctx, next) => {
  const file = ctx.request.files['file']
  console.log('---------------------->', file.filepath, file.originalFilename, file.size, file.mimetype)
  const { size, filepath, originalFilename, mimetype } = file
  ctx.body = await saveFile({
    name: originalFilename,
    type: mimetype,
    size,
    filePath: filepath
  })
})

module.exports = router
2
3
4
5
6
7
8
9
10
11
12
13
14
15
16
17
18
19
20
21
22
23
24
25
26
27
28
29
30
31
32
33
34
35
src/controller/utils.js:
/**
 * @description utils controller
 * @author yuanke
 */

const { uploadFileSizeFailInfo } = require("../model/ErrorInfo")
const { ErrorModel, SuccessModel } = require("../model/ResModel")
const fs = require('fs/promises')
const path = require("path")
const { pipeline } = require('stream/promises')
const fsSync = require('fs')

// 存储目录
const DIST_FOLDER_PATH = path.resolve(__dirname, '..', '..', 'uploadFiles')
// 文件最大体积 1M
const MAX_SIZE = 1024 * 1024 * 1024
// 是否需要创建目录,项目启动时执行一次
fs.access(DIST_FOLDER_PATH, fsSync.constants.F_OK).catch(() => {
  fs.mkdir(DIST_FOLDER_PATH)
    .then(() => console.log('新建保存图片的目录成功'))
    .catch(e => console.log('e'))
})

/**
 * 保存文件
 * @param {string} name 文件名
 * @param {string} type 文件类型
 * @param {string} size 文件体积大小
 * @param {string} filePath 文件路径
 */
const saveFile = async ({ name, type, size, filePath }) => {
  if (size > MAX_SIZE) {
    await fs.rm(filePath)
    return new ErrorModel(uploadFileSizeFailInfo)
  }
  // 移动文件
  const fileName = Date.now() + '.' + name // 防止重名
  const distFilePath = path.join(DIST_FOLDER_PATH, fileName) // 目的地
  await pipeline(fsSync.ReadStream(filePath), fsSync.WriteStream(distFilePath))
  await fs.rm(filePath)

  // 返回信息 /2.png
  return new SuccessModel({
    url: '/' + fileName
  })
}

module.exports = {
  saveFile
}
2
3
4
5
6
7
8
9
10
11
12
13
14
15
16
17
18
19
20
21
22
23
24
25
26
27
28
29
30
31
32
33
34
35
36
37
38
39
40
41
42
43
44
45
46
47
48
49
50
使用原生 js 实现
views/index.ejs:
<!DOCTYPE html>
<html>
  <head>
    <title>演示</title>
  </head>
  <body>
    <div>
      <img class="pic" src="https://cn.vuejs.org/images/logo.svg" width="100px">
      <input class="inp" type="file">
    </div>

    <script>
      document.querySelector('.inp').addEventListener('change', function(e) {
        let file = e.target.files
        if (!file.length) return
        let formData = new FormData()
        formData.append('file', file[0])
        fetch('/api/utils/upload', {
          method: 'post',
          body: formData
        }).then(response => {
          if (response.ok) {
            response.json().then(res => {
              console.log(res)
              document.querySelector('.pic').src = res.url
            })
          }
        })
      })
    </script>
  </body>
</html>
2
3
4
5
6
7
8
9
10
11
12
13
14
15
16
17
18
19
20
21
22
23
24
25
26
27
28
29
30
31
32
routes/index.js:
const router = require('koa-router')()
const KoaBody = require('koa-body')
const path = require('path')
const fs = require('fs/promises')
const { pipeline } = require('stream/promises')
const fsSync = require('fs')

const koaBodySetting = {
  multipart: true,
  formidable: {
    uploadDir: path.join(__dirname, '..'),
    keepExtensions: true
  }
}

const TARGET_FOLDER = path.join(__dirname, '..', 'uploadFiles')
fs.access(TARGET_FOLDER).catch(() => {
  fs.mkdir(TARGET_FOLDER)
    .then(() => console.log('新建保存图片处成功'))
    .catch(e => console.log(e))
})

// 将传来的图片进行一系列处理:剪切原图片至新建的文件夹,并重命名该图片,返回新图片的地址
const saveFile = async ({ name, type, size, filePath }) => {
  if (size > 1024 * 1024 * 1024) {
    fs.rm(filePath)
      .then(() => { return new ErrorModel('图片过大') })
      .catch(e => console.log(e))
  }
  const fileName = Date.now() + '.' + name
  const targetFilePath = path.join(TARGET_FOLDER, fileName)
  await pipeline(fsSync.createReadStream(filePath), fsSync.createWriteStream(targetFilePath))
  await fs.rm(filePath)
  return {
    errno: 0,
    url: '/' + fileName
  }
}

router.post('/api/utils/upload', KoaBody(koaBodySetting), async (ctx, next) => {
  const file = ctx.request.files['file']
  const { size, filepath, originalFilename, mimetype } = file
  ctx.body = await saveFile({
    name: originalFilename,
    type: mimetype,
    size,
    filePath: filepath
  })
})

module.exports = router
2
3
4
5
6
7
8
9
10
11
12
13
14
15
16
17
18
19
20
21
22
23
24
25
26
27
28
29
30
31
32
33
34
35
36
37
38
39
40
41
42
43
44
45
46
47
48
49
50
51
app.js:
const KoaStatic = require('koa-static')

app.use(KoaStatic(__dirname + '/public'))
app.use(KoaStatic(__dirname + '/uploadFiles'))
2
3
4
7.3 修改基本信息
src/routes/api/user.js:
// 修改个人信息
router.patch('/changeInfo', loginCheck, genValidator(userValidate), async (ctx, next) => {
  const { nickName, city, picture } = ctx.request.body
  ctx.body = await changeInfo(ctx, { nickName, city, picture })
})
2
3
4
5
src/controller/user.js:
/**
 * 修改个人信息
 * @param {Object} ctx ctx
 * @param {string} nickName 昵称
 * @param {string} city 城市
 * @param {string} picture 头像
 */
const changeInfo = async (ctx, { nickName, city, picture }) => {
  const { userName } = ctx.session.userInfo
  if (!nickName) nickName = userName
  const result = await updateUser(
    {
      newNickName: nickName,
      newCity: city,
      newPicture: picture
    },
    { userName }
  )
  if (result) {
    // 执行成功
    Object.assign(ctx.session.userInfo, {
      nickName,
      city,
      picture
    })
    return new SuccessModel()
  }
  return new ErrorModel(changeInfoFailInfo)
}
2
3
4
5
6
7
8
9
10
11
12
13
14
15
16
17
18
19
20
21
22
23
24
25
26
27
28
29
src/service/user.js:
/**
 * 更新用户信息
 * @param {object} param0 要修改的内容 newPassword, newNickName, newPicture, newCity
 * @param {object} param1 查询条件 userName, password
 */
const updateUser = async (
  { newPassword, newNickName, newPicture, newCity },
  { userName, password }
) => {
  // 拼接修改内容
  const updateData = {}
  if (newPassword) {
    updateData.password = newPassword
  }
  if (newNickName) {
    updateData.nickName = newNickName
  }
  if (newPicture) {
    updateData.picture = newPicture
  }
  if (newCity) {
    updateData.city = newCity
  }

  // 拼接查询条件
  const whereData = {
    userName
  }
  if (password) {
    whereData.password = password
  }
  // 执行修改
  const result = await User.update(updateData, {
    where: whereData
  })
  return result[0] > 0 // 修改的行数
}
2
3
4
5
6
7
8
9
10
11
12
13
14
15
16
17
18
19
20
21
22
23
24
25
26
27
28
29
30
31
32
33
34
35
36
37
7.4 修改密码(逻辑同 7.3)
src/routes/apiuser.js:
// 修改密码
router.patch('/changePassword', loginCheck, genValidator(userValidate), async (ctx, next) => {
  const { password, newPassword } = ctx.request.body
  const { userName } = ctx.session.userInfo
  ctx.body = await changePassword(userName, password, newPassword)
})
2
3
4
5
6
src/controller/user.js:
/**
 * 修改密码
 * @param {string} userName 用户名
 * @param {string} password 当前密码
 * @param {string} newPassword 新密码
 */
const changePassword = async (userName, password, newPassword) => {
  const result = await updateUser(
    { newPassword: doCrypto(newPassword) },
    {
      userName,
      password: doCrypto(password)
    }
  )
  if (result) {
    // 成功
    return new SuccessModel()
  }
  // 失败
  return new ErrorModel(changePasswordFailInfo)
}
2
3
4
5
6
7
8
9
10
11
12
13
14
15
16
17
18
19
20
21
7.5 退出登录
src/routes/api/user.js:
// 退出登录
router.post('/logout', loginCheck, async (ctx, next) => {
  ctx.body = await logout(ctx)
})
2
3
4
src/controller/user.js:
// 退出登录
router.post('/logout', loginCheck, async (ctx, next) => {
  ctx.body = await logout(ctx)
})
2
3
4
7.6 单元测试
test/user/login.test.js:
// 登录
test('登录,应该成功', async () => {
  const res = await server
    .post('/api/user/login')
    .send({
      userName,
      password
    })
    expect(res.body.errno).toBe(0)

    // 获取 cookie
    COOKIE = res.headers['set-cookie'].join(';')
    console.log(res.header['set-cookie'])
})

// 修改基本信息
test('修改基本信息,应该成功', async () => {
  const res = await server
    .patch('/api/user/changeInfo')
    .send({
      nickName: '测试昵称',
      city: '测试城市',
      picture: '/test.png',
    })
    .set('Cookie', COOKIE)
  expect(res.body.errno).toBe(0)
})

// 修改密码
test('修改密码,应该成功', async () => {
  const res = await server
    .patch('/api/user/changePassword')
    .send({
      password,
      newPassword: `p_${Date.now()}`
    })
  	.set('Cookie', COOKIE)
  expect(res.body.errno).toBe(0)
})

// 删除,需要验证 loginCheck,可以通过设置 cookie 规避
test('删除用户,应该成功', async () => {
  const res = await server
    .post('/api/user/delete')
    .set('Cookie', COOKIE)
  expect(res.body.errno).toBe(0)
})

// 退出
test('退出登录应该成功', async () => {
  const res = await server
    .post('/api/user/logout')
    .set('Cookie', COOKIE)
  expect(res.body.errno).toBe(0)
})
2
3
4
5
6
7
8
9
10
11
12
13
14
15
16
17
18
19
20
21
22
23
24
25
26
27
28
29
30
31
32
33
34
35
36
37
38
39
40
41
42
43
44
45
46
47
48
49
50
51
52
53
54
55
8.微博内容开始
8.1 创建数据模型
src/db/model/Blog.js:
/**
 * @description 微博数据模型
 * @author yuanke
 */

const seq = require('../seq')
const { STRING, INTEGER, TEXT } = require('../types')

const Blog = seq.define('blog', {
  userId: {
    type: INTEGER,
    allowNull: false,
    comment: '用户 id'
  },
  content: {
    type: TEXT,
    allowNull: false,
    comment: '微博内容'
  },
  image: {
    type: STRING,
    allowNull: true,
    comment: '图片地址'
  }
})

module.exports = Blog
2
3
4
5
6
7
8
9
10
11
12
13
14
15
16
17
18
19
20
21
22
23
24
25
26
27
src/db/model/index.js:
/**
 * @description 数据模型入口文件
 * @author yuanke
 */

const User = require('./User')
const Blog = require('./Blog')

// 多对一的关系,查询微博时顺带查出用户来
Blog.belongsTo(User, {
  foreignKey: 'userId'
})

// // 一对多的关系,查询用户时顺带查出微博来
// User.hasMany(Blog, {
//   foreignKey: 'userId'
// })

module.exports = {
  User,
  Blog
}
2
3
4
5
6
7
8
9
10
11
12
13
14
15
16
17
18
19
20
21
22
8.2 创建微博 API
src/views/widgets/input.ejs:
<!-- 微博输入框 -->
<div class="margin-bottom-10 padding-bottom-10 border-bottom">
<textarea class="form-control" id="text-content" rows="3"></textarea>
<div class="margin-top-10">
<button class="btn btn-primary" id="btn-submit">发表</button>
<a href="#" id="btn-add-img">
<i class="fa fa-picture-o"></i>
插入一张图片
</a>
<input type="file" accept="image/*" id="file-picture" style="display: none;">
<input type="hidden" id="input-img-url">
<span id="span-img-name"></span>
</div>
</div>
<script>
$(function () {
var $spanImgName = $('#span-img-name')
var $inputImgUrl = $('#input-img-url')
var $textContent = $('#text-content')
var $filePicture = $('#file-picture')
// 上传图片
$filePicture.change(function (e) {
var file = $filePicture[0].files[0]
$spanImgName.text(file.name)
ajax.upload('/api/utils/upload', file, function (err, data) {
if (err) {
alert(err)
return
}
// 成功
$inputImgUrl.val(data.url)
})
})
// 插入图片
$('#btn-add-img').click(function (e) {
e.preventDefault()
// 开始选择图片
$filePicture.click()
})
// 发布微博
$('#btn-submit').click(function () {
var content = $textContent.val().trim()
var imgUrl = $inputImgUrl.val() || ''
// 验证
if (content.length === 0) {
alert('请输入微博内容')
return
}
// 发布
ajax.post('/api/blog/create', {
content: content,
image: imgUrl
}, function (err) {
if (err) {
// 失败
alert(err)
return
}
// 成功
$filePicture.val('')
$spanImgName.text('')
$textContent.val('')
$inputImgUrl.val('')
// 刷新页面
location.href = location.pathname
})
})
// // @ 功能
// $textContent.atwho({
// at: '@',
// data: '/api/user/getAtList'
// // data: ['Peter', 'Tom', 'Anne']
// })
})
</script>
2
3
4
5
6
7
8
9
10
11
12
13
14
15
16
17
18
19
20
21
22
23
24
25
26
27
28
29
30
31
32
33
34
35
36
37
38
39
40
41
42
43
44
45
46
47
48
49
50
51
52
53
54
55
56
57
58
59
60
61
62
63
64
65
66
67
68
69
70
71
72
73
74
75
76
77
78
79
80
81
82
83
84
85
src/routes/api/blog-home.js:
/**
 * @description 首页 API 路由
 * @author yuanke
 */

const router = require('koa-router')()
const { create } = require('../../controller/blog-home')
const { loginCheck } = require('../../middlewares/loginChecks')

router.prefix('/api/blog')

// 创建微博
router.post('/create', loginCheck, async (ctx, next) => {
  const { content, image } = ctx.request.body
  const { id: userId } = ctx.session.userInfo
  ctx.body = await create({ userId, content, image })
})

module.exports = router
2
3
4
5
6
7
8
9
10
11
12
13
14
15
16
17
18
19
src/controller/blog-home.js:
/**
 * @description 首页 controller
 * @author yuanke
 */

const { createBlogFailInfo } = require('../model/ErrorInfo')
const { SuccessModel, ErrorModel } = require('../model/ResModel')
const { createBlog } = require('../service/blog')

/**
 * 创建微博
 * @param {Object} param0 创建微博所需的数据 { userId, content, image }
 */
const create = async ({ userId, content, image }) => {
  try {
    // 创建微博
    const blog = await createBlog({
      userId,
      content,
      image
    })
    return new SuccessModel(blog)
  } catch (ex) {
    console.error(ex.message, ex.stack)
    return new ErrorModel(createBlogFailInfo)
  }
}

module.exports = {
  create
}
2
3
4
5
6
7
8
9
10
11
12
13
14
15
16
17
18
19
20
21
22
23
24
25
26
27
28
29
30
31
src/service/blog.js:
/**
 * @description 微博 service
 * @author yuanke
 */

const { Blog } = require('../db/model/index')

/**
 * 创建微博
 * @param {Object} param0 创建微博的数据 { userId, content, image }
 */
const createBlog = async ({ userId, content, image }) => {
  const result = await Blog.create({
    userId,
    content,
    image
  })
  return result.toJSON()
}

module.exports = {
  createBlog
}
2
3
4
5
6
7
8
9
10
11
12
13
14
15
16
17
18
19
20
21
22
23
8.3 xss 过滤和格式校验
安装:
npm i xss -S,在 controller 层引用 xss 后,用xss(content)包裹 content 就可以防止 xss 攻击了
格式校验:
src/validator/blog.js:
/**
 * @description 微博数据格式校验
 * @author yuanke
 */

const validate = require('./_validate')

// 校验规则
const SCHEMA = {
  type: 'object',
  properties: {
    content: {
      type: 'string'
    },
    image: {
      type: 'string',
      maxLength: 255
    }
  }
}

/**
 * 校验微博数据格式
 * @param {Object} data 微博数据
 * @returns
 */
const blogValidate = (data = {}) => {
  return validate(SCHEMA, data)
}

module.exports = blogValidate
2
3
4
5
6
7
8
9
10
11
12
13
14
15
16
17
18
19
20
21
22
23
24
25
26
27
28
29
30
31
8.4 单元测试
test/testUserInfo.js:
/**
 * @description 用户单元测试的用户信息
 * @author yuanke
 */

/**
 * [特别提醒] cookie 是用户的敏感信息,此处只能是 **测试** 用户的 cookie
 * 每次测试用户重新登录,都需要更新这里的 cookie
 */

module.exports = {
  COOKIE: 'weibo.sid=kFi4GdKLCbskaUZOqDHtKWqJx9RVsGxt; weibo.sid.sig=YhhPOrRV1UH0jsR4o-QVFF2SkhU'
}
2
3
4
5
6
7
8
9
10
11
12
13
test/blog/model.test.js:
/**
 * @description 微博数据模型单元测试
 * @author yuanke
 */

const { Blog } = require('../../src/db/model/index')

test('微博数据模型各个属性符合预期', () => {
  const blog = Blog.build({
    userId: 1,
    content: '微博内容',
    image: '/test.png'
  })
  expect(blog.userId).toBe(1)
  expect(blog.content).toBe('微博内容')
  expect(blog.image).toBe('/test.png')
})
2
3
4
5
6
7
8
9
10
11
12
13
14
15
16
17
test/blog/home.test.js:
/**
 * @description 首页 test
 * @author yuanke
 */

const server = require('../server')
const { COOKIE } = require('../testUserInfo')

// 存储微博 id
let BLOG_ID

test('创建一条微博应该成功', async () => {
  // 定义测试内容
  const content = '单元测试自动创建的微博_' + Date.now()
  const image = '/xxx.png'
  // 开始测试
  const res = await server
    .post('/api/blog/create')
    .send({
      content,
      image
    })
    .set('Cookie', COOKIE)
  expect(res.body.errno).toBe(0)
  expect(res.body.data.content).toBe(content)
  expect(res.body.data.image).toBe(image)

  // 记录微博 id
  BLOG_ID = res.body.data.id
})
2
3
4
5
6
7
8
9
10
11
12
13
14
15
16
17
18
19
20
21
22
23
24
25
26
27
28
29
30
9.微博内容深入
9.1 开始和创建页面
src/routes/view/blog.js:
// 个人主页
router.get('/profile', loginRedirect, async (ctx, next) => {
  const { userName } = ctx.session.userInfo
  ctx.redirect(`/profile/${userName}`)
})

router.get('/profile/:userName', loginRedirect, async (ctx, next) => {
  const { userName: curUserName } = ctx.params
  // 获取微博第一页数据
  const result = await getProfileBlogList(curUserName, 0)
  const { isEmpty, blogList, pageSize, pageIndex, count } = result.data

  await ctx.render('profile', {
    blogData: {
      isEmpty,
      blogList,
      pageSize,
      pageIndex,
      count
    }
  })
})
2
3
4
5
6
7
8
9
10
11
12
13
14
15
16
17
18
19
20
21
22
src/controller/blog-profile.js:
/**
 * @description 个人主页 controller
 * @author yuanke
 */

const { getBlogListByUser } = require("../service/blog")
const { PAGE_SIZE } = require('../conf/constant')
const { SuccessModel } = require("../model/ResModel")

/**
 * 获取个人主页微博列表
 * @param {string} userName 用户名
 * @param {number} pageIndex 当前页面
 */
const getProfileBlogList = async (userName, pageIndex = 0) => {
  const result = await getBlogListByUser({
    userName,
    pageIndex,
    pageSize: PAGE_SIZE
  })
  const blogList = result.blogList

  // 拼接返回数据
  return new SuccessModel({
    isEmpty: blogList.length === 0,
    blogList,
    pageSize: PAGE_SIZE,
    pageIndex,
    count: result.count
  })
}

module.exports = {
  getProfileBlogList
}
2
3
4
5
6
7
8
9
10
11
12
13
14
15
16
17
18
19
20
21
22
23
24
25
26
27
28
29
30
31
32
33
34
35
src/service/blog.js:连表查询
/**
 * 根据用户获取微博列表
 * @param {Object} param0 { userName, pageIndex = 0, pageSize = 10 }
 */
const getBlogListByUser = async ({ userName, pageIndex = 0, pageSize = 10 }) => {
  // 拼接查询条件
  const userWhereOpts = {}
  if (userName) userWhereOpts.userName = userName
  // 执行查询
  const result = await Blog.findAndCountAll({
    limit: pageSize, // 每页多少条
    offset: pageSize * pageIndex, // 跳过多少条
    order: [
      ['id', 'desc']
    ],
    include: [
      {
        model: User,
        attributes: ['userName', 'nickName', 'picture'],
        where: userWhereOpts
      }
    ]
  })
  // result.count 总数,跟分页无关
  // result.rows 查询结果,数组
  let blogList = result.rows.map(row => row.toJSON())
  blogList = blogList.map(blogItem => {
    const user = blogItem.user
    blogItem.user = formatUser(user)
    return blogItem
  })
  return {
    count: result.count,
    blogList
  }
}
2
3
4
5
6
7
8
9
10
11
12
13
14
15
16
17
18
19
20
21
22
23
24
25
26
27
28
29
30
31
32
33
34
35
36
9.2 创建路由 - 格式化时间
安装:
npm i -S date-fns
src/utils/dt.js:
/**
 * @description 时间相关的工具函数
 * @author yuanke
 */

const { format } = require('date-fns')

/**
 * 格式化时间,如 09.05 23:02
 * @param {string} str 时间字符串
 */
const timeFormat = (str) => {
  console.log(format(new Date(str), 'MM.dd HH:mm'))
  return format(new Date(str), 'MM.dd HH:mm')
}

module.exports = {
  timeFormat
}
2
3
4
5
6
7
8
9
10
11
12
13
14
15
16
17
18
19
src/service/_format.js:
/**
 * 格式化数据的时间
 * @param {Object} obj 数据
 */
const _formatDBTime = obj => {
  obj.createdAtFormat = timeFormat(obj.createdAt)
  obj.updatedAtFormat = timeFormat(obj.updatedAt)
  return obj
}

/**
 * 格式化微博信息
 * @param {Array|Object} list 微博列表或者单个微博对象
 */
const formatBlog = (list) => {
  if (list == null) return list
  if (list instanceof Array) {
    // 数组
    return list.map(_formatDBTime)
  }
  // 对象
  return _formatDBTime(list)
}
2
3
4
5
6
7
8
9
10
11
12
13
14
15
16
17
18
19
20
21
22
23
src/service/blog.js:
/**
 * 根据用户获取微博列表
 * @param {Object} param0 { userName, pageIndex = 0, pageSize = 10 }
 */
const getBlogListByUser = async ({ userName, pageIndex = 0, pageSize = 10 }) => {
  // 拼接查询条件
  const userWhereOpts = {}
  if (userName) userWhereOpts.userName = userName
  // 执行查询
  const result = await Blog.findAndCountAll({
    limit: pageSize, // 每页多少条
    offset: pageSize * pageIndex, // 跳过多少条
    order: [
      ['id', 'desc']
    ],
    include: [
      {
        model: User,
        attributes: ['userName', 'nickName', 'picture'],
        where: userWhereOpts
      }
    ]
  })
  // result.count 总数,跟分页无关
  // result.rows 查询结果,数组
  let blogList = result.rows.map(row => row.toJSON())

  // 格式化
  blogList = formatBlog(blogList)
  blogList = blogList.map(blogItem => {
    const user = blogItem.user
    blogItem.user = formatUser(user)
    return blogItem
  })
  return {
    count: result.count,
    blogList
  }
}
2
3
4
5
6
7
8
9
10
11
12
13
14
15
16
17
18
19
20
21
22
23
24
25
26
27
28
29
30
31
32
33
34
35
36
37
38
39
9.3 后端渲染"加载更多"页面
安装:
npm i -S ejs
src/views/widgets/blog-list.ejs:
后端渲染的页面,会传到前端去的
<% blogList.forEach(blog => { %>
<div class="item-wrapper">
<img class="user-picture" src="<%= blog.user.picture%>"/>
<div class="content clear-fix">
<% if (blog.image) { %>
<a href="<%= blog.image%>" target="_blank">
<img class="blog-img" src="<%= blog.image%>"/>
</a>
<% } %>
<a href="/profile/<%= blog.user.userName%>">
<%= blog.user.nickName%>
</a>:
<span><%- blog.content%></span>
</div>
<div class="info">
<span><%= blog.createdAtFormat%></span>
<% if (locals.canReply) { %>
<%# 可以回复 %>
<a href="#" class="blog-list-reply"
data-content="<%= blog.content%>"
data-userName="<%= blog.user.userName%>"
data-nickName="<%= blog.user.nickName%>"
>
<i class="fa fa-mail-reply"></i> 回复
</a>
<% } %>
</div>
</div>
<% }) %>
<script>
$(function () {
// 设置焦点
function setCursor(el, st, end) {
if (el.setSelectionRange) {
el.focus()
el.setSelectionRange(st, end)
} else if (el.createTextRange) {
var range = el.createTextRange()
range.collapse(true)
range.moveEnd('character',end)
range.moveStart('character',st)
range.select()
}
}
// 回复
var $textContent = $('#text-content')
$('.blog-list-reply').click(function (e) {
e.preventDefault()
var $target = $(e.target)
// 获取内容和用户
var content = $target.attr('data-content')
var userName = $target.attr('data-userName')
var nickName = $target.attr('data-nickName')
// 设置内容并获取焦点
$textContent.val(' // @' + nickName + ' - ' + userName + ' : ' + content)
setCursor($textContent[0], 0, 0)
})
})
</script>
2
3
4
5
6
7
8
9
10
11
12
13
14
15
16
17
18
19
20
21
22
23
24
25
26
27
28
29
30
31
32
33
34
35
36
37
38
39
40
41
42
43
44
45
46
47
48
49
50
51
52
53
54
55
56
57
58
59
60
61
62
63
64
src/routes/api/blog-profile.js:
// 加载更多
router.get('/loadMore/:userName/:pageIndex', loginCheck, async (ctx, next) => {
  let { userName, pageIndex } = ctx.params
  pageIndex = parseInt(pageIndex)
  let result = await getProfileBlogList(userName, pageIndex)
  // 渲染为 html 字符串
  result.data.blogListTpl = getBlogListStr(result.data.blogList)
  ctx.body = result
})
2
3
4
5
6
7
8
9
src/utils/blog.js:
/**
 * @description 微博数据相关的工具方法
 * @author yuanke
 */

const ejs = require('ejs')
const fs = require('fs')
const path = require('path')

// 获取 blog-ejs 的文件内容
const BLOG_LIST_TPL = fs.readFileSync(
  path.join(__dirname, '..', 'views', 'widgets', 'blog-list.ejs')
).toString()

/**
 * 根据 blogList 渲染出 html 字符串
 * @param {Array} blogList 微博列表
 * @param {Boolean} canReply 是否可以回复
 */
const getBlogListStr = (blogList = [], canReply = false) => {
  return ejs.render(BLOG_LIST_TPL, {
    blogList,
    canReply
  })
}

module.exports = {
  getBlogListStr
}
2
3
4
5
6
7
8
9
10
11
12
13
14
15
16
17
18
19
20
21
22
23
24
25
26
27
28
29
9.4 单元测试
test/blog/profile.test.js:
/**
 * @description 个人主页 test
 * @author yuanke
 */

const server = require('../server')
const { USER_NAME, COOKIE } = require('../testUserInfo')
test('个人主页,加载第一页数据,应该成功', async () => {
  const res = await server
    .get(`/api/profile/loadMore/${USER_NAME}/0`)
    .set('Cookie', COOKIE)

  expect(res.body.errno).toBe(0)

  const data = res.body.data
  expect(data).toHaveProperty('isEmpty')
  expect(data).toHaveProperty('blogList')
  expect(data).toHaveProperty('pageSize')
  expect(data).toHaveProperty('pageIndex')
  expect(data).toHaveProperty('count')
})
2
3
4
5
6
7
8
9
10
11
12
13
14
15
16
17
18
19
20
21
10.微博广场页
10.1 redis - 基本设置
src/routes/api/blog-square.js:
/**
 * @description 广场页 API 路由
 * @author yuanke
 */

const router = require('koa-router')()
const { loginCheck } = require('../../middlewares/loginChecks')
const { getProfileBlogList, getSquareBlogList } = require('../../controller/blog-square')
const { getBlogListStr } = require('../../utils/blog')

router.prefix('/api/square')

// 加载更多
router.get('/loadMore/:pageIndex', loginCheck, async (ctx, next) => {
  let { pageIndex } = ctx.params
  pageIndex = parseInt(pageIndex)
  let result = await getSquareBlogList(pageIndex)
  // 渲染为 html 字符串
  result.data.blogListTpl = getBlogListStr(result.data.blogList)
  ctx.body = result
})

module.exports = router
2
3
4
5
6
7
8
9
10
11
12
13
14
15
16
17
18
19
20
21
22
23
src/controller/blog-square.js:
/**
 * @description 广场页 controller
 * @author yuanke
 */

const { PAGE_SIZE } = require('../conf/constant')
const { SuccessModel } = require('../model/ResModel')
const { getSquareCacheList } = require('../cache/blog')

/**
 * 获取广场的微博列表
 * @param {number} pageIndex pageIndex
 */
const getSquareBlogList = async (pageIndex = 0) => {
  const result = await getSquareCacheList(pageIndex, PAGE_SIZE)
  const blogList = result.blogList

  // 拼接返回数据
  return new SuccessModel({
    isEmpty: blogList.length === 0,
    blogList,
    pageSize: PAGE_SIZE,
    pageIndex,
    count: result.count
  })
}

module.exports = {
  getSquareBlogList
}
2
3
4
5
6
7
8
9
10
11
12
13
14
15
16
17
18
19
20
21
22
23
24
25
26
27
28
29
30
src/cache/blog.js:
/**
 * @description 微博缓存层
 * @author yuanke
 */

const { set, get } = require('./_redis')
const { getBlogListByUser } = require('../service/blog')

// redis key 前缀
const KEY_PREFIX = 'weibo:square:'

/**
 * 获取广场列表的缓存
 * @param {number} pageIndex pageIndex
 * @param {number} pageSize pageSize
 */
const getSquareCacheList = async (pageIndex, pageSize) => {
  const key = `${KEY_PREFIX}${pageIndex}_${pageSize}`

  // 尝试获取缓存
  const cacheResult = await get(key)
  if (cacheResult != null) {
    // 获取缓存成功
    return cacheResult
  }
  // 没有缓存,则读取数据库
  const result = await getBlogListByUser({ pageIndex, pageSize })

  // 设置缓存,过期时间 1min
  set(key, result, 60)
  return result
}

module.exports = {
  getSquareCacheList
}
2
3
4
5
6
7
8
9
10
11
12
13
14
15
16
17
18
19
20
21
22
23
24
25
26
27
28
29
30
31
32
33
34
35
36
10.2 单元测试
test/blog/square.test.js:
/**
 * @description 广场 square
 * @author yuanke
 */

const server = require('../server')
const { COOKIE } = require('../testUserInfo')

// 加载第一页数据
test('广场,加载第一页数据', async () => {
  const res = await server
    .get('/api/square/loadMore/0')
    .set('Cookie', COOKIE)
  expect(res.body.errno).toBe(0)
  const data = res.body.data
  expect(data).toHaveProperty('isEmpty')
  expect(data).toHaveProperty('blogList')
  expect(data).toHaveProperty('pageSize')
  expect(data).toHaveProperty('pageIndex')
  expect(data).toHaveProperty('count')
})
2
3
4
5
6
7
8
9
10
11
12
13
14
15
16
17
18
19
20
21
11.关注
11.1 开始与数据建模
src/db/model/UserRelation.js:
/**
 * @description 用户关注关系
 * @author yuanke
 */

const seq = require('../seq')
const { INTEGER } = require('../types')

const UserRelation = seq.define('userRelation', {
  userId: {
    type: INTEGER,
    allowNull: false,
    comment: '用户 id'
  },
  followerId: {
    type: INTEGER,
    allowNull: false,
    comment: '被关注用户的 id'
  }
})

module.exports = UserRelation
2
3
4
5
6
7
8
9
10
11
12
13
14
15
16
17
18
19
20
21
22
src/db/model/index.js:
/**
 * @description 数据模型入口文件
 * @author yuanke
 */

const User = require('./User')
const Blog = require('./Blog')
const UserRelation = require('./UserRelation')

// 多对一的关系,查询微博时顺带查出用户来
Blog.belongsTo(User, {
  foreignKey: 'userId'
})

// // 一对多的关系,查询用户时顺带查出微博来
// User.hasMany(Blog, {
//   foreignKey: 'userId'
// })

UserRelation.belongsTo(User, {
  foreignKey: 'followedId'
})
User.hasMany(UserRelation, {
  foreignKey: 'userId'
})

module.exports = {
  User,
  Blog,
  UserRelation
}
2
3
4
5
6
7
8
9
10
11
12
13
14
15
16
17
18
19
20
21
22
23
24
25
26
27
28
29
30
31
11.2 开发粉丝列表
src/views/widgets/fans.ejs:
<div class="user-list right-item">
  <p class="title bold">
    <i class="fa fa-users"></i>
    粉丝(<%= count%>)
  </p>
  <div class="user-list clear-fix">
    <% userList.forEach(user => { %>
    <a href="/profile/<%= user.userName%>" class="user-item float-left">
      <img src="<%= user.picture%>"/>
      <span><%= user.nickName%></span>
    </a>
    <% }) %>
  </div>
</div>
2
3
4
5
6
7
8
9
10
11
12
13
14
src/routes/view/blog.js:
// 主页微博
router.get('/profile/:userName', loginRedirect, async (ctx, next) => {
  // 已登录用户的信息
  const myUserInfo = ctx.session.userInfo
  const myUserName = myUserInfo.userName

  let curUserInfo
  const { userName: curUserName } = ctx.params
  const isMe = myUserName === curUserName
  if (isMe) {
    // 用户信息从 session 里面取
    curUserInfo = myUserInfo
  } else {
    const existResult = await isExist(curUserName)
    if (existResult.errno !== 0) {
      return
    }
    // 用户信息从数据库里取
    curUserInfo = existResult.data
  }

  // 获取微博第一页数据
  const result = await getProfileBlogList(curUserName, 0)
  const { isEmpty, blogList, pageSize, pageIndex, count } = result.data

  // 获取粉丝
  const fansResult = await getFans(curUserInfo.id)
  const { fansCount, fansList } = fansResult.data

  await ctx.render('profile', {
    blogData: {
      isEmpty,
      blogList,
      pageSize,
      pageIndex,
      count
    },
    userData: {
      userInfo: curUserInfo,
      isMe,
      fansData: {
        count: fansCount,
        list: fansList
      }
    }
  })
})
2
3
4
5
6
7
8
9
10
11
12
13
14
15
16
17
18
19
20
21
22
23
24
25
26
27
28
29
30
31
32
33
34
35
36
37
38
39
40
41
42
43
44
45
46
47
src/controller/user-relation.js:
/**
 * @description 用户关系 controller
 * @author yuanke
 */

const { SuccessModel } = require('../model/ResModel')
const { getUsersByFollower } = require('../service/user-relation')

/**
 * 根据 userid 获取粉丝列表
 * @params {number} userId 用户 id
 */
const getFans = async (userId) => {
  const { count, userList } = await getUsersByFollower(userId)
  return new SuccessModel({
    fansCount: count,
    fansList: userList
  })
}

module.exports = {
  getFans
}
2
3
4
5
6
7
8
9
10
11
12
13
14
15
16
17
18
19
20
21
22
23
src/service/user-relation.js:
外键是粉丝 id。在 User 表中通过查主播 id 查出 UserRelation 表中的粉丝 id 及其相关 user 表中的信息
/**
 * @description 用户关系 service
 * @author yuanke
 */

const { User, UserRelation } = require('../db/model/index')
const { formatUser } = require('./_format')

/**
 * 获取关注该用户的用户列表,即该用户的粉丝
 * @params {number} followerId 被关注人的 id
 */
const getUsersByFollower = async (followerId) => {
  const result = await User.findAndCountAll({
    attributes: ['id', 'userName', 'nickName', 'picture'],
    order: [
      ['id', 'desc']
    ],
    include: [
      {
        model: UserRelation,
        where: {
          followerId
        }
      }
    ]
  })
  // result.count 总数
  // result.rows 查询结果,数组
  let userList = result.rows.map(row => row.toJSON())
  // 格式化,加上默认图片
  userList = formatUser(userList)

  return {
    count: result.count,
    userList
  }
}

module.exports = {
  getUsersByFollower
}
2
3
4
5
6
7
8
9
10
11
12
13
14
15
16
17
18
19
20
21
22
23
24
25
26
27
28
29
30
31
32
33
34
35
36
37
38
39
40
41
42
11.3 开发关注接口 - 判断开发状态
src/routes/views/blog.js:
// 我是否关注了此人?
  const amIFollowed = fansList.some(item => {
    return item.userName === myUserName
  })
2
3
4
然后再把
amIFollowed放到userData里
11.4 关注开发接口 - 完成
src/routes/api/blog-profile.js:
// 关注
router.post('/follow', loginCheck, async (ctx, next) => {
  const { id: myUserId } = ctx.session.userInfo
  const { userId: curUserId } = ctx.request.body
  ctx.body = await follow(myUserId, curUserId)
})
2
3
4
5
6
src/controller/user-relation.js:
/**
 * 关注
 * @param {number} myUserId 当前登录的用户 id
 * @param {number} curUserId 要被关注的用户 id
 */
const follow = async (myUserId, curUserId) => {
  try {
    await addFollower(myUserId, curUserId)
    return new SuccessModel()
  } catch (ex) {
    return new ErrorModel(addFollowerFailInfo)
  }
}
2
3
4
5
6
7
8
9
10
11
12
13
src/service/user-relation.js:
/**
 * 关注
 * @param {number} myUserId 当前登录的用户 id
 * @param {number} curUserId 要被关注的用户 id
 */
const follow = async (myUserId, curUserId) => {
  try {
    await addFollower(myUserId, curUserId)
    return new SuccessModel()
  } catch (ex) {
    return new ErrorModel(addFollowerFailInfo)
  }
}
2
3
4
5
6
7
8
9
10
11
12
13
unFollow 的逻辑一致
11.5 开发关注人列表
src/routes/view/blog.js:
在
/profile/:userName路由的处理函数下写的
// 获取关注人列表
const followersResult = await getFollowers(curUserInfo.id)
const { count: followersCount, followersList } = followersResult.data
2
3
src/controller/user-relation.js:
/**
 * 获取关注人列表
 * @param {number} userId userId
 */
const getFollowers = async (userId) => {
  const { count, userList } = await getFollowersByUser(userId)
  return new SuccessModel({
    count,
    followersList: userList
  })
}
2
3
4
5
6
7
8
9
10
11
src/service/user-relation.js:
外键为主播 id。在 userRelation 表中通过粉丝 id 查询主播 id,连带着主播 id 名下的 user 表中的内容
/**
 * 获取关注人列表
 * @param {number} userId userId
 */
const getFollowersByUser = async (userId) => {
  const result = await UserRelation.findAndCountAll({
    order: [
      ['id', 'desc']
    ],
    include: [
      {
        model: User,
        attributes: ['id', 'userName', 'nickName', 'picture']
      }
    ],
    where: {
      userId
    }
  })
  // result.count 总数
  // result.rows 查询结果,数组
  let userList = result.rows.map(row => row.toJSON())
  userList = userList.map(item => {
    let user = item.user
    user = formatUser(user)
    return user
  })

  return {
    count: result.count,
    userList
  }
}
2
3
4
5
6
7
8
9
10
11
12
13
14
15
16
17
18
19
20
21
22
23
24
25
26
27
28
29
30
31
32
33
11.6 单元测试
test/user/relation.test.js:
/**
 * @description 用户关系 单元测试
 * @author yuanke
 */

const server = require('../server')
const { getFans, getFollowers } = require('../../src/controller/user-relation')
const {
  Z_ID,
  Z_COOKIE,
  Z_USER_NAME,
  L_ID,
  L_USER_NAME
} = require('../testUserInfo')

// 先让张三关注李四(为了避免现在张三关注了李四)
test('无论如何,先取消关注', async () => {
  const res = await server
    .post('/api/profile/unFollow')
    .send({ userId: L_ID })
    .set('Cookie', Z_COOKIE)
  expect(1).toBe(1)
})

// 添加关注
test('张三关注李四,应该成功', async () => {
  const res = await server
    .post('/api/profile/follow')
    .send({ userId: L_ID })
    .set('Cookie', Z_COOKIE)
  expect(res.body.errno).toBe(0)
})

// 获取粉丝
test('获取李四的粉丝,应该有张三', async () => {
  const res = await getFans(L_ID)
  const { fansCount, fansList } = res.data
  const hasUserName = fansList.some(fanInfo => {
    return fanInfo.userName === Z_USER_NAME
  })
  expect(fansCount > 0).toBe(true)
  expect(hasUserName).toBe(true)
})

// 获取关注人
test('获取张三的关注人,应该有李四', async () => {
  const result = await getFollowers(Z_ID)
  const { count, followersList } = result.data
  const hasUserName = followersList.some(followerInfo => {
    return followerInfo.userName === L_USER_NAME
  })
  expect(count > 0).toBe(true)
  expect(hasUserName).toBe(true)
})

// 取消关注
test('张三取消关注李四,应该成功', async () => {
  const res = await server
    .post('/api/profile/unFollow')
    .send({ userId: L_ID })
    .set('Cookie', Z_COOKIE)
  expect(res.body.errno).toBe(0)
})
2
3
4
5
6
7
8
9
10
11
12
13
14
15
16
17
18
19
20
21
22
23
24
25
26
27
28
29
30
31
32
33
34
35
36
37
38
39
40
41
42
43
44
45
46
47
48
49
50
51
52
53
54
55
56
57
58
59
60
61
62
63
12.首页
12.1 数据建模
src/db/model/index.js:
// 将 blogs 表的 userId 与 userRelations 表的 followerId 关联起来
// 这样就可以通过 userRelations 的 userid 查询到 followerId 对应的 blogs 表中的数据了
// 数据库看不到这个外键映射,但是实际上已经成功了
Blog.belongsTo(UserRelation, {
  foreignKey: 'userId',
  targetKey: 'followerId'
})
2
3
4
5
6
7
12.2 "自己关注自己"
src/service/user.js:
/**
 * 创建用户
 * @param {string} userName 用户名
 * @param {string} password 密码
 * @param {number} gender 性别
 * @param {string} nickName 昵称
 */
const createUser = async ({ userName, password, gender = 3, nickName }) => {
  const result = await User.create({
    userName,
    password,
    nickName: nickName ? nickName : userName,
    gender
  })
  const data = result.toJSON()

  // 自己关注自己(为了方便首页获取数据)
  addFollower(data.id, data.id)

  return data
}
2
3
4
5
6
7
8
9
10
11
12
13
14
15
16
17
18
19
20
21
src/service/user-relation.js:
清除自己关注自己的影响
const { Op } = require('sequelize')

/**
 * 获取关注该用户的用户列表,即该用户的粉丝
 * @params {number} followerId 被关注人的 id
 */
const getUsersByFollower = async (followerId) => {
  const result = await User.findAndCountAll({
    attributes: ['id', 'userName', 'nickName', 'picture'],
    order: [
      ['id', 'desc']
    ],
    include: [
      {
        model: UserRelation,
        where: {
          followerId,
          userId: {
            // Op:option  ne:not equal
            [Op.ne]: followerId
          }
        }
      }
    ]
  })
  // ...
  // ...
  /**
 * 获取关注人列表
 * @param {number} userId userId
 */
const getFollowersByUser = async (userId) => {
  const result = await UserRelation.findAndCountAll({
    order: [
      ['id', 'desc']
    ],
    include: [
      {
        model: User,
        attributes: ['id', 'userName', 'nickName', 'picture']
      }
    ],
    where: {
      userId,
      followerId: {
        [Op.ne]: userId
      }
    }
  })
  // ...
  // ...
2
3
4
5
6
7
8
9
10
11
12
13
14
15
16
17
18
19
20
21
22
23
24
25
26
27
28
29
30
31
32
33
34
35
36
37
38
39
40
41
42
43
44
45
46
47
48
49
50
51
12.3 主页渲染 - 三表查询
src/routes/view/blog.js:
// 首页
router.get('/', loginRedirect, async (ctx, next) => {
  const userInfo = ctx.session.userInfo
  const { id: userId } = userInfo

  // 获取第一页数据
  const result = await getHomeBlogList(userId)
  const { isEmpty, blogList, pageSize, pageIndex, count } = result.data

  // 获取粉丝
  const fansResult = await getFans(userId)
  const { fansCount, fansList } = fansResult.data

  // 获取关注人列表
  const followersResult = await getFollowers(userId)
  const { count: followersCount, followersList } = followersResult.data

  await ctx.render('index', {
    userData: {
      userInfo,
      fansData: {
        count: fansCount,
        list: fansList
      },
      followersData: {
        count: followersCount,
        list: followersList
      }
    },
    blogData: { isEmpty, blogList, pageSize, pageIndex, count }
  })
})
2
3
4
5
6
7
8
9
10
11
12
13
14
15
16
17
18
19
20
21
22
23
24
25
26
27
28
29
30
31
32
src/controller/blog-home.js:
/**
 * 获取首页微博列表
 * @param {number} userId userId
 * @param {number} pageIndex page index
 */
const getHomeBlogList = async (userId, pageIndex = 0) => {
  const result = await getFollowersBlogList({ userId, pageIndex, pageSize: PAGE_SIZE })
  const { count, blogList } = result
  // 返回数据
  return new SuccessModel({
    isEmpty: blogList.length === 0,
    blogList,
    pageSize: PAGE_SIZE,
    pageIndex,
    count
  })
}
2
3
4
5
6
7
8
9
10
11
12
13
14
15
16
17
src/service/blog.js:
/**
 * 获取关注者的微博列表(首页)
 * @param {Object} param0 查询条件 { userId, pageIndex = 0, pageSize = 10 }
 */
const getFollowersBlogList = async ({ userId, pageIndex = 0, pageSize = 10 }) => {
  const result = await Blog.findAndCountAll({
    limit: pageSize, // 每页多少条
    offset: pageSize * pageIndex, // 跳过多少条
    order: [
      ['id', 'desc']
    ],
    include: [
      {
        model: User,
        attributes: ['userName', 'nickName', 'picture']
      },
      {
        model: UserRelation,
        attributes: ['userId', 'followerId'],
        where: { userId }
      }
    ]
  })

  // 格式化数据
  let blogList = result.rows.map(row => row.toJSON())
  blogList = formatBlog(blogList)
  blogList = blogList.map(blogItem => {
    blogItem.user = formatUser(blogItem.user)
    return blogItem
  })

  return {
    count: result.count,
    blogList
  }
}
2
3
4
5
6
7
8
9
10
11
12
13
14
15
16
17
18
19
20
21
22
23
24
25
26
27
28
29
30
31
32
33
34
35
36
37
12.4 加载更多
src/routes/api/blog-home.js:
// 加载更多
router.get('/loadMore/:pageIndex', loginCheck, async (ctx, next) => {
  let { pageIndex } = ctx.params
  pageIndex = parseInt(pageIndex)
  const { id: userId } = ctx.session.userInfo
  const result = await getHomeBlogList(userId, pageIndex)
  // 渲染为 html 字符串
  result.data.blogListTpl = getBlogListStr(result.data.blogList)
  ctx.body = result
})
2
3
4
5
6
7
8
9
10
12.5 单元测试
test/blog/home.test.js:
// 加载第一页数据
test('首页,加载第一页数据', async () => {
  const res = await server
    .get('/api/blog/loadMore/0')
    .set('Cookie', Z_COOKIE)
  expect(res.body.errno).toBe(0)
  const data = res.body.data
  expect(data).toHaveProperty('isEmpty')
  expect(data).toHaveProperty('blogList')
  expect(data).toHaveProperty('pageSize')
  expect(data).toHaveProperty('pageIndex')
  expect(data).toHaveProperty('count')
})
2
3
4
5
6
7
8
9
10
11
12
13
13.回复 & @功能
13.1 开始和显示 @
src/routes/api/user.js:
// 获取 at 列表,即关注人列表
router.get('/getAtList', loginCheck, async (ctx, next) => {
  const { id: userId } = ctx.session.userInfo
  const result = await getFollowers(userId)
  const { followersList } = result.data
  const list = followersList.map(user => {
    return `${user.nickName} - ${user.userName}`
  })
  // 格式如:['张三 - zhangsan', '李四 - lisi', '昵称 - userName']
  ctx.body = list
})
2
3
4
5
6
7
8
9
10
11
13.2 at 用户转为链接格式
src/service/_format.js:
/**
 * 格式化微博内容
 * @param {Object} obj 微博数据对象
 */
const _formatContent = (obj) => {
  obj.contentFormat = obj.content

  // 格式化 @: '哈喽 @张三 - zhangsan 你好'
  // '哈喽 <a href="/profile/zhangsan">张三</a> 你好'
  obj.contentFormat = obj.contentFormat.replace(
    REG_FOR_AT_WHO,
    (matchStr, nickName, userName) => {
      return `<a href="/profile/${userName}">@${nickName}</a>`
    }
  )

  return obj
}

/**
 * 格式化微博信息
 * @param {Array|Object} list 微博列表或者单个微博对象
 */
const formatBlog = (list) => {
  if (list == null) return list
  if (list instanceof Array) {
    // 数组
    return list.map(_formatDBTime).map(_formatContent)
  }
  // 对象
  let result = list
  result =  _formatDBTime(result)
  result = _formatContent(result)
  return result
}
2
3
4
5
6
7
8
9
10
11
12
13
14
15
16
17
18
19
20
21
22
23
24
25
26
27
28
29
30
31
32
33
34
35
13.3 实现回复功能
src/views/widgets/blog-list.ejs:
$(function () {
  // 设置焦点
  function setCursor(el, st, end) {
    if (el.setSelectionRange) {
      el.focus()
      el.setSelectionRange(st, end)
    } else if (el.createTextRange) {
      var range = el.createTextRange()
      range.collapse(true)
      range.moveEnd('character',end)
      range.moveStart('character',st)
      range.select()
    }
  }

  // 回复
  var $textContent = $('#text-content')
  $('.blog-list-reply').click(function (e) {
    e.preventDefault()
    var $target = $(e.target)

    // 获取内容和用户
    var content = $target.attr('data-content')
    var userName = $target.attr('data-userName')
    var nickName = $target.attr('data-nickName')

    // 设置内容并获取焦点
    $textContent.val(' // @' + nickName + ' - ' + userName + ' : ' + content)
    setCursor($textContent[0], 0, 0)
  })
})
2
3
4
5
6
7
8
9
10
11
12
13
14
15
16
17
18
19
20
21
22
23
24
25
26
27
28
29
30
31
13.4 单元测试
test/user/relation.test.js:
// 获取 at 列表
test('获取张三的 at 列表,应该有李四', async () => {
  const res = await server
    .get('/api/user/getAtList')
    .set('Cookie', Z_COOKIE)
  const atList = res.body
  const hasUserName = atList.some(item => {
    // '昵称 - userName'
    return item.indexOf(`- ${L_USER_NAME}`) > 0
  })
  expect(hasUserName).toBe(true)
})
2
3
4
5
6
7
8
9
10
11
12
14.at 提到自己和已读等
14.1 数据建模
src/db/model/AtRelation.js:
/**
 * @description 微博 @ 用户的关系,数据模型
 * @author yuanke
 */

const seq = require('../seq')
const { INTEGER, BOOLEAN } = require('../types')

const AtRelation = seq.define('atRelation', {
  userId: {
    type: INTEGER,
    allowNull: false,
    comment: '用户 id'
  },
  blogId: {
    type: INTEGER,
    allowNull: false,
    comment: '微博 id'
  },
  isRead: {
    type: BOOLEAN,
    allowNull: false,
    defaultValue: false, // 默认未读
    comment: '是否已读'
  }
})

module.exports = AtRelation
2
3
4
5
6
7
8
9
10
11
12
13
14
15
16
17
18
19
20
21
22
23
24
25
26
27
28
src/db/model/index.js:
Blog.hasMany(AtRelation, {
  foreignKey: 'blogId'
})
2
3
14.2 分析 at 关系并存储
src/controller/blog-home.js:
/**
 * 创建微博
 * @param {Object} param0 创建微博所需的数据 { userId, content, image }
 */
const create = async ({ userId, content, image }) => {
  // 分析并收集 content 中的 @ 用户
  // content 格式如 '哈喽 @李四 - lisi 你好 @王五 - wangwu'
  const atUserNameList = []
  content = content.replace(
    REG_FOR_AT_WHO,
    (matchStr, nickName, userName) => {
      // 目的不是 replace 而是获取 userName
      atUserNameList.push(userName)
      return matchStr // 替换不生效,预期
    }
  )

  // 根据 @ 用户名查询用户信息
  const atUserList = await Promise.all(
    atUserNameList.map(userName => getUserInfo(userName))
  )
  // 根据用户信息,获取用户 id
  const atUserIdList = atUserList.map(user => user.id)

  try {
    // 创建微博
    const blog = await createBlog({
      userId,
      content: xss(content),
      image
    })

    // 创建 @ 关系
    // blog.id
    await Promise.all(atUserIdList.map(userId => createAtRelation(blog.id, userId)))

    return new SuccessModel(blog)
  } catch (ex) {
    console.error(ex.message, ex.stack)
    return new ErrorModel(createBlogFailInfo)
  }
}
2
3
4
5
6
7
8
9
10
11
12
13
14
15
16
17
18
19
20
21
22
23
24
25
26
27
28
29
30
31
32
33
34
35
36
37
38
39
40
41
42
src/service/at-relation.js:
/**
 * @description 微博 @ 用户关系 service
 * @author yuanke
 */

const { AtRelation } = require('../db/model/index')

/**
 * 创建微博 @ 用户的关系
 * @params {number} blogId 微博 id
 * @params {number} userId 用户 id
 */
const createAtRelation = async (blogId, userId) => {
  const result = await AtRelation.create({
    blogId,
    userId
  })
  return result.toJSON()
}

module.exports = {
  createAtRelation
}
2
3
4
5
6
7
8
9
10
11
12
13
14
15
16
17
18
19
20
21
22
23
14.3 显示 at 数量
route 层和 controller 层就不写了
src/service/at-relation.js:
/**
 * 获取 @ 用户的微博数量(未读的)
 * @param {number} userId userId
 */
const getAtRelationCount = async (userId) => {
  const result = await AtRelation.findAndCountAll({
    where: {
      userId,
      isRead: false
    }
  })
  return result.count
}
2
3
4
5
6
7
8
9
10
11
12
13
14.4 开发 at 页面
src/service/at-relation.js:
/**
 * 获取 @ 用户的微博列表 { userId, pageIndex, pageSize = 10 }
 * @param {Object} param0 查询条件
 */
const getAtUserBlogList = async ({ userId, pageIndex, pageSize = 10 }) => {
  const result = await Blog.findAndCountAll({
    limit: pageSize,
    offset: pageSize * pageIndex,
    order: [
      ['id', 'desc']
    ],
    include: [
      // @ 关系
      {
        model: AtRelation,
        attributes: ['userId', 'blogId'],
        where: { userId }
      },
      // User
      {
        model: User,
        attributes: ['userName', 'nickName', 'picture']
      }
    ]
  })

  // 格式化
  let blogList = result.rows.map(row => row.toJSON())
  blogList = formatBlog(blogList)
  blogList = blogList.map(blogItem => {
    blogItem.user = formatUser(blogItem.user)
    return blogItem
  })
  return {
    count: result.count,
    blogList
  }
}
2
3
4
5
6
7
8
9
10
11
12
13
14
15
16
17
18
19
20
21
22
23
24
25
26
27
28
29
30
31
32
33
34
35
36
37
38
14.5 标记为已读
src/routes/view/blog.js:
// atMe 路由
router.get('/at-me', loginRedirect, async (ctx, next) => {
  const { id: userId } = ctx.session.userInfo

  // 获取 @ 数量
  const atCountResult = await getAtMeCount(userId)
  const { count: atCount } = atCountResult.data

  // 获取第一页列表
  const result = await getAtMeBlogList(userId)
  const { isEmpty, blogList, pageSize, pageIndex, count } = result.data

  // 渲染页面
  await ctx.render('atMe', {
    atCount,
    blogData: { isEmpty, blogList, pageSize, pageIndex, count }
  })

  // 标记为已读
  if (atCount > 0) {
    await markAsRead(userId)
  }
})
2
3
4
5
6
7
8
9
10
11
12
13
14
15
16
17
18
19
20
21
22
23
src/controller/blog-at.js:
/**
 * 标记为已读
 * @param {number} userId userId
 */
const markAsRead = async (userId) => {
  try {
    await updateAtRelation(
      { newIsRead: true },
      { userId, isRead: false }
    )
  } catch (ex) {
    console.error(ex);
  }
  // 不需要返回 SuccessfulModel 和 ErrorModel
}
2
3
4
5
6
7
8
9
10
11
12
13
14
15
src/service/at-relation.js:
/**
 * 更新 AtRelation
 * @params {Object} params0 更新内容
 * @params {Object} params1 查询条件
 */
const updateAtRelation = async (
  { newIsRead }, // 要更新的内容
  { userId, isRead } // 条件
) => {
  // 拼接更新内容
  const updateData = {}
  if (newIsRead) {
    updateData.isRead = newIsRead
  }
  // 拼接查询条件
  const whereData = {}
  if (userId) {
    whereData.userId = userId
  }
  if (isRead) {
    whereData.isRead = isRead
  }
  // 执行更新
  const result = await AtRelation.update(updateData, {
    where: whereData
  })
  return result[0] > 0
}
2
3
4
5
6
7
8
9
10
11
12
13
14
15
16
17
18
19
20
21
22
23
24
25
26
27
28
14.6 单元测试
test/blog/at.test.js:
/**
 * @description 微博 @ 关系 test
 * @author yuanke
 */

const server = require('../server')
const {
  Z_COOKIE,
  L_COOKIE,
  L_USER_NAME
} = require('../testUserInfo')

let BLOG_ID

test('张三创建一条微博,@李四,应该成功', async () => {
  const content = '单元测试自动创建的微博 @李四 - ' + L_USER_NAME
  const res = await server
    .post('/api/blog/create')
    .send({
      content
    })
    .set('Cookie', Z_COOKIE)
  expect(res.body.errno).toBe(0)

  // 记录微博 id
  BLOG_ID = res.body.data.id
})

test('获取李四的 @ 列表(第一页),应该有刚刚创建的微博', async () => {
  const res = await server
    .get('/api/atMe/loadMore/0') // 列表是倒序排列的
    .set('Cookie', L_COOKIE)
  expect(res.body.errno).toBe(0)
  const data = res.body.data
  const blogList = data.blogList
  const isHaveCurBlog = blogList.some(blog => blog.id === BLOG_ID)
  expect(isHaveCurBlog).toBe(true)
})
2
3
4
5
6
7
8
9
10
11
12
13
14
15
16
17
18
19
20
21
22
23
24
25
26
27
28
29
30
31
32
33
34
35
36
37
38
15.上线
15.1 pm2 常用命令
常用命令:
pm2 start xxx:启动 pm2 服务pm2 list:查看 pm2 进程列表pm2 restart <AppName>/<id>:手动重启pm2 stop <AppName>/<id>、pm2 delete <AppName>/<id>:第一个是停止服务,第二个是删除服务pm2 info <AppName>/<id>:查看进程基本信息pm2 log <AppName>/<id>:查看日志打印pm2 monit <AppName>/<id>:监控进程内存、CPU 信息
15.2 pm2 配置项
- 配置服务信息
- 配置进程数量
- 配置日志目录
package.json:
"prd": "cross-env NODE_ENV=production pm2 start pm2.conf.json"
pm2.conf.json:
{
  "apps": {
    "name": "weibo",
    "script": "bin/www",
    "watch": true,
    "ignore_watch": [
      "node_modules",
      "logs",
      "uploadFiles"
    ],
    "instances": 4,
    "error_file": "./logs/err.log",
    "out_file": "./logs/out.log",
    "log_date_format": "YYYY-MM-DD HH:mm:ss"
  }
}
2
3
4
5
6
7
8
9
10
11
12
13
14
15
16
15.3 多进程
为什么使用多进程:
操作系统会限制一个进程的内存
内存:无法充分利用机器全部内存
CPU:无法充分利用多核 CPU 的优势
pm2.conf.json:
"instances": 6
15.4 nginx
简介:
- 高性能的 web 服务器,开源免费
- 一般用于做静态服务、负载均衡(本课没用到)
- 反向代理(本课用到)
- 在 http://localhost:8000/api/blog/list 拥有博客数据,在 http://localhost:8001/ 拥有博客首页的数据,若要整合二者到 http://localhost:8080/ 端口,就需要进行反向代理
nginx 命令:
未配置 path,故在 nginx 文件夹中使用以下命令
- 测试配置文件格式是否正确:
./nginx -t - 启动 nginx:
start ./nginx - 重启:
./nginx -s reload - 停止:
./nginx -s stop
nginx.conf:
# 分配 cpu 内核
worker_processes 2;

http {
    include       mime.types;
    default_type  application/octet-stream;
    sendfile        on;
    keepalive_timeout  65;
    server {
        listen       8080;
        server_name  localhost;

        # 写了这里
        location / {
            proxy_pass http://localhost:8001;
        }
        location /api/ {
            proxy_pass http://localhost:8000;
            proxy_set_header Host $host;
        }

        error_page   500 502 503 504  /50x.html;
        location = /50x.html {
            root   html;
        }
    }
}
2
3
4
5
6
7
8
9
10
11
12
13
14
15
16
17
18
19
20
21
22
23
24
25
26
27
总结:当设置好代理之后,在请求接口时不需要 baseUrl 只需要写类似于 /api/blog/list,就可以反向代理。请求接口有 /api/ 时,都会去 http://localhost:8000/api/ 中去寻找内容;请求接口为 / 时,就回去 http://localhost:8001 去寻找内容
在 http {} 中,有 log_format 和 access_log 选项,前者和后者都是注释状态的,可以将它们解开。其中,access_log 的内容可以写上自定义的路径,例如 koa2-weibo-code/logs/access.log