面试题
0.面试实战
0.1 顺丰
es6 为什么越来越少用了?
- es6 引入了 let 和 const 关键字,可以声明块级作用域的变量,避免了 var 的变量提升和全局污染的问题,使得闭包的应用场景减少了。
- es6 提供了箭头函数,可以继承外层函数的 this 值,不需要使用 bind 或者 self 等方式来保存 this
- es6 支持了模块化,可以通过 import 和 export 来导入和导出模块中的变量或函数,不需要使用闭包来实现私有化或封装
flex: 1 的解释?
flex-grow、flex-shrink、flex-basis 分别为 0、1、auto,分别为项目的放大比例、项目的缩小比例、项目的基准宽度
箭头函数和普通函数的区别?
- 箭头函数更简洁,可省略参数的括号、函数体的大括号等
- 无自己的 this,继承所处上下文的 this,无法通过 call、bind、apply 等方式改变
- 箭头函数无法作为构造函数,不能用 new 生成实例,因为它没有 prototype 属性
- 无 argument,只能用剩余参数传入所有参数
为什么使用虚拟节点?
- 虚拟节点为对象,能描述 dom 节点
- 虚拟节点用 createElement 渲染成 dom 节点,而且通过 patch 方法对比新旧节点差异,并更新视图
- 虚拟节点可以减少 dom 操作,提升性能
路由导航?
- 全局导航守卫:
- 全局前置守卫:beforeEach
- 全局解析守卫:beforeResolve
- 全局后置守卫:afterEach
- 路由独享的守卫:beforeEnter
- 组件内的守卫:
- beforeRouteEnter
- beforeRouteUpdate
- beforeRouteLeave
vuex 作用?
- Vuex 的状态是响应式的,当组件从 Vuex 中获取状态时,如果状态发生变化,组件会自动更新;
- Vuex 可以通过定义和分隔不同类型的状态和操作来实现结构化和模块化的代码;
- Vuex 可以通过插件来实现数据持久化、日志记录、调试等功能。
设计登录注册功能,前端、后端、ui、产品都要做什么?
- 前端:前端需要负责创建登录和注册的表单页面,以及验证用户的输入是否合法和安全。前端还需要通过 Ajax 或者 Fetch 等技术与后端进行数据交互,以及处理用户的登录状态和权限。
- 后端:后端需要负责接收和处理前端发送的请求,以及与数据库进行数据存储和查询。后端还需要实现一些安全机制,如密码加密、令牌生成、身份验证等。
- UI:UI 需要负责设计登录和注册的界面风格和布局,以及提供一些用户友好的提示和反馈。UI 还需要考虑不同设备和浏览器的兼容性和适配性。
- 产品:产品需要负责定义登录和注册的功能需求和目标,以及分析用户的行为和喜好。产品还需要制定一些测试方案和评估指标,以及收集用户的反馈和建议。
es6 的新东西?
- 块级作用域变量如 let、const,避免变量提升和全局污染问题
- 新的循环语法如 for in 和 for of,前者能遍历数组的 key 和数组的索引,后者能遍历数组和对象的 value
- 模板字符串
- 新的 class
- 箭头函数
- promise、async、await
- 解构赋值
- 模块
- 新的数据类型:BigInt、Symbol、Map、Set、WeakMap、WeakSet
- 新的对象数组方法:
- Object.assign():该方法可以将一个或多个源对象的可枚举属性复制到目标对象,并返回目标对象。
- Object.is():该方法可以判断两个值是否相同,它和===运算符类似,但是对于 NaN 和+0/-0 有不同的处理方式。
- Array.from():该方法可以从一个类数组或可迭代对象创建一个新的数组实例。
- Array.of():该方法可以根据一组参数创建一个新的数组实例,而不考虑参数的数量或类型。
- Array.find():该方法可以返回数组中满足提供的测试函数的第一个元素的值,否则返回 undefined。
- Array.findIndex():该方法可以返回数组中满足提供的测试函数的第一个元素的索引,否则返回-1。
- Array.includes():该方法可以判断一个数组是否包含一个指定的值,返回 true 或 false。
- Object.entries():该方法可以返回一个给定对象自身可枚举属性的键值对数组。
- Object.values():该方法可以返回一个给定对象自身可枚举属性的值的数组。
- Array.fill():该方法可以用一个固定值填充一个数组中从起始索引到终止索引内的全部元素。
- Array.copyWithin():该方法可以在数组内部复制一段元素到另一段位置,并返回修改后的数组。
- Array.flat():该方法可以创建一个新数组,其中所有子数组元素递归地连接到指定深度。
- Array.flatMap():该方法可以先对数组中的每个元素执行一个函数,然后将结果连接成一个新数组
权限管理如何实现?
使用路由守卫(router guards)来控制用户访问不同的页面,根据用户的角色或权限来决定是否允许进入某个路由。
使用自定义指令(custom directives)来控制用户操作不同的元素,根据用户的角色或权限来决定是否显示或禁用某个按钮或链接。
使用动态组件(dynamic components)来控制用户查看不同的内容,根据用户的角色或权限来决定渲染哪个组件。
使用路由守卫实现页面级别的权限控制:在定义路由时,可以给每个路由添加一个 meta 属性,用来存储该路由所需的角色或权限。然后,在全局前置守卫(beforeEach)中,可以获取用户的角色或权限,并与目标路由的 meta 属性进行比较,如果匹配则放行,否则跳转到错误页面或登录页面。
使用自定义指令实现元素级别的权限控制:在创建 Vue 实例时,可以注册一个全局自定义指令(v-permission),用来绑定用户的角色或权限。然后,在模板中,可以给需要控制的元素添加该指令,并传入一个参数,表示该元素所需的角色或权限。在指令的钩子函数中,可以获取用户和元素的角色或权限,并进行比较,如果匹配则显示元素,否则隐藏或禁用元素。
使用动态组件实现内容级别的权限控制:在模板中,可以使用
<component>标签来渲染一个动态组件,并使用 is 属性来绑定一个变量,表示要渲染的组件名。然后,在数据或计算属性中,可以根据用户的角色或权限来动态地改变该变量的值,从而渲染不同的组件。
1.HTML、CSS 专题
1.1 html 面试题
如何理解 HTML 语义化?
让人更容易读懂(增加代码可读性)
让搜索引擎更容易读懂(SEO)
默认情况下,哪些 HTML 标签是块级元素、哪些是内联元素?
- 块级元素:div、h1、h2、table、ul、ol、p 等
- 内联元素:span、img、input、button 等
1.2 css 面试题
盒子模型的宽度如何计算?
- offsetWidth = (内容宽度 + 内边距 + 边框),无外边距
- clientWidth = (内容宽度 + 内边距),无外边距和边框,可视区域
- offsetWidth = (内容宽度 + 内边距),无外边距和边框
- 如果改成
box-border,那么 width 包括内容宽度、内边距和边框了
margin 纵向重叠问题
- 相邻元素的 margin-top 和 margin-bottom 会发生重叠,取较大值
- 空白内容也会重叠,高度为 0
margin 负值的问题
- margin-top 和 margin-left 负值,元素向上、向左移动
- margin-right 负值,右侧元素左移,自身不受影响
- margin-bottom 负值,下方元素上移,自身不受影响
BFC 理解
Block format context,块级格式化上下文
一块独立渲染区域,内部元素的渲染不会影响边界以外的元素
形成 BFC 的常见条件:
- float 不是 none
- position 是 absolute 或 fixed
- overflow 不是 visible
- display 是 flex inline-block 等
既解决外边距重叠,又解决塌陷问题(以后直接在需要的元素的类上加上 clearfix 就好):
.clearfix::before,
.clearfix::after {
  content: '';
  display: table;
  clear: both;
}
1
2
3
4
5
6
absolute 和 relative 定位
- relative 依据自身定位
- absolute 依据最近一层的定位元素(absolute、relative、fixed 或者 body)定位
居中对齐的实现方式
- 水平居中
- inline 元素:
text-align: center; - block 元素:
margin: auto; - absolute 元素:
left: 50% + margin-left 负值
- inline 元素:
- 垂直居中
- inline 元素: line-height 的值等于 height 值
- absolute 元素:
top: 50% + margin-top 负值 - absolute 元素:
top: 50% + transform:translate(-50%, -50%) - absolute 元素:
top,left,bottom,right = 0 + margin: auto
- 水平居中
CSS - 图文样式
- line-height 如何继承
- 具体数值,如 30px,则继承该值
- 继承比例,如 2 / 1.5
- 百分比,如 200%,则继承计算出来的值,例如 body 里写
font-size: 20px; line-height: 200%;,p 标签里写font-size: 16px;,则 p 标签的 line-height 为 20px * 200% = 40px
- line-height 如何继承
CSS - 响应式
px,绝对长度单位,最常用
em,相对长度单位,相对于父元素,不常用
rem,相对长度单位,相对于根元素,常用于响应式布局,在
html {font-size: 100px;}之后,1rem = 100px.- media-query,根据不同的屏幕宽度设置根元素 font-size
@media only screen and (max-width: 374px) {
  /* iphone5 或者更小的尺寸,以 iphone5 的宽度(320px) 比例设置 font-size */
  html {
    font-size: 86px;
  }
}
@media only screen and (min-width: 375px) and (max-width: 413px) {
  /* iphone6/7/8 和 iphonex */
  html {
    font-size: 100px;
  }
}
@media only screen and (min-width: 414px) {
  /* iphone 6p 或者更大的尺寸,以 iphone6p 的宽度(414px)比例设置 font-size */
  html {
    font-size: 110px;
  }
}

body {
  font-size: 0.16rem;
}
1
2
3
4
5
6
7
8
9
10
11
12
13
14
15
16
17
18
19
20
21
22vw / vh
- rem 的弊端: 具有"阶梯"性
- 网页视口尺寸:
window.screen.height: 屏幕高度,包括导航栏和状态栏window.innerHeight: 网页视口高度,不包括导航栏和状态栏document.body.clientHeight: body 高度
- vh: 网页视口高度的 1/100,vw: 网页视口宽度的 1/100,vmax 取两者最大值;vmin 取两者最小值
1.3 圣杯布局和双飞翼布局
目的:三栏布局,中间一栏最先加载和渲染(内容最重要),两侧内容固定,中间内容随着宽度自适应
两个布局技术总结:
- 使用 float 布局
- 两侧使用 margin 负值,以便和中间内容横向重叠
- 防止中间内容被两侧覆盖,一个用 padding,一个用 margin
圣杯布局:
<!DOCTYPE html>
<html lang="en">
  <head>
    <meta charset="UTF-8" />
    <meta http-equiv="X-UA-Compatible" content="IE=edge" />
    <meta name="viewport" content="width=device-width, initial-scale=1.0" />
    <title>Document</title>
    <style>
      body {
        min-width: 550px;
      }
      #container {
        padding-left: 200px;
        padding-right: 150px;
      }
      #container .column {
        float: left;
      }
      #header {
        text-align: center;
        background-color: #f1f1f1;
      }
      #center {
        background-color: #ccc;
        width: 100%;
      }
      #left {
        position: relative;
        background-color: yellow;
        width: 200px;
        margin-left: -100%;
        right: 200px;
      }
      #right {
        background-color: red;
        width: 150px;
        margin-right: -150px;
      }
      #footer {
        clear: both;
        text-align: center;
        background-color: #f1f1f1;
      }
    </style>
  </head>
  <body>
    <div id="header">this is header</div>
    <div id="container">
      <div id="center" class="column">this is center</div>
      <div id="left" class="column">this is left</div>
      <div id="right" class="column">this is right</div>
    </div>
    <div id="footer">this is footer</div>
  </body>
</html>
2
3
4
5
6
7
8
9
10
11
12
13
14
15
16
17
18
19
20
21
22
23
24
25
26
27
28
29
30
31
32
33
34
35
36
37
38
39
40
41
42
43
44
45
46
47
48
49
50
51
52
53
54
55
双飞翼布局:
<!DOCTYPE html>
<html lang="en">
  <head>
    <meta charset="UTF-8" />
    <meta http-equiv="X-UA-Compatible" content="IE=edge" />
    <meta name="viewport" content="width=device-width, initial-scale=1.0" />
    <title>Document</title>
    <style>
      body {
        min-width: 550px;
      }
      .col {
        float: left;
      }
      #main {
        width: 100%;
        height: 200px;
        background-color: #ccc;
      }
      #main-wrap {
        margin: 0 190px 0 190px;
      }
      #left {
        width: 190px;
        height: 200px;
        background-color: #0000ff;
        margin-left: -100%;
      }
      #right {
        width: 190px;
        height: 200px;
        background-color: #ff0000;
        margin-left: -190px;
      }
    </style>
  </head>
  <body>
    <div id="main" class="col">
      <div id="main-wrap">this is main</div>
    </div>
    <div id="left" class="col">this is left</div>
    <div id="right" class="col">this is right</div>
  </body>
</html>
2
3
4
5
6
7
8
9
10
11
12
13
14
15
16
17
18
19
20
21
22
23
24
25
26
27
28
29
30
31
32
33
34
35
36
37
38
39
40
41
42
43
44
2.JavaScript
2.1 JS 值类型和引用类型的区别
- 值类型存在栈中
- 引用类型: 栈中的 key 是变量,value 是地址; 在堆中地址是 key,而对象(或数组)存在 value 中
- null 是特殊引用类型,指针指向为空地址; 函数也是特殊引用类型,但不用于存储数据,所以没有“拷贝、复制函数”这一说法
2.2 手写 JS 深拷贝
typeof 运算符:
- 识别所有值类型
- 识别函数
- 判断是否是引用类型(不可再细分)
深拷贝:
/**
 * 深拷贝
 * @param {Object} obj 要拷贝的对象
 */
function deepClone(obj = {}) {
  if (typeof obj !== 'object' || obj == null) {
    // obj 是 null,或者不是对象和数组,直接返回
    return obj
  }

  // 初始化返回结果
  let result
  if (obj instanceof Array) {
    result = []
  } else {
    result = {}
  }

  for (let key in obj) {
    // 保证 key 不是原型的属性
    if (obj.hasOwnProperty(key)) {
      result[key] = deepClone(obj[key])
    }
  }

  // 返回结果
  return result
}
2
3
4
5
6
7
8
9
10
11
12
13
14
15
16
17
18
19
20
21
22
23
24
25
26
27
28
2.3 变量计算 - 类型转换
== 和 ===:
- == 由于会尽量发生类型转换,导致
100 == '100'; 0 == false; false == ''; null == undefined这样的等式返回都是 true,所以只有判断xxx === null || xxx === undefined的情况下,用xx == null代替
truely 变量和 falsely 变量:(if 语句判断的就是 truely 变量或者 falsely 变量)
// 下面是 falsely 变量,除此之外都是 truely 变量(包括 {})
!!0 === false
!!NaN === false
!!'' === false
!!null === false
!!undefined === false
!!false === false
2
3
4
5
6
7
所以
if ({}) {xxx}仍会执行 xxx 内容
2.4 class 实现继承
建立一个 People 父类,Student 类继承该父类,yuanke、xialuo 是上述二类的实例化
instanceof:
xialuo instanceof Student // true
xialuo instanceof People // true
xialuo instanceof Object // true

[] instanceof Array // true
[] instanceof Object // true
{} instanceof Array // false

{} instanceof Object // true
2
3
4
5
6
7
8
9
原型:
每个构造函数(class 类)都有显式原型,每个实例都有隐形原型
typeof yuanke // function
typeof xiaoming // function

// 隐式原型 __proto__ 显式原型 prototype
console.log(xialuo.__proto__)
console.log(Student.prototype)
2
3
4
5
6
所以,基于原型的执行规则如下:
- 获取属性 xialuo.name 或执行方法 xialuo.sayhi() 时
- 现在自身属性和方法寻找
- 如果找不到就自动去 ·
__proto__中查找
原型链:
console.log(Student.prototype.__proto__)
console.log(People.prototype)
console.log(People.prototype === Student.prototype.__proto__) // true
2
3
2.5 作用域、闭包
- 函数作用域
- 全局作用域
- 块级作用域
案例一(简单):
// 函数作为返回值
function create() {
  let a = 100
  return function () {
    console.log(a)
  }
}

const fn = create()
const a = 200
fn() // 100
2
3
4
5
6
7
8
9
10
11
案例二:
所有的自由变量的查找,是在函数定义的地方,向上级作用域查找,不是在执行的地方!
// 函数作为参数
function print(fn) {
  const a = 200
  fn()
}
const a = 100
function fn() {
  console.log(a)
}
print(fn) // 100
2
3
4
5
6
7
8
9
10
2.6 this 有几种赋值情况
this 取什么样的值,是在函数执行时确认的,而不是在函数定义时确认的(和闭包相反)
- 作为普通函数,返回 window 对象
- 使用 call、apply、bind,指向其指向的对象
- 作为对象方法被调用,指向对象
- 在 class 方法中调用,指向实例
- 箭头函数,指向上级作用域
实例:
function fn1() {
  console.log(this)
}
fn1() // window

fn1.call({ x: 100 }) // { x: 100 }

const fn2 = fn1.bind({ x: 100 }) // bind 会返回一个新的函数
fn2() // { x: 100 }

const zhangsan = {
  name: '张三',
  sayHi() {
    console.log(this) // this 即对象
  },
  wait() {
    // 箭头函数的 this 取的是上级作用域的值
    setTimeout(() => {
      console.log(this) // this 即当前对象.如果是 function 的话,this 即 window 对象
    })
  }
}

const zhangsan = {
  name: '张三',
  sayHi() {
    console.log(this)
  },
  wait() {
    setTimeout(
      function () {
        console.log(this)
      }.call(zhangsan)
    ) // zhangsan
  }
}
2
3
4
5
6
7
8
9
10
11
12
13
14
15
16
17
18
19
20
21
22
23
24
25
26
27
28
29
30
31
32
33
34
35
36
模拟 bind 和 apply:
// 模拟 bind
Function.prototype.bind1 = function () {
  // 将参数拆解为数组
  // // const args = Array.prototype.slice.call(arguments)
  const args = Array.from(arguments)
  // 获取 this (数组第一项)
  const t = args.shift()
  // fn1.bind(...) 中的 fn1
  const self = this
  // 返回一个函数
  return function () {
    return self.apply(t, args)
  }
}

// call 形式: fn1.apply(fn2, [1, 2, 3])
// 模拟 apply(利用 call)
Function.prototype.apply1 = function () {
  const self = this
  const args = Array.from(arguments)
  const t = args.shift()
  return function () {
    return self.call(t, ...args)
  }
}

function fn1([a, b]) {
  console.log('this', this)
  console.log(a, b)
  return 'this is fn1'
}

// const fn2 = fn1.bind({ x: 100 }, 10, 20)
// const res = fn2()
// console.log(res)

const fn2 = fn1.apply1({ x: 200 }, [1, 2])
const res = fn2()
console.log(res)
2
3
4
5
6
7
8
9
10
11
12
13
14
15
16
17
18
19
20
21
22
23
24
25
26
27
28
29
30
31
32
33
34
35
36
37
38
39
2.7 实际工作中闭包的应用
简易 cache:
// 闭包隐藏数据,只提供 api
function createCache() {
  const data = {} // 闭包中的数据,被隐藏,不被外界访问
  return {
    set(key, val) {
      data[key] = val
    },
    get(key) {
      return data[key]
    }
  }
}

const c = createCache()
c.set('a', 100)
console.log(c.get('a')) // 100
2
3
4
5
6
7
8
9
10
11
12
13
14
15
16
创建一个 1-10 的标签,点击 alert 对应数字:
因为 let i = 0,所以每次循环都会产生一个块级作用域,就不会出现 let i 在 for 循环之前声明导致的 for 循环跑完了后每个标签点击都是 10 的错误实现了
for (let i = 0; i < 10; i += 1) {
  const a = document.createElement('a')
  a.innerHTML = i + '<br>'
  a.addEventListener('click', function (e) {
    e.preventDefault()
    alert(i)
  })
  document.body.appendChild(a)
}
2
3
4
5
6
7
8
9
2.8 jQuery 简单实现
class jQuery {
  length: number
  selector: string
  dialog!: (info: any) => void;
  // 使用了一个索引签名,将索引类型设置为 number,并将索引值类型设置为 Element。现在,TypeScript 就知道 jQuery 对象可以像数组一样被索引,而索引值的类型是 Element
  [index: number]: HTMLElement
  constructor(selector: keyof HTMLElementTagNameMap) {
    this.selector = selector
    const result = document.querySelectorAll(selector)
    const length = result.length
    for (let i = 0; i < length; i += 1) {
      this[i] = result[i]
    }
    this.length = length
  }
  get(index: number) {
    return this[index]
  }
  each(fn: (e: HTMLElement) => void) {
    for (let i = 0; i < this.length; i += 1) {
      const elem = this[i]
      fn(elem)
    }
  }
  on(type: keyof HTMLElementEventMap, fn: EventListenerOrEventListenerObject) {
    return this.each(elem => {
      elem.addEventListener(type, fn, false)
    })
  }
}

const $p = new jQuery('p')

console.log($p.get(1))

$p.each(elem => {
  console.log(elem.nodeName)
})

$p.on('click', e => {
  console.log(`good ${e}`)
})

// 插件
jQuery.prototype.dialog = function (info: any) {
  alert(info)
}
$p.dialog('hahawoshishabi')

// 覆写
class myJQuery extends jQuery {
  constructor(selector: keyof HTMLElementTagNameMap) {
    super(selector)
  }
  // 拓展自己的方法
  addClass(className: string) {}
  // ...
}
2
3
4
5
6
7
8
9
10
11
12
13
14
15
16
17
18
19
20
21
22
23
24
25
26
27
28
29
30
31
32
33
34
35
36
37
38
39
40
41
42
43
44
45
46
47
48
49
50
51
52
53
54
55
56
57
58
3.异步
3.1 同步和异步
单线程和异步:
- JS 是单线程语言,只能同时做一件事
- 浏览器和 nodejs 已经支持 JS 启动进程,如 Web Worker
- JS 和 DOM 渲染共用同一个线程,因为 JS 可以修改 DOM 结构
异步和同步的区别:
- 基于 JS 是单线程语言
- 异步不会阻塞代码执行
- 同步会阻塞代码执行
3.2 异步应用场景
- 网络请求,如 ajax 图片加载
- 定时任务,如 setTimeout
一张一张加载图片:
function loadImg(src) {
  return new Promise((resolve, reject) => {
    const img = document.createElement('img')
    img.onload = () => {
      resolve(img)
    }
    img.onerror = () => {
      const err = new Error(`图片加载失败 ${src}`)
      reject(err)
    }
    img.src = src
  })
}

const url1 = 'https://v2.cn.vuejs.org/images/logo.svg'
const url2 = 'https://sponsors.vuejs.org/images/xitujuejinjishushequ.png'

loadImg(url1)
  .then(img1 => {
    img1.width = 100
    document.body.appendChild(img1)
    return loadImg(url2)
  })
  .then(img2 => {
    img2.width = 100
    document.body.appendChild(img2)
  })
  .catch(ex => console.error(ex))
2
3
4
5
6
7
8
9
10
11
12
13
14
15
16
17
18
19
20
21
22
23
24
25
26
27
28
4.异步进阶
4.0 面试答法
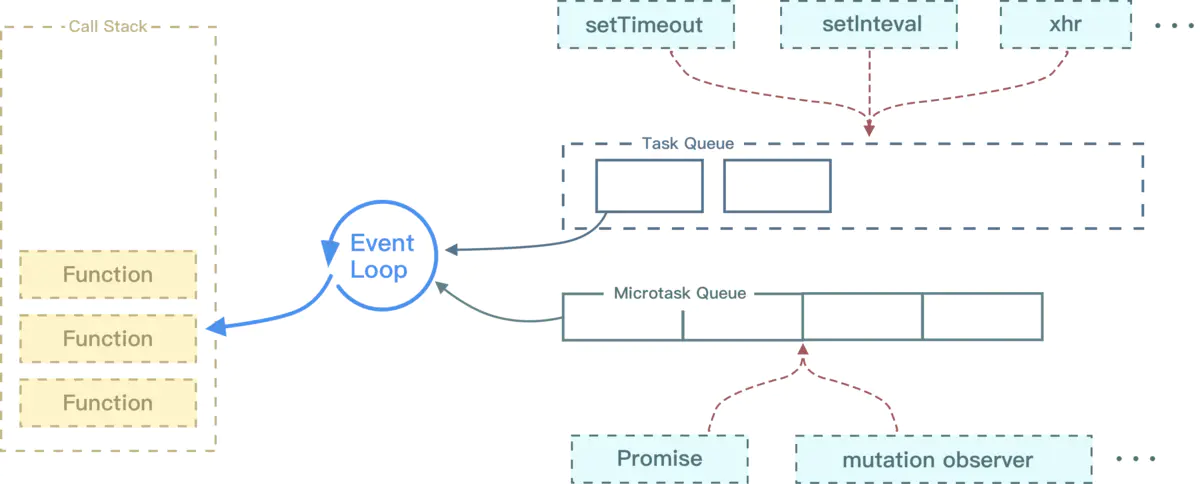
Event Loop 中,每一次循环称为 tick,每一次 tick 的任务如下:
- 执行栈选择最先进入队列的宏任务(一般都是 script),执行其同步代码直至结束;
- 检查是否存在微任务,有则会执行至微任务队列为空;
- 如果宿主为浏览器,可能会渲染页面;
- 开始下一轮 tick,执行宏任务中的异步代码(setTimeout 等回调)。
| 宏任务 | 微任务 | |
|---|---|---|
| 谁发起的 | 宿主(Node、浏览器) | JS 引擎 |
| 具体事件 | script(可以理解为外层同步代码)、setTimeout/setInterval、UI rendering/UI 事件/post Message,MessageChannel、IO(Node.js) | Promise、MutationObserver、Process.nextTick(Node.js) |
| 谁先执行 | 后运行 | 先运行 |
| 会触发新一轮 Tick 吗 | 会 | 不会 |
4.1 event loop
- JS 是单线程运行的
- 异步要基于回调来实现
- event loop 就是异步回调的实现原理
示例代码:
console.log('Hi')
setTimeout(function cb1() {
  console.log('cb1')
}, 5000)
console.log('end')
2
3
4
5
事件轮询步骤(共有 Browser console、call stack、web APIs、callback queue 四个区域)
- 第一行代码,是同步代码,会被推入 call stack 中去,执行完后打印再 browser console 中,然后弹出
- 第二行代码.会将 setTimeout 放在 call stack 中去,然后将 cb1 函数放在 web APIs 中去.然后 call stack 中的 setTimeout 执行完弹出
- 第三行,同第一行.完成后浏览器检测到 call stack 为空,自动开启事件轮询(event loop)
- 等待 5s 后,web APIs 中的 cb1 会进入 callback queue 中去.这时事件轮询检测到 callback queue 有值,立即将 cb1 放入 call stack 中去.这时,call stack 中有 cb1 函数和 console 语句.完成 console 打印后,call stack 中的两个语句也就弹出了
总结 event loop 过程
- 同步代码,一行一行放在 call stack 执行
- 遇到异步,会先"记录"下,等待时机(定时、网络请求等)
- 时机到了,就移动到 callback queue
- 如果 call stack 为空(即同步代码执行完),event loop 开始工作
- 轮询查找 callback queue,如有则移动到 call stack 执行
- 然后继续轮询查找(永动机一样)
当有 dom 操作时:dom 操作是基于 event loop,但不是异步
当
setTimeout(function cb1() { console.log('cb1') }, 5000)变成$('#btn1').click(function () { console.log('clicked') })时,其实和 setTimeout 一样,$('#btn1').click()是立即执行的,里面的内容放在 web apis 中
4.2 Promise 的三种状态
pending、resolved、rejected
- pending 状态,不会触发 then 和 catch
- resolved 状态,会触发后续的 then 回调函数
- rejected 状态,会触发后续的 catch 回调函数
- then 正常返回 resolved,里面有报错则返回 rejected
- catch 正常返回 resolved,里面有报错则返回 rejected
代码示例:
运行结果: 1 2 3
Promise.resolve()
  .then(() => {
    console.log(1)
    throw new Error('err1')
  })
  .catch(() => {
    console.log(2)
  })
  .then(() => {
    console.log(3)
  })
2
3
4
5
6
7
8
9
10
11
运行结果: 1 2
Promise.resolve()
  .then(() => {
    console.log(1)
    throw new Error('err1')
  })
  .catch(() => {
    // 返回 resolved 的 promise
    console.log(2)
  })
  .catch(() => {
    console.log(3)
  })
2
3
4
5
6
7
8
9
10
11
12
4.3 async await
- 执行 async 函数,返回的是 Promise 对象
- await 相当于 Promise 的 then
- try...catch 可捕获异常,代替了 Promise 的 catch
执行顺序练习:
const async1 = async () => {
  console.log('async1 start') // 2
  await async2() // undefined
  // await 的后面,都可以看做是 callback 里的内容,即异步
  console.log('async1 end') // 5,同步内容执行完毕,event loop 机制使 callback queue 里的这行代码推入 call stack 里去执行
}

const async2 = async () => {
  console.log('async2') // 3
}

console.log('script start') // 1
async1()
console.log('script end') // 4
2
3
4
5
6
7
8
9
10
11
12
13
14
4.4 宏任务 macroTask 和微任务 microTask
有哪些?
- 宏任务: setTimeout、setInterval、Ajax、DOM 事件
- 微任务: Promise async / await
- 微任务执行时机比宏任务要早
微任务和宏任务时机:
之前的 event loop 是不完善的,现在新增加一个概念: 当 call stack 空闲的时候,会先尝试 Dom 渲染,再进行触发 event loop!所以,每次事件轮询都会先渲染 Dom,然后再执行.
const container = document.querySelector('#container')
const p1 = '<p>一段文字</p>'
const p2 = '<p>一段文字</p>'
const p3 = '<p>一段文字</p>'
container.innerHTML = p1 + p2 + p3
console.log('length', container.children.length)
// alert 会阻断 js 执行,也会阻断 DOM 渲染,便于查看渲染
alert('本次 call stack 结束,DOM结构已更新,但尚未触发渲染')
2
3
4
5
6
7
8
- 宏任务: DOM 渲染后触发,如 setTimeout
- 微任务: DOM 渲染前触发,如 promise
const container = document.querySelector('#container')
const p1 = '<p>一段文字</p>'
const p2 = '<p>一段文字</p>'
const p3 = '<p>一段文字</p>'
container.innerHTML = p1 + p2 + p3
console.log('length', container.children.length)

// 微任务: DOM 渲染前触发
Promise.resolve().then(() => {
  console.log('length1', container.children.length)
  alert('Promise then') // DOM 渲染了吗 - 没有
})

// 宏任务: Dom 渲染后触发
setTimeout(() => {
  console.log('length2', container.children.length)
  alert('setTimeout') // DOM 渲染了吗 - 有
})
2
3
4
5
6
7
8
9
10
11
12
13
14
15
16
17
18
4.5 微任务和宏任务的根本区别
微任务在 call stack 后会移动至 micro task queue 而非 web apis 里面(不想 setTimeout 那样放到 web apis 中去)
为什么?
- 微任务是 ES6 语法规定的
- 宏任务是由浏览器规定的
真正的顺序:
- call stack 空闲
- 执行当前的微任务
- 尝试 DOM 渲染
- 执行宏任务
- 执行宏任务中产生的微任务
- 尝试 DOM 渲染
- 执行下一轮的宏任务
- ...
4.6 宏任务微任务练习
async function async1() {
  console.log('async1 start') // 2
  await async2()
  console.log('async1 end') // 微任务1 6
}

async function async2() {
  console.log('async2') // 3
}

console.log('script start') // 1

setTimeout(() => {
  console.log('setTimeout') // 宏任务1 8
}, 0)

async1()

new Promise(function (resolve) {
  console.log('promise1') // 4
  resolve()
}).then(function () {
  console.log('promise2') // 微任务2 7
})

console.log('script end') // 5
2
3
4
5
6
7
8
9
10
11
12
13
14
15
16
17
18
19
20
21
22
23
24
25
26
4.7 手写 Promise
实现功能:
- 初始化 & 异步调用
- then catch 链式调用
- API .resolve .reject .all .race
代码:
/**
 * @description MyPromise
 * @author yuanke
 */

class MyPromise {
  state = 'pending' // 状态 -> pending fulfilled rejected
  value = undefined // 成功后的值
  reason = undefined // 失败后的值

  resolveCallbacks = [] // pending 状态下,存储成功的回调
  rejectCallbacks = [] // pending 状态下,存储失败的回调

  constructor(fn) {
    const resolveHandler = value => {
      if (this.state === 'pending') {
        this.state = 'fulfilled'
        this.value = value
        this.resolveCallbacks.forEach(fn => fn(this.value))
      }
    }
    const rejectHandler = reason => {
      if (this.state === 'pending') {
        this.state = 'rejected'
        this.reason = reason
        this.rejectCallbacks.forEach(fn => fn(this.reason))
      }
    }
    try {
      fn(resolveHandler, rejectHandler)
    } catch (err) {
      rejectHandler(err)
    }
  }

  then(fn1, fn2) {
    // 当 pending 状态下,fn1 fn2 会被存储到 callbacks 中
    fn1 = typeof fn1 === 'function' ? fn1 : v => v
    fn2 = typeof fn2 === 'function' ? fn2 : e => e

    if (this.state === 'pending') {
      return new MyPromise((resolve, reject) => {
        this.resolveCallbacks.push(() => {
          try {
            const newValue = fn1(this.value)
            resolve(newValue)
          } catch (err) {
            reject(err)
          }
        })
        this.rejectCallbacks.push(() => {
          try {
            const newReason = fn2(this.reason)
            reject(newReason)
          } catch (err) {
            reject(err)
          }
        })
      })
    }
    if (this.state === 'fulfilled') {
      return new MyPromise((resolve, reject) => {
        try {
          const newValue = fn1(this.value)
          resolve(newValue)
        } catch (err) {
          reject(err)
        }
      })
    }
    if (this.state === 'rejected') {
      return new MyPromise((resolve, reject) => {
        try {
          const newReason = fn2(this.reason)
          reject(newReason)
        } catch (err) {
          reject(err)
        }
      })
    }
  }

  // 就是 then 的一个语法糖,简单模式
  catch(fn) {
    return this.then(null, fn)
  }
}

MyPromise.resolve = function (value) {
  return new MyPromise((resolve, reject) => resolve(value))
}
MyPromise.reject = function (reason) {
  return new MyPromise((resolve, reject) => reject(reason))
}
MyPromise.all = function (promiseList = []) {
  return new MyPromise((resolve, reject) => {
    const result = [] // 存储 promiseList 所有的结果
    const length = promiseList.length
    let resolvedCount = 0

    promiseList.forEach(p => {
      p.then(data => {
        result.push(data)

        // resolvedCount 必须在 then 里面做 ++
        // 不能用 index
        resolvedCount += 1
        if (resolvedCount === length) {
          // 已经遍历到最后一个 promise
          resolve(result)
        }
      }).catch(err => {
        reject(err)
      })
    })
  })
}
MyPromise.race = function (promiseList = []) {
  let resolved = false // 标记
  return new MyPromise((resolve, reject) => {
    promiseList.forEach(p => {
      p.then(data => {
        if (!resolve) {
          resolve(data)
          resolve = true
        }
      }).catch(err => {
        reject(err)
      })
    })
  })
}
2
3
4
5
6
7
8
9
10
11
12
13
14
15
16
17
18
19
20
21
22
23
24
25
26
27
28
29
30
31
32
33
34
35
36
37
38
39
40
41
42
43
44
45
46
47
48
49
50
51
52
53
54
55
56
57
58
59
60
61
62
63
64
65
66
67
68
69
70
71
72
73
74
75
76
77
78
79
80
81
82
83
84
85
86
87
88
89
90
91
92
93
94
95
96
97
98
99
100
101
102
103
104
105
106
107
108
109
110
111
112
113
114
115
116
117
118
119
120
121
122
123
124
125
126
127
128
129
130
131
132
5.JS-WEB-API
内容:
- DOM
- BOM
- 时间绑定
- ajax
- 存储
5.1 DOM 节点操作
DOM 的本质是一个树
- 获取 DOM 节点
- attribute
- property
示例代码:
const pList = document.querySelectorAll('p')
const p1 = pList[0]

// // property 形式(对 dom 元素的 js 变量进行修改)
// p1.style.width = '100px'
// console.log(p1.style.width) // 100px
// p1.className = 'red'
// console.log(p1.className) // red
// console.log(p1.nodeName)
// console.log(p1.nodeType) // 正常的 node 节点类型都是 1

// attribute(对 dom 元素的节点属性进行修改)
p1.setAttribute('data-name', 'imooc')
console.log(p1.getAttribute('data-name'))
p1.setAttribute('style', 'font-size: 50px;')
console.log(p1.getAttribute('style'))
2
3
4
5
6
7
8
9
10
11
12
13
14
15
16
- property: 修改对象属性,不会体现到 html 结构中,尽量用这个
- attribute: 修改 html 属性,会改变 html 结构
- 两者都有可能引起 DOM 重新渲染
5.2 DOM 结构操作
- 新增 / 插入节点
- 获取子元素列表,获取父元素
- 删除子元素
示例代码:
const div1 = document.getElementById('div1')
const div2 = document.getElementById('div2')

// 新建节点
const newP = document.createElement('p')
newP.innerHTML = 'this is newP'
// 插入节点
div1.appendChild(newP)

// 移动节点(对于现有节点使用 appendChild 会移动节点)
const p1 = document.getElementById('p1')
div2.appendChild(p1)

// 获取父元素
console.log(p1.parentNode)

// 获取子元素列表
const div1ChildNodes = div1.childNodes
console.log(div1ChildNodes)
const div1ChildNodesP = Array.from(div1.childNodes).filter(child => {
  // 普通节点的 nodeType 是 1,文本节点的 nodeType 是 3
  if (child.nodeType === 1) {
    return true
  }
  return false
})
console.log('div1ChildNodeP', div1ChildNodesP)

// 删除节点
div1.removeChild(div1ChildNodesP[0])
2
3
4
5
6
7
8
9
10
11
12
13
14
15
16
17
18
19
20
21
22
23
24
25
26
27
28
29
30
5.3 DOM 性能
- DOM 操作非常"昂贵",避免频繁的 DOM 操作
- 对 DOM 查询做缓存
- 将频繁操作改为一次性操作
DOM 查询做缓存:
// 不缓存 DOM 查询结果
for (let i = 0; i < document.getElementsByTagName('p').length; i += 1) {
  // 每次循环,都会计算 length,频繁进行 DOM 查询
}

// 缓存 DOM 查询结果
const pList = document.getElementsByTagName('p')
const length = pList.length
for (let i = 0; i < length; i += 1) {
  // 缓存 length,只进行一次 DOM 查
}
2
3
4
5
6
7
8
9
10
11
将频繁操作改为一次性操作:
const listNode = document.getElementById('list')

// 创建一个文档片段,此时还没有插入到 DOM 树中
const frag = document.createDocumentFragment()

// 执行插入
for (let x = 0; x < 10; x += 1) {
  const li = document.createElement('li')
  li.innerHTML = 'List item' + x
  frag.appendChild(li)
}

// 都完成后,再插入到 DOM 树中
listNode.appendChild(frag)
2
3
4
5
6
7
8
9
10
11
12
13
14
之前的设置 1-10 的 li,且点击后弹出其对应数字的示例优化:
// 渲染一个数字从 1-10 的 li 标签,且点击相应 li 时会弹出其对应数字.要考虑性能优化.

// 先创建一个文档片段,此时还没有插入到 DOM 结构中
const frag = document.createDocumentFragment()

for (let i = 1; i <= 10; i += 1) {
  const li = document.createElement('li')
  li.addEventListener('click', function (e) {
    e.preventDefault()
    alert(i)
  })
  li.innerHTML = i
  frag.appendChild(li)
}

const ul = document.createElement('ul')
ul.appendChild(frag)
document.body.appendChild(ul)
2
3
4
5
6
7
8
9
10
11
12
13
14
15
16
17
18
5.4 面试题
DOM 是哪种数据结构?
- 树(DOM 树)
DOM 操作常用 API:
- DOM 节点操作
- DOM 结构操作
property 和 attribute 的区别:
- property: 修改对象属性,不会体现到 html 结构中
- attribute: 修改 html 属性,会改变 html 结构
- 两者都有可能引起 DOM 重新渲染,尽量使用 property 进行操作
6.BOM
6.1 BOM 操作
- navigator
- screen
- location
- history
// navigator,识别浏览器类型
const ua = navigator.userAgent
const isChrome = ua.includes('Chrome')
console.log(isChrome, 'isChrome')

// screen
console.log(screen.width)
console.log(screen.height)

// 控制台,分解 url 各个部分
location.href // 网站的全址
location.hash // 网站的锚点 例如 #Anchor
location.pathname // localhost:8001/class/chapter/1.html 中的 /class/chapter/1.html
location.search // 网站的 query,如 ?a=10&b=200
location.protocal // 网站协议,如 http 和 https

// history
history.back() // 网站后退
history.forward() // 网站前进
2
3
4
5
6
7
8
9
10
11
12
13
14
15
16
17
18
19
7.事件绑定、冒泡及事件代理
7.1 事件绑定和事件冒泡
通用的事件监听函数:
<!DOCTYPE html>
<html lang="en">

<head>
  <meta charset="UTF-8">
  <meta http-equiv="X-UA-Compatible" content="IE=edge">
  <meta name="viewport" content="width=device-width, initial-scale=1.0">
  <title>Document</title>
</head>

<body>
  <button id="btn1">按钮1</button>
  <div id="div3">
    <a href="#">1</a><br>
    <a href="#">2</a><br>
    <a href="#">3</a><br>
  </div>
  <script>
    // 通用的事件绑定函数
    function bindEvent(elem, type, selector, fn) {
      // 普通绑定时只有三个参数
      if (fn == null) {
        fn = selector
        selector = null
      }
      elem.addEventListener(type, event => {
        const target = event.target
        if (selector) {
          // 代理绑定
          if (target.matches(selector)) {
            fn.call(target, event)
          }
        } else {
          // 普通绑定
          fn.call(target, event)
        }
      })
    }

    // 普通绑定
    const btn1 = document.getElementById('btn1')
    bindEvent(btn1, 'click', function(event) {
      event.preventDefault()
      alert(this.innerHTML)
    })
    // 代理绑定
    const div3 = document.getElementById('div3')
    bindEvent(div3, 'click', 'a', function(event) {
      event.preventDefault()
      alert(this.innerHTML)
    })
  </script>
</body>

</html>
2
3
4
5
6
7
8
9
10
11
12
13
14
15
16
17
18
19
20
21
22
23
24
25
26
27
28
29
30
31
32
33
34
35
36
37
38
39
40
41
42
43
44
45
46
47
48
49
50
51
52
53
54
55
无限下拉图片列表,如何监听每个图片的点击:
- 事件代理
- 用 e.target 获取触发元素
- 用 matched 来判断是否是触发元素
事件冒泡:
// 点击 p1,会先后 alert 激活和取消
// 点击非 p1 区域,会 alert 取消
const p1 = document.getElementById('p1')
const body = document.body
p1.addEventListener('click', e => {
  // 阻止从 p1 往 body 冒泡,只执行 p1 的 click 事件,而阻止 body 的 click 事件
  e.stopPropagation()
  alert('激活')
})
body.addEventListener('click', e => {
  alert('取消')
})
2
3
4
5
6
7
8
9
10
11
12
7.2 事件代理
好处:
- 代码简洁
- 减少浏览器内存占用
- 不要滥用
加载更多案例实现:
<!DOCTYPE html>
<html lang="en">

<head>
  <meta charset="UTF-8">
  <meta http-equiv="X-UA-Compatible" content="IE=edge">
  <meta name="viewport" content="width=device-width, initial-scale=1.0">
  <title>Document</title>
</head>

<body>
  <div id="div3">
    <a href="#">a1</a><br>
    <a href="#">a2</a><br>
    <a href="#">a3</a><br>
    <a href="#">a4</a><br>
    <button>加载更多</button>
  </div>
  <script>
    const div3 = document.getElementById('div3')
    // 事件代理
    div3.addEventListener('click', event => {
      event.preventDefault()
      const target = event.target
      // 当点击其中的 a 标签时,自动弹出 a 标签的值
      if (target.nodeName === 'A') {
        alert(target.innerHTML)
      }
      // 点击按钮后,在 button 前新增 4 个 a 标签与换行符
      // if (target.matches('button')) {}
      if (target.nodeName === 'BUTTON') {
        const frag = document.createDocumentFragment()
        for (let i = 0; i < 4; i += 1) {
          const a = document.createElement('a')
          a.setAttribute('href', '#')
          const br = document.createElement('br')
          a.innerHTML = `a${i + 1}`
          frag.appendChild(a)
          frag.insertBefore(br, a.nextElementSibling)
        }
        const btn = document.querySelector('#div3 button')
        div3.insertBefore(frag, btn)
      }
    })
  </script>
</body>

</html>
2
3
4
5
6
7
8
9
10
11
12
13
14
15
16
17
18
19
20
21
22
23
24
25
26
27
28
29
30
31
32
33
34
35
36
37
38
39
40
41
42
43
44
45
46
47
48
8.ajax
8.1 XMLHttpRequest
xhr.readyState:
- 0 - UNSET 尚未调用 open 方法
- 1 - OPENED open 方法已被调用
- 2 - HEADERS_RECEIVED send 方法已被调用,header 已被接收
- 3 - LOADING 下载中,responseText 已有部分内容
- 4 - DONE 下载完成,responseText 已有完全内容
xhr.status:
- 2xx - 表示成功处理请求,如 200
- 3xx - 需要重定向,浏览器直接跳转,如 301 302 304
- 4xx - 客户端请求错误,如 404 403
- 5xx - 服务器端错误
示例代码:
const xhr = new XMLHttpRequest()
xhr.open('GET', './test.json', true)
xhr.onreadystatechange = function () {
  if (xhr.readyState === 4) {
    if (xhr.status === 200) {
      alert(xhr.responseText)
    }
  }
}
xhr.send(null)
2
3
4
5
6
7
8
9
10
8.2 同源策略
- ajax 请求时,浏览器要求当前网页和 server 必须同源(安全)
- 同源: 协议、域名、端口,三者必须一致: 例如前端 http://a.com:8080/; 后端: https://b.com/api/xxx; 中协议 http 和 https 不一样,域名 a.com 和 b.com 不一样,端口 8080 和 80 不一样
- 所有的跨域,都必须经过 server 端允许和配合
- 未经 server 端允许就实现跨域,说明浏览器有漏洞,危险信号
无视同源策略的情况:
- 图片的 src 地址
- link 标签中的 href,即跨域的 css 地址
- script 标签中的 src,即跨域的 js 地址
利用无视同源策略的特性的应用:
<img />可用于统计打点,可使用第三方统计服务<link />、<script>可使用 cdn,cdn 一般都是外域<script>可实现 JSONP
nodejs 避免同源:
const http = require('http')
const server = http.createServer((req, res) => {
  res.setHeader('Access-Control-Allow-Origin', 'http://localhost:8001')
  res.setHeader('Access-Control-Allow-Headers', 'X-Requested-With')
  res.setHeader('Access-Control-Allow-Method', 'PUT,POST,GET,DELETE,OPTIONS')

  // 接收跨域的 cookie
  res.setHeader('Access-Control-Allow-Credentials', 'true')
})
server.listen(8003)
2
3
4
5
6
7
8
9
10
app.all('*', async (req, res, next) => {
  res.header('Access-Control-Allow-Origin', 'http://localhost:3000')
  res.header('Access-Control-Allow-Headers', 'content-type')
  res.header('Access-Control-Allow-Methods', 'DELETE,PUT,POST,GET,OPTIONS')
  if (req.method.toLowerCase() === 'options') {
    res.send(200)
  } else {
    next()
  }
})
2
3
4
5
6
7
8
9
10
8.3 手写简易 ajax
function ajax(url) {
  return new Promise((resolve, reject) => {
    const xhr = new XMLHttpRequest()
    xhr.open('GET', url, true)
    xhr.onreadystatechange = function () {
      if (xhr.readyState === 4) {
        if (xhr.status === 200) {
          resolve(JSON.parse(xhr.responseText))
        } else if (xhr.status === 404) {
          reject(new Error('404 not found'))
        }
      }
    }
    xhr.send(null)
  })
}

ajax('/test.json')
  .then(res => console.log(res))
  .catch(err => console.error(err))
2
3
4
5
6
7
8
9
10
11
12
13
14
15
16
17
18
19
20
9.cookie
8.1 面试题
cookie 的缺点:(不适合作为本地存储的方案了)
- 存储大小,最大 4kb
- http 请求时需要发送到服务端,增加请求数据量
- 只能用
document.cookie = '...'来修改,太过于简陋
localStorage:
- HTML5 专门为存储而设计,最大可存 5M
- API 简单易用 setItem getItem
- 不会随着 http 请求被发送出去
localStorage 和 sessionStorage:
- localStorage 数据会永久存储,除非代码或手动删除
- sessionStorage 数据只存在于当前会话,浏览器关闭则清空
描述 cookie localStorage sessionStorage 区别:
- 容量: cookie 4kb、localStorage 5M
- API 易用性
- 是否跟随 http 请求发送出去
10.http
10.1 状态码
状态码分类:
- 1xx: 服务器收到请求
- 2xx: 请求成功,如 200
- 3xx: 重定向,如 302
- 4xx: 客户端错误,如 404
- 5xx: 服务端错误,如 500
常见状态码:
- 200: 成功
- 301: 永久重定向(配合 location,浏览器自动处理)
- 302: 临时重定向(配合 location,浏览器自动处理): 例如
res.writeHead(302, { 'location': 'http://www.baidu.com' }) - 304: 资源未被修改
- 404: 资源未找到
- 403: 没有权限
- 500: 服务器错误
- 504 网关超时
10.2 Restful-API
传统 methods:
- get 获取服务器的数据
- post 向服务器提交数据
- 简单的网页功能,就这俩操作
现代 methods:
- get: 获取数据
- post: 新建数据
- patch / put: 更新数据
- delete: 删除数据
Restful API:
- 一种新的 API 设计方法
- 传统的 API 设计: 把每个 url 当做一个功能
- Restful API 设计: 把每个 url 当做一个唯一的资源
如何设计成一个资源:
- 尽量不用 url 参数
- 传统 API 设计:
/api/list?pageIndex=2 - Restful API 设计:
/api/list/2
- 传统 API 设计:
- 用 method 表示操作类型
- 传统 API 设计:
- post 请求:
/api/create-blog - post 请求:
/api/update-blog?id=100 - get 请求:
/api/get-blog?id=100
- post 请求:
- Restful API 设计:
- post 请求:
/api/blog - patch 请求:
/api/blog/100 - get 请求:
/api/blog/100
- post 请求:
- 传统 API 设计:
10.3 http 的常见 header
Request Headers(请求头):
- Accept: 浏览器可接收的数据格式
- Accept-Encoding: 浏览器可接收的压缩算法,如 gzip
- Accept-Language: 浏览器可接收的语言,如 zh-CN
- Connection: keep-alive 一次 TCP 连接重复使用
- cookie: 每次请求都会携带
- Host: 请求的域名
- User-Agent(简称 ua): 浏览器信息
- Content-type: 发送数据的格式,如 application/json
Response Header(响应头):
- Content-type: 返回数据的格式,如 application/json
- Content-length: 返回数据的大小,多少字节
- Content-Encoding: 返回数据的压缩算法,如 gzip
- Set-Cookie: 服务端改 cookie
- Cache-Control
- Last-Modified
- Etag
10.4 http 缓存
哪些资源可以被缓存? - 静态资源(js css img)
强制缓存:
- 浏览器首先请求服务器,服务器返回资源和 Cache-Control(同时设置了过期时间)
- 浏览器再次请求时,就从本地缓存里寻找资源返回资源
- 如果过期了,则再次向服务器请求资源
Cache-Control 的值:
- max-age: 设置本地缓存与过期时间
- no-cache: 不用本地缓存
- no-store: 不用本地缓存,也不用服务端的缓存
Expires 同在 Response Headers 中,同为控制缓存过期,但是已经被 Cache-Control 代替了
协商缓存(对比缓存):
服务端缓存策略,并不是缓存存在于服务端中!
- 服务器判断客户端资源,是否和服务端资源一样
- 一致则返回 304,否则返回 200 和最新的资源
协商缓存步骤:
- 浏览器首次请求,服务器返回资源和资源标识
- 浏览器再次请求,携带资源标识,服务器对资源标识进行比对,返回 304 或返回资源和新的资源标识
资源标识:
- 在 Response Headers 中
- Last-Modified: 资源的最后修改时间
- Etag: 资源的唯一标识(一个字符串,类似人类的指纹)
Last-Modified 的交互步骤:
- 浏览器初次请求服务器,服务器返回资源和 Last-Modified
- 浏览器再次请求,Request Headers 带着 If-Modified-Since
- 服务器返回 304,或返回资源和新的 Last-Modified
Etag 的交互步骤:(优先使用 Etag,因为 Last-Modified 只能精确到秒级,且当资源被重复生成,而内容不变的情况下,Etag 更加精确)
- 浏览器除此请求,服务器返回资源和 Etag
- 浏览器再次请求,Request Headers 带着 If-None-Match
- 服务器返回 304,货返回资源和新的 Etag
10.5 三种刷新操作
- 正常操作: 地址栏输入 url,跳转链接,前进后退等(强制缓存有效,协商缓存有效)
- 手动刷新: F5,点击刷新按钮,右击菜单刷新(强制缓存失效,协商缓存有效)
- 强制刷新: ctrl + F5(强制缓存与协商缓存都失效)
11.https
11.1 https 加密方式
- 对称加密: 一个 key 同负责加密、解密
- 非对称加密: 一堆 key,A 加密之后, 只能用 B 来解密
Https 加密步骤:
- 客户端向服务端请求,服务端有公钥与私钥,服务端返回公钥和证书给客户端
- 客户端首先验证证书合法性(防止中间人攻击,调包服务端的公私钥),然后用公钥加密一个随机字符串(该字符串将来用作对称加密的 key),然后发送加密字符串给服务端
- 服务端解密加密字符串(这时黑客只能劫持中间的公钥和加密内容,而无法获得随机字符串的值,但是客户端和服务端都有了该随机字符串的值)
- 利用该随机字符串作为 key,进行对称加密.服务端将加密后的返回值返回客户端,实现数据运输的加密(这时候黑客只能获得加密后的返回数据,而黑客并不知道 key 即随机字符串的内容,所以无法解密)
12.性能优化
12.1 网页是如何加载并渲染出来的
资源的形式:
- html 代码
- 媒体文件,如图片、视频等
- javascript css
加载资源过程:
- DNS(domin name system 域名系统): 域名 -> ip 地址
- 浏览器根据 IP 地址向服务器发起 http 请求(三次握手)
- 服务器处理 http 请求,并返回给浏览器(连接关闭后四次挥手)
渲染过程:
- 根据 HTML 代码生成 DOM Tree
- 根据 CSS 代码生成 CSSOM
- 将 DOM Tree 和 CSSOM 整合形成 Render Tree
- 根据 Render Tree 渲染页面
- 遇到
<script>则暂停渲染,优先加载并执行 JS 代码,完成再继续 - 直至把 Render Tree 渲染完成
window.onload 和 DOMContentLoaded 区别:
window.addEventListener('load', function () {
  // 页面的全部资源加载完才会执行,包括图片、视频等
})
// 建议监听这个事件
document.addEventListener('DOMContentLoaded', function () {
  // DOM 渲染完即可执行,此时图片、视频可能还没有加载完
})
2
3
4
5
6
7
12.2 性能优化
原则:
- 多使用内存、缓存或掐方法
- 减少 CPU 计算量,减少网络加载耗时
- 空间换时间
让加载更快:
强制缓存:浏览器首次请求资源时,服务器返回 cache-control。浏览器再次请求时,会根据 cache-control 来判断是否过期,若未过期则使用本地缓存;
协商缓存:前端携带 If-Modified-Since 后,服务器会将其与资源的 Last-Modified 进行比较,如果相同,说明资源没有更新,返回 304 状态码;如果不同,说明资源有更新,返回 200 状态码和新的资源。
前端携带 If-None-Match 后,服务器会将其与资源的 ETag 进行比较,如果相同,说明资源没有更新,返回 304 状态码;如果不同,说明资源有更新,返回 200 状态码和新的资源。
- 减少资源体积: 压缩代码(css-minimizer-webpack-plugin),例如 webpack 的 IgnorePlugin 和 noParse
- 减少访问次数: 合并 css 和 js 代码,SSR 服务器端渲染,缓存(output 的 chunk 添加 hash、强制缓存和协商缓存)、将小图片以 base64 的格式进行打包
- 使用更快的网络: CDN
让渲染更快:
- CSS 放在 head,JS 放在 body 最下面
- 尽早开始执行 JS,用 DOMContentLoaded 触发
- 避免重绘与回流:重绘是指元素的外观发生改变,但不影响布局,如颜色、背景等。回流是指元素的几何属性发生改变,导致重新计算布局和渲染树。回流一定会引起重绘,但重绘不一定会引起回流
- 使用 transform、opacity、filter 等属性来实现动画效果,而不是改变宽高、位置等属性。
- 使用 class 来批量修改样式,而不是频繁操作 style 属性。
- 避免使用 table 布局,因为一个小的改动可能会导致整个表格重新布局。
- 将需要频繁操作的元素设置为绝对定位或固定定位,使其脱离文档流,减少影响范围。
- 使用虚拟 DOM 来避免不必要的 DOM 操作。
代码分割、按需加载
懒加载(图片懒加载,上划加载更多)
<!DOCTYPE html>
<html lang="en">
  <head>
    <meta charset="UTF-8" />
    <meta http-equiv="X-UA-Compatible" content="IE=edge" />
    <meta name="viewport" content="width=device-width, initial-scale=1.0" />
    <title>Document</title>
  </head>

  <body>
    <img
      style="width: 500px; display: block;"
      src="/asset/loading.gif"
      data-src="/asset/1.svg" />
    <img
      style="width: 500px; display: block;"
      src="/asset/loading.gif"
      data-src="/asset/2.svg" />
    <img
      style="width: 500px; display: block;"
      src="/asset/loading.gif"
      data-src="/asset/3.png" />
    <img
      style="width: 500px; display: block;"
      src="/asset/loading.gif"
      data-src="/asset/4.png" />
    <img
      style="width: 300px; display: block;"
      src="/asset/loading.gif"
      data-src="/asset/5.png" />

    <script>
      window.addEventListener('load', function () {
        const num = document.querySelectorAll('img').length
        const imgs = document.querySelectorAll('img')
        let n = 0

        lazyLoad()
        window.addEventListener('scroll', lazyLoad)

        function lazyLoad() {
          // 可视区高度
          const seeHeight = document.documentElement.clientHeight
          // 滚动条距离文档顶部距离
          const scrollTop = document.documentElement.scrollTop
          for (let i = n; i < num; i += 1) {
            // offset: dom 元素距离文档顶部距离
            if (imgs[i].offsetTop < seeHeight + scrollTop) {
              if (imgs[i].getAttribute('src') === '/asset/loading.gif') {
                imgs[i].src = imgs[i].getAttribute('data-src')
              }
              n = i + 1
            }
          }
        }
      })
    </script>
  </body>
</html>
2
3
4
5
6
7
8
9
10
11
12
13
14
15
16
17
18
19
20
21
22
23
24
25
26
27
28
29
30
31
32
33
34
35
36
37
38
39
40
41
42
43
44
45
46
47
48
49
50
51
52
53
54
55
56
57
58
59
- 对 DOM 查询进行缓存
- 频繁 DOM 操作,合并到一起插入 DOM 结构
- 节流 throttle 防抖 debounce
12.3 前端性能优化的示例
缓存:
- 静态资源加 hash 后缀,根据文件内容计算 hash
- 文件内容不变,则 hash 不变,则 url 不变
- url 和文件不变,则会自动触发 http 缓存机制,返回 304
SSR:
- 服务器端渲染: 将网页和数据一起加载,一起渲染
- 非 SSR(前后端分离): 先加载网页,再加载数据,再渲染数据
12.4 防抖 debounce
- 监听一个输入框的,文字变化后触发 change 事件
- 直接用 keyup 事件,就会频繁触发 change 事件
- 防抖: 用户输入结束或暂停时,才会触发 change 事件
示例代码:
<!DOCTYPE html>
<html lang="en">
  <head>
    <meta charset="UTF-8" />
    <meta http-equiv="X-UA-Compatible" content="IE=edge" />
    <meta name="viewport" content="width=device-width, initial-scale=1.0" />
    <title>debounce 演示</title>
  </head>

  <body>
    <input type="text" id="input" />
    <script>
      const input = document.getElementById('input')
      let timer = null
      input.addEventListener('keyup', function () {
        if (timer) {
          clearTimeout(timer)
        }
        // 无论短时间内按多少下,生效的总是最后那下
        timer = setTimeout(() => {
          console.log(this.value)
          // 清空定时器
          timer = null
        }, 500)
      })
    </script>
  </body>
</html>
2
3
4
5
6
7
8
9
10
11
12
13
14
15
16
17
18
19
20
21
22
23
24
25
26
27
28
封装成工具函数:
const input = document.getElementById('input')
// 防抖
function debounce(fn, delay = 500) {
  let timer = null
  return function () {
    if (timer) {
      clearTimeout(timer)
    }
    timer = setTimeout(() => {
      fn.apply(this, arguments)
      timer = null
    }, delay)
  }
}

input.addEventListener(
  'keyup',
  debounce(function () {
    console.log(input.value)
  })
)
2
3
4
5
6
7
8
9
10
11
12
13
14
15
16
17
18
19
20
21
12.5 节流 throttle
- 拖拽一个元素时,要随时拿到该元素被拖拽的位置
- 直接用 drag 事件,则会频繁触发,很容易导致卡顿
- 节流: 无论拖拽速度多快,都会每隔 100ms 触发一次
示例代码:
<!DOCTYPE html>
<html lang="en">
  <head>
    <meta charset="UTF-8" />
    <meta http-equiv="X-UA-Compatible" content="IE=edge" />
    <meta name="viewport" content="width=device-width, initial-scale=1.0" />
    <title>throttle 演示</title>
    <style>
      #div {
        border: 1px solid #ccc;
        width: 200px;
        height: 100px;
      }
    </style>
  </head>

  <body>
    <div id="div" draggable="true">可拖拽</div>
    <script>
      const div = document.getElementById('div')

      let timer = null
      div.addEventListener('drag', function (e) {
        if (timer) return
        timer = setTimeout(() => {
          console.log(e.offsetX, e.offsetY)
          timer = null
        }, 100)
      })
    </script>
  </body>
</html>
2
3
4
5
6
7
8
9
10
11
12
13
14
15
16
17
18
19
20
21
22
23
24
25
26
27
28
29
30
31
32
封装成工具函数:
const div = document.getElementById('div')
function throttle(fn, delay = 100) {
  let timer = null
  return function () {
    if (timer) return
    timer = setTimeout(() => {
      fn.apply(this, arguments)
      timer = null
    }, delay)
  }
}
div.addEventListener(
  'drag',
  throttle(function (e) {
    console.log(e.offsetX, e.offsetY)
  }, 200)
)
2
3
4
5
6
7
8
9
10
11
12
13
14
15
16
17
12.6 安全
- XSS 跨站请求攻击
- XSRF 跨站请求伪造
xss 攻击:
- 一个博客网站,我发表一篇博客,其中嵌入
<script>脚本 - 脚本内容: 获取 cookie,发送到我的服务器(服务器配合跨域)
- 发布这篇博客,有人查看它,我轻松收割访问者的 cookie
xss 预防:
- 替换特殊字符,如
<变成<,>变成> <script>变为<script>,直接显示,而不会作为脚本执行- 前端要替换,后端也要替换,都做总不会有错
XSRF 攻击:
- 你正在购物,看中了某个商品,商品 id 是 100
- 付费接口时
xxx.com/pay?id=100,但没有任何验证 - 我是攻击者,我看中一个商品是 200,id 是 200
- 我向你发送一封电子邮件,邮件标题很吸引人
- 但是邮件正文隐藏着
<img src=xxx.com/pay?id=200 /> - 你一查看右键,就帮我购买了 id 是 200 的商品
XSRF 预防:
- 使用 post 接口
- 增加验证,例如 密码、短信验证码、指纹等
13 常见面试题
13.1 列举强制类型转换和隐式类型转换
- 强制: parseInt、parseFloat、toString 等
- 隐式: if、逻辑运算、==、+ 拼接字符串
13.2 手写深度比较 & 数组的 api
手写深度比较:
const obj1 = {
  a: 100,
  b: {
    x: 100,
    y: 200
  }
}

const obj2 = {
  a: 100,
  b: {
    x: 100,
    y: 200
  }
}

function isEqual(obj1, obj2) {
  // 如果 obj1、obj2 不是引用类型
  if (
    !(typeof obj1 === 'object' && obj1 !== null) ||
    !(typeof obj2 === 'object' && obj2 !== null)
  ) {
    return obj1 === obj2
  }
  if (obj1 === obj2) return true
  const obj1Keys = Object.keys(obj1)
  const obj2Keys = Object.keys(obj2)
  if (obj1Keys.length !== obj2Keys.length) return false
  for (let key in obj1) {
    const res = isEqual(obj1[key], obj2[key])
    if (!res) return false
  }
  return true
}

console.log(isEqual(obj1, obj2))
2
3
4
5
6
7
8
9
10
11
12
13
14
15
16
17
18
19
20
21
22
23
24
25
26
27
28
29
30
31
32
33
34
35
36
数组的 pop push unshift shift 的分别是什么?
- pop 和 shift 类似,都是删除数组元素,返回被删除的元素
- unshift 和 push 类似,都是添加数组元素,返回新的数组的长度
纯函数:
不改变原数组(没有副作用),返回一个数组
const arr = [1, 2]
// concat
const arr1 = arr.concat([50, 60]) // arr 没变,arr1 变成 [1, 2, 50, 60]
// map
const arr2 = arr.map(v => v * 10) // arr 不变,arr2 变
// filter
const arr3 = arr.filter(num => num > 25) // arr 不变,arr3 变
// slice
const arr4 = arr.slice()
2
3
4
5
6
7
8
9
非纯函数:
push pop shift unshift、forEach、some、every、reduce、splice
13.3 第三组面试题
new Object() 和 Object.create() 区别:
- {} 等同于 new Object(),原型 Object.prototype
- Object.create(null) 没有原型,等于是个 {},然后原型上挂一个 null
手写字符串 trim 保证浏览器兼容性:
String.prototype.trim1 = function () {
  return this.replace(/^\s+/, '').replace(/\s+$/, '')
}
2
3
获取最大值:
function max() {
  const nums = Array.from(arguments)
  let max = 0
  nums.forEach(n => {
    if (n > max) {
      max = n
    }
  })
  return max
}

const a = max(12, 18)
2
3
4
5
6
7
8
9
10
11
12
13.4 第四组面试题
捕获 JS 异常:
- 方法一:
try catch - 方法二:
window.onerror = function (message, source, lineNom, colNom, error) {
  // 第一,对跨域的 js,如 cdn 的,不会有详细的报错信息
  // 第二,对于压缩的 js,还要配合 sourceMap 反查到未压缩代码的行、列
}
2
3
4
获取当前页面 url 参数:
- 传统方式,查找
location.search
// 传统方式
function query(name) {
  const search = location.search.substr(1) // 类似 arr.slice(1)
  // name=yuanke&age=20&location=guangdong
  const reg = new RegExp(`(^|&)${name}=([^&]*)(&|$)`, 'i')
  // const reg= new RegExp(`(^|&)${name}=(\\w*)(?=&|$)`, 'i')
  const res = search.match(reg)
  if (res === null) {
    return null
  }
  // res[0] 是正则表达式匹配的内容,res[1]、res[2] 是原子组匹配的内容
  return res[2]
}
const res = query('age')
console.log(res) // 20
2
3
4
5
6
7
8
9
10
11
12
13
14
15
- 新 API:
URLSearchParams:
function query(name) {
  const search = location.search
  const p = new URLSearchParams(search)
  return p.get(name)
}
console.log(query('name'))
2
3
4
5
6
13.5 第五组面试题
将 url 参数解析为 js 对象:
方法一:
function queryToObj() {
  const res = {}
  const search = location.search.substr(1)
  search.split('&').forEach(paramStr => {
    const arr = paramStr.split('=')
    const key = arr[0]
    const val = arr[1]
    res[key] = val
  })
  return res
}
2
3
4
5
6
7
8
9
10
11
方法二:
function queryToObj() {
  const res = {}
  const pList = new URLSearchParams(location.search)
  pList.forEach((val, key) => {
    res[key] = val
  })
}
2
3
4
5
6
7
数组拍平:
const arr = [1, [2, 3, [4, 5]]]
function flat(arr) {
  // 验证 arr 中,还有没有深层数组
  const isDeep = arr.some(item => item instanceof Array)
  if (!isDeep) return arr
  const res = Array.prototype.concat.apply([], arr)
  return flat(res)
}
const res = flat(arr)
console.log(res)
2
3
4
5
6
7
8
9
10
数组去重:
//  // 方式一
// function unique(arr) {
//   const res = []
//   arr.forEach(item => {
//     if (res.indexOf(item) < 0) {
//       res.push(item)
//     }
//   })
//   return res
// }

// 方式二(无序,不能重复)
function unique(arr) {
  const set = new Set(arr)
  return [...set]
}
console.log(unique([1, 1, 1, 2]))
2
3
4
5
6
7
8
9
10
11
12
13
14
15
16
17
13.6 第六组面试题 - 动画
介绍 RAF requestAnimationFrame:
传统方式:(都什么年代,还在用传统定时器)
<!DOCTYPE html>
<html lang="en">
  <head>
    <meta charset="UTF-8" />
    <meta http-equiv="X-UA-Compatible" content="IE=edge" />
    <meta name="viewport" content="width=device-width, initial-scale=1.0" />
    <title>xss 演示</title>
    <style>
      #div {
        width: 100px;
        height: 50px;
        background-color: red;
      }
    </style>
  </head>

  <body>
    <p>JS 真题演示</p>
    <div id="div"></div>
    <script>
      // 3s 后把宽度从 100px 变成 640px,即增加 540px
      // 60帧/s,3s 180帧,每次变化 3px
      const div = document.getElementById('div')
      let curWidth = div.offsetWidth
      const maxWidth = 640
      function animate() {
        curWidth = curWidth + 3
        div.setAttribute('style', `width: ${curWidth}px`)
        if (curWidth < maxWidth) {
          setTimeout(animate, 16.7) // 自己控制时间
        }
      }
      animate()
    </script>
  </body>
</html>
2
3
4
5
6
7
8
9
10
11
12
13
14
15
16
17
18
19
20
21
22
23
24
25
26
27
28
29
30
31
32
33
34
35
36
第二种方式:
function animate() {
  curWidth = curWidth + 3
  div.setAttribute('style', `width: ${curWidth}px`)
  if (curWidth < maxWidth) {
    window.requestAnimationFrame(animate) // 时间不用自己控制
  }
}
2
3
4
5
6
7
13.6 map 和 set
- object 是无序结构、array 是有序结构,无序快有序慢
- map 是有序结构,map 速度却很快
const m = new Map([
  ['key1', 'hello'],
  ['key2', 100],
  ['key3', { x: 100 }]
])
// map.set('name', 'yuanke')
// m.delete('key2')
// m.has('key3')
// m.forEach((value, key) => {
//   console.log(value, key)
// })
// m.size

// Map 可以以任意类型为 key
const o = { name: 'zhangsan' }
m.set(o, 'object key')
function fn() {}
m.set(fn, 'fn key')
2
3
4
5
6
7
8
9
10
11
12
13
14
15
16
17
18
13.7 手写发布订阅
interface CacheProps {
  [key: string]: Array<(data?: unknown) => void>
}

class Observer {
  private caches: CacheProps = {}
  on(eventName: string, fn: (data?: unknown) => void) {
    this.caches[eventName] = this.caches[eventName] || []
    this.caches[eventName].push(fn)
  }
  emit(eventName: string, data?: unknown) {
    if (this.caches[eventName].length) {
      this.caches[eventName].forEach(fn => fn(data))
    }
  }
  off(eventName: string, fn?: (data?: unknown) => void) {
    if (this.caches[eventName]) {
      const newCaches = fn ? this.caches[eventName].filter(e => e !== fn) : []
      this.caches[eventName] = newCaches
    }
  }
}

const obs = new Observer()
const sayAge = (age: unknown) => {
  console.log(age)
}
obs.on('yuanke', sayAge)
obs.emit('yuanke', 1)
obs.off('yuanke', sayAge)
2
3
4
5
6
7
8
9
10
11
12
13
14
15
16
17
18
19
20
21
22
23
24
25
26
27
28
29
30
13.8 生成特定长度的随机数组
// 生成一个长度为 length,在 [min, max] 内不重复的整数随机数组
function rand(arr: number[], min: number, max: number, length: number): Array<number> {
  let randomNum: number
  randomNum = Math.floor(Math.random() * (max - min + 1) + min)
  if (!arr.includes(randomNum)) {
    arr.push(randomNum)
  }
  return arr.length === length ? arr : rand(arr, min, max, length)
}

console.log(rand([], 1, 8, 3))
2
3
4
5
6
7
8
9
10
11
13.9 图片懒加载
<!DOCTYPE html>
<html lang="en">
  <head>
    <meta charset="UTF-8" />
    <meta http-equiv="X-UA-Compatible" content="IE=edge" />
    <meta name="viewport" content="width=device-width, initial-scale=1.0" />
    <title>图片懒加载</title>
  </head>

  <body>
    <img
      src="./asset/loading.gif"
      data-src="./asset/1.svg"
      width="400px"
      class="lazy" /><br />
    <img
      src="./asset/loading.gif"
      data-src="./asset/2.svg"
      width="400px"
      class="lazy" /><br />
    <img
      src="./asset/loading.gif"
      data-src="./asset/3.png"
      width="400px"
      class="lazy" /><br />
    <img
      src="./asset/loading.gif"
      data-src="./asset/4.png"
      width="400px"
      class="lazy" /><br />
    <img
      src="./asset/loading.gif"
      data-src="./asset/5.png"
      width="400px"
      class="lazy" /><br />

    <script>
      document.addEventListener('DOMContentLoaded', function () {
        let lazyImages = Array.from(document.querySelectorAll('img.lazy'))
        // 判断是否兼容高版本浏览器
        if ('IntersectionObserver' in window) {
          // 创建 observer 对象,该对象可以调用方法 observe 监听元素是否出现可见性变化
          let lazyImageObserver = new IntersectionObserver((entries, observer) => {
            entries.forEach(entry => {
              // 遍历可见性变化的已监听元素,并进行相应操作
              if (entry.isIntersecting) {
                let lazyImage = entry.target
                lazyImage.src = lazyImage.dataset.src
                lazyImage.classList.remove('lazy')
                lazyImageObserver.unobserve(lazyImage)
              }
            })
          })
          lazyImages.forEach(lazyImage => {
            // 监听元素
            lazyImageObserver.observe(lazyImage)
          })
        } else {
          // 兼容代码,适配低版本浏览器
          let active = false
          const lazyLoad = () => {
            if (!active) {
              // 节流操作,每 0.2s 监听一次
              active = true
              setTimeout(() => {
                lazyImages.forEach(lazyImage => {
                  if (
                    lazyImage.getBoundingClientRect().top <=
                      document.documentElement.clientHeight &&
                    lazyImage.getBoundingClientRect().bottom >= 0 &&
                    getComputedStyle(lazyImage).display !== 'none'
                  ) {
                    console.log('haha')
                    lazyImage.src = lazyImage.dataset.src
                    lazyImage.classList.remove('lazy')
                    lazyImages = lazyImages.filter(image => image !== lazyImage)
                  }
                  if (!lazyImages.length) {
                    document.removeEventListener('scroll', lazyLoad)
                    window.removeEventListener('load', lazyLoad)
                    window.removeEventListener('resize', lazyLoad)
                    window.removeEventListener('orientationchange', lazyLoad)
                  }
                })
                active = false
              }, 200)
            }
          }
          document.addEventListener('scroll', lazyLoad)
          window.addEventListener('load', lazyLoad)
          window.addEventListener('resize', lazyLoad)
          window.addEventListener('orientationchange', lazyLoad)
        }

        // 点击回到顶部
        const toTop = document.querySelector('.toTop')
        toTop.addEventListener('click', function (e) {
          e.preventDefault()
          window.scroll({
            top: 0,
            // left: 0,
            behavior: 'smooth'
          })
        })
      })
      // 刷新后自动回到顶部
      window.addEventListener('beforeunload', function () {
        document.documentElement.scrollTop = 0
      })
    </script>
  </body>
</html>
2
3
4
5
6
7
8
9
10
11
12
13
14
15
16
17
18
19
20
21
22
23
24
25
26
27
28
29
30
31
32
33
34
35
36
37
38
39
40
41
42
43
44
45
46
47
48
49
50
51
52
53
54
55
56
57
58
59
60
61
62
63
64
65
66
67
68
69
70
71
72
73
74
75
76
77
78
79
80
81
82
83
84
85
86
87
88
89
90
91
92
93
94
95
96
97
98
99
100
101
102
103
104
105
106
107
108
109
110
111
112
13.10 下拉刷新、上拉加载
<!DOCTYPE html>
<html lang="en">

<head>
  <meta charset="UTF-8">
  <meta http-equiv="X-UA-Compatible" content="IE=edge">
  <meta name="viewport" content="width=device-width, initial-scale=1.0">
  <title>下拉刷新、上拉加载</title>
</head>

<body>
  <main>
    <p class="refreshText"></p>
    <ul id="refreshContainer">
      <li>111</li>
      <li>222</li>
      <li>222</li>
      <li>111</li>
      <li>222</li>
      <li>222</li>
      <li>222</li>
      <li>222</li>
      <li>222</li>
      <li>111</li>
      <li>222</li>
      <li>222</li>
      <li>333</li>
      <li>222</li>
      <li>222</li>
      <li>111</li>
      <li>222</li>
      <li>222</li>
      <li>444</li>
      <li>222</li>
      <li>222</li>
      <li>111</li>
      <li>222</li>
      <li>222</li>
      <li>555</li>
      <li>222</li>
      <li>222</li>
      <li>111</li>
      <li>222</li>
      <li>222</li>
    </ul>
    <p class="loadMoreText"></p>
  </main>

  <script>
    !(function (window) {
      // 下拉刷新逻辑
      const _element = document.getElementById('refreshContainer')
      const _refreshText = document.querySelector('.refreshText')
      let _startPos = 0
      let _transitionHeight = 0
      _element.addEventListener('touchstart', function (e) {
        _startPos = e.touches[0].pageY
        _element.style.position = 'relative'
        _element.style.transition = 'transform 0s'
      }, false)
      _element.addEventListener('touchmove', function (e) {
        _transitionHeight = e.touches[0].pageY - _startPos
        if (_transitionHeight > 0 && _transitionHeight < 60) {
          _refreshText.innerHTML = '下拉刷新'
          _element.style.transform = `translateY(${_transitionHeight}px)`
          if (_transitionHeight > 55) {
            _refreshText.innerHTML = '释放刷新'
          }
        }
      }, false)
      _element.addEventListener('touchend', function (e) {
        _element.style.transition = 'transform 0.5s ease 0.5s'
        _element.style.transform = 'translateY(0px)'
        // todo
        if (true) {
          _refreshText.innerHTML = '更新成功'
          setTimeout(() => {
            _refreshText.innerHTML = ''
          }, 1000)
        } else {
          _refreshText.innerHTML = '更新失败'
        }
      }, false)


      // 上拉加载逻辑
      // 获取当前滚动条位置
      function getScrollTop() {
        return document.documentElement.scrollTop
      }
      // 获取当前可视范围的高度
      function getClientHeight() {
        return document.documentElement.clientHeight
      }
      // 获取文档完整的高度
      function getScrollHeight() {
        return document.documentElement.scrollHeight
      }
      const _text = document.querySelector('.loadMoreText')
      const _container = document.getElementById('refreshContainer')
      // 节流函数
      function throttle(fn, delay = 300) {
        let timer = null
        return function () {
          if (timer) return
          timer = setTimeout(() => {
            fn.apply(this, arguments)
            timer = null
          }, delay)
        }
      }
      function fetchData() {
        setTimeout(function () {
          _container.insertAdjacentHTML('beforeend', '<li>new add...</li>')
        }, 1000)
      }
      window.addEventListener('scroll', function () {
        if (getScrollTop() + getClientHeight() >= getScrollHeight() - 10) {
          _text.innerHTML = '加载中'
          throttle(fetchData())
        }
      })
    })(window)
  </script>
</body>

</html>
2
3
4
5
6
7
8
9
10
11
12
13
14
15
16
17
18
19
20
21
22
23
24
25
26
27
28
29
30
31
32
33
34
35
36
37
38
39
40
41
42
43
44
45
46
47
48
49
50
51
52
53
54
55
56
57
58
59
60
61
62
63
64
65
66
67
68
69
70
71
72
73
74
75
76
77
78
79
80
81
82
83
84
85
86
87
88
89
90
91
92
93
94
95
96
97
98
99
100
101
102
103
104
105
106
107
108
109
110
111
112
113
114
115
116
117
118
119
120
121
122
123
124
125
126
127
13.11 阻止文本框输入特殊字符
Android:
<input type="text" />
<script>
  const inputElement = document.querySelector('input')
  inputElement.addEventListener('input', function (e) {
    let regex = /[^1-9a-zA-Z]/g
    e.target.value = e.target.value.replace(regex, '')
    // 阻止输入的默认行为,使 replace 前的内容不会打出
    e.returnValue = false
  })
</script>
2
3
4
5
6
7
8
9
10
兼容 Android、IOS、PC:
<input type="text" />
<script>
  const inputElement = document.querySelector('input')
  let inputLock = false
  function doIt(inputElement) {
    const regex = /[^1-9a-zA-Z]/g
    inputElement.value = inputElement.value.replace(regex, '')
  }
  // IOS 候选词输入时
  inputElement.addEventListener('compositionstart', function () {
    inputLock = true
  })
  // IOS 确认候选词时
  inputElement.addEventListener('compositionend', function (e) {
    inputLock = false
    doIt(e.target)
  })
  inputElement.addEventListener('input', function (e) {
    if (!inputLock) {
      doIt(e.target)
      e.returnValue = false
    }
  })
</script>
2
3
4
5
6
7
8
9
10
11
12
13
14
15
16
17
18
19
20
21
22
23
24
13.12 解析 URL params 为对象
const url =
  'http://www.domain.com/?user=anonymous&id=123&id=456&city=%E5%8C%97%E4%BA%AC&enabled'
const res = parseParams(url)
// { user: 'anonymous', id: [ '123', '456' ], city: '北京', enabled: true }
console.log(res)

function parseParams(url) {
  // user=anonymous&id=123&id=456&city=%E5%8C%97%E4%BA%AC&enabled
  const paramsStr = /.+\?(.+)$/.exec(url)[1]
  const paramsArr = paramsStr.split('&')
  let paramsObj = {}
  paramsArr.forEach(param => {
    if (/=/.test(param)) {
      let [key, val] = param.split('=')
      val = decodeURIComponent(val)
      val = /^\d$/.test(val) ? parseFloat(val) : val
      if (paramsObj.hasOwnProperty(key)) {
        paramsObj[key] = [].concat(paramsObj[key], val)
      } else {
        paramsObj[key] = val
      }
    } else {
      paramsObj[param] = true
    }
  })
  return paramsObj
}
2
3
4
5
6
7
8
9
10
11
12
13
14
15
16
17
18
19
20
21
22
23
24
25
26
27
14.设计模式
14.1 观察者模式 / 发布-订阅模式
观察者模式 / 发布 - 订阅模式 / 消息机制定义了对象之间的一对对多的依赖关系,只要当一个对象状态发生改变后,所有依赖它的对象都得到通知并自动更新,解决了主体对象和贯彻着之间功能的耦合,即一个对象状态改变给其他对象通知的问题
let observer_ids = 0
let observed_ids = 0
// 观察者类
class Observer {
  constructor() {
    this.id = observer_ids++
  }
  // 观测到变化后的处理
  update(ob) {
    console.log('观察者' + this.id + `-检测到被观察者${ob.id}变化`)
  }
}
//被观察者类
class Observed {
  constructor() {
    this.observers = []
    this.id = observed_ids++
  }
  // 添加观察者
  addObserver(observer) {
    this.observers.push(observer)
  }
  // 删除观察者
  removeObserver(observer) {
    this.observers = this.observers.filter(o => o.id !== observer.id)
  }
  // 通知所有的观察者
  notify() {
    this.observers.forEach(observer => {
      observer.update(this)
    })
  }
}

let mObserved = new Observed()
let mObserver1 = new Observer()
let mObserver2 = new Observer()
mObserved.addObserver(mObserver1)
mObserved.addObserver(mObserver2)
mObserved.notify()
2
3
4
5
6
7
8
9
10
11
12
13
14
15
16
17
18
19
20
21
22
23
24
25
26
27
28
29
30
31
32
33
34
35
36
37
38
39
40
14.2 单体模式
单体是一个用来划分命名空间并将一批相关的属性和方法组织在一起的对象,如果他可 以被实例化,那么他只能被实例化一次。
const singleInstance = {
  attr1: true,
  attr2: 10,
  method1() {
    console.log(this) // 输出结果与下同
  },
  method2: function () {
    console.log(this)
  }
}

console.log(singleInstance.attr1)
singleInstance.method1()
singleInstance.method2()
2
3
4
5
6
7
8
9
10
11
12
13
14
14.3 单例模式
单例模式定义了一个对象的创建过程,此对象只有一个单独的实例,并提供一个访问它 的全局访问点。也可以说单例就是保证一个类只有一个实例,实现的方法一般是先判断实例存在与 否,如果存在直接返回,如果不存在就创建了再返回,这就确保了一个类只有一个实例对象。
localStorage 存储:
<!DOCTYPE html>
<html lang="en">
  <head>
    <meta charset="UTF-8" />
    <meta http-equiv="X-UA-Compatible" content="IE=edge" />
    <meta name="viewport" content="width=device-width, initial-scale=1.0" />
    <title>Document</title>
  </head>

  <body>
    <script>
      class Storage {
        // 获取方法
        get(key) {
          return localStorage.getItem(key)
        }
        // 存储方法
        set(key, value) {
          return localStorage.setItem(key, value)
        }
        // 外部调用此函数实例化
        static getInstance() {
          if (!Storage.instance) {
            Storage.instance = new Storage()
          }
          return Storage.instance
        }
      }

      const state_1 = Storage.getInstance()
      state_1.set('hi', 'hello')
    </script>
  </body>
</html>
2
3
4
5
6
7
8
9
10
11
12
13
14
15
16
17
18
19
20
21
22
23
24
25
26
27
28
29
30
31
32
33
34
控制文字显示隐藏:
<!DOCTYPE html>
<html lang="en">
  <head>
    <meta charset="UTF-8" />
    <meta http-equiv="X-UA-Compatible" content="IE=edge" />
    <meta name="viewport" content="width=device-width, initial-scale=1.0" />
    <title>Document</title>
    <style>
      #model {
        height: 200px;
        width: 200px;
        line-height: 200px;
        position: fixed;
        left: 50%;
        top: 50%;
        transform: translate(-50%, -50%);
        border: 1px solid black;
        text-align: center;
      }
    </style>
  </head>

  <body>
    <button id="open">open</button>
    <button id="close">close</button>
    <script>
      class ModelBase {
        constructor() {
          this.target = document.createElement('div')
          this.target.innerHTML = '我是一个全局唯一的 Model'
          this.target.id = 'model'
          this.target.style.display = 'none'
          document.body.appendChild(this.target)
        }
        static getInstance() {
          if (!ModelBase.instance) {
            console.log('新建了一个新实例哦') // 这个只会执行一次
            ModelBase.instance = new ModelBase()
          }
          return ModelBase.instance
        }
        // 开启
        open() {
          this.target.style.display = 'block'
        }
        close() {
          this.target.style.display = 'none'
        }
      }
      const openBtn = document.querySelector('#open')
      const closeBtn = document.querySelector('#close')
      openBtn.addEventListener('click', function () {
        const model = ModelBase.getInstance()
        model.open()
        console.log('open')
      })
      closeBtn.addEventListener('click', function () {
        const model = ModelBase.getInstance()
        model.close()
        console.log('close')
      })
    </script>
  </body>
</html>
2
3
4
5
6
7
8
9
10
11
12
13
14
15
16
17
18
19
20
21
22
23
24
25
26
27
28
29
30
31
32
33
34
35
36
37
38
39
40
41
42
43
44
45
46
47
48
49
50
51
52
53
54
55
56
57
58
59
60
61
62
63
64
又一个例子:
class Singleton {
  instance: object | null
  constructor(public name: string) {
    this.name = name
    this.instance = null
  }
  getName() {
    console.log(this.name)
  }
  static getInstance(name: string) {
    if (!Singleton.prototype.instance) {
      Singleton.prototype.instance = new Singleton(name)
    }
    return Singleton.prototype.instance
  }
}

const a = Singleton.getInstance('a')
const b = Singleton.getInstance('b')
console.log(a === b) // true
2
3
4
5
6
7
8
9
10
11
12
13
14
15
16
17
18
19
20
TS 的一个例子:
// 原型和原型链
class Student {
  name: string
  age: number
  constructor() {
    this.name = 'zhangsan'
    this.age = 18
  }
}

class PrimaryStudent extends Student {
  hobby: string
  num: number
  static instance: PrimaryStudent | undefined
  constructor() {
    super()
    this.hobby = 'play basketball'
    this.num = 0
  }
  changeNum() {
    this.num += 1
    return this.num
  }
  static getInstance(): PrimaryStudent {
    if (!this.instance) {
      this.instance = new PrimaryStudent()
    }
    return this.instance
  }
}

const student1 = PrimaryStudent.getInstance()
student1.changeNum()
console.log(student1.num) // 1
const student2 = PrimaryStudent.getInstance()
student2.changeNum()
console.log(student2.num) // 2
2
3
4
5
6
7
8
9
10
11
12
13
14
15
16
17
18
19
20
21
22
23
24
25
26
27
28
29
30
31
32
33
34
35
36
37
14.4 工厂模型
简单工厂模式:
class Phone {
  call() {
    console.log('我用手机打电话')
  }
}

class XiaoMiPhone extends Phone {
  call() {
    console.log('我用小米手机打电话')
  }
}

class ApplePhone extends Phone {
  call() {
    console.log('我用苹果手机打电话')
  }
}

class PhoneFactory {
  produce(type) {
    if (type === 'xiaomi') {
      return new XiaoMiPhone()
    } else if (type === 'apple') {
      return new ApplePhone()
    } else {
      return new Phone()
    }
  }
}

const phones = new PhoneFactory()
phones.produce('xiaomi').call()
2
3
4
5
6
7
8
9
10
11
12
13
14
15
16
17
18
19
20
21
22
23
24
25
26
27
28
29
30
31
32
14.5 策略模式
策略模式指的是定义一些列的算法,把他们一个个封装起来,目的就是将算法的使用与 算法的实现分离开来。说白了就是以前要很多判断的写法,现在把判断里面的内容抽离开来,变成 一个个小的个体
class RegularCard {
  calculate(deposit) {
    return deposit * 0.1
  }
}

class GoldCard {
  calculate(deposit) {
    return deposit * 0.2
  }
}

class PlatinumCard {
  calculate(deposit) {
    return deposit * 0.3
  }
}

class Bonus {
  constructor() {
    this.deposit = null
    this.strategy = null
  }
  setSalary(deposit) {
    this.deposit = deposit
  }
  setStrategy(strategy) {
    this.strategy = strategy
  }
  getBonus() {
    return this.strategy.calculate(this.deposit)
  }
}

const bonus = new Bonus()
bonus.setSalary(2000)
bonus.setStrategy(new GoldCard())
console.log(bonus.getBonus())
bonus.setStrategy(new PlatinumCard())
console.log(bonus.getBonus())
2
3
4
5
6
7
8
9
10
11
12
13
14
15
16
17
18
19
20
21
22
23
24
25
26
27
28
29
30
31
32
33
34
35
36
37
38
39
40
14.6 模板模式
定义了一个操作中的算法的骨架,而将一些步骤延迟到子类中。模板方法使得子类可以 不改变一个算法的结构即可重定义该算法的某些特定步骤。 通俗的讲,就是将一些公共方法封装 到父类,子类可以继承这个父类,并且可以在子类中重写父类的方法,从而实现自己的业务逻辑
namespace template {
  //抽象类,表示豆浆
  abstract class SoyaMilk {
    //模板方法,make,模板方法可以做成final,不让子类去覆盖
    make(): void {
      this.select()
      if (this.customerWantCondiments()) {
        this.addCondiments()
      }
      this.soak()
      this.beat()
    }
    //选材料
    select(): void {
      console.log('第一步:选择好的新鲜黄豆')
    }
    //添加不同的配料,抽象方法,子类具体实现
    abstract addCondiments(): void
    //侵泡
    soak(): void {
      console.log('第三步,黄豆和配料开始侵泡,需要3小时')
    }
    beat(): void {
      console.log('第四步:黄豆和配料放到豆浆机去打碎')
    }
    //钩子方法,决定是否需要添加配料
    customerWantCondiments(): boolean {
      return true
    }
  }

  class PeanutSoyaMilk extends SoyaMilk {
    addCondiments(): void {
      console.log('加入上好的花生')
    }
  }

  class RedBeanSoyaMilk extends SoyaMilk {
    addCondiments(): void {
      console.log('加入上好的红豆')
    }
  }

  //纯豆浆
  class PureSoyaMilk extends SoyaMilk {
    addCondiments() {
      //空实现
    }
    customerWantCondiments(): boolean {
      // TODO Auto-generated method stub
      return false
    }
  }

  class Client {
    public constructor() {
      console.log('-----制作红豆豆浆-----')
      let redBeanSoyaMilk = new RedBeanSoyaMilk()
      redBeanSoyaMilk.make()

      console.log('-----制作花生豆浆-----')
      let peanutSoyaMilk = new PeanutSoyaMilk()
      peanutSoyaMilk.make()

      console.log('-----制作纯豆浆-----')
      let pureSoyaMilk = new PureSoyaMilk()
      pureSoyaMilk.make()
    }
  }

  new Client()
}

/*
  -----制作红豆豆浆-----
  第一步:选择好的新鲜黄豆
  加入上好的红豆
  第三步,黄豆和配料开始侵泡,需要3小时
  第四步:黄豆和配料放到豆浆机去打碎
  -----制作花生豆浆-----
  第一步:选择好的新鲜黄豆
  加入上好的花生
  第三步,黄豆和配料开始侵泡,需要3小时
  第四步:黄豆和配料放到豆浆机去打碎
  -----制作纯豆浆-----
  第一步:选择好的新鲜黄豆
  第三步,黄豆和配料开始侵泡,需要3小时
  第四步:黄豆和配料放到豆浆机去打碎
*/
2
3
4
5
6
7
8
9
10
11
12
13
14
15
16
17
18
19
20
21
22
23
24
25
26
27
28
29
30
31
32
33
34
35
36
37
38
39
40
41
42
43
44
45
46
47
48
49
50
51
52
53
54
55
56
57
58
59
60
61
62
63
64
65
66
67
68
69
70
71
72
73
74
75
76
77
78
79
80
81
82
83
84
85
86
87
88
89
14.7 代理模式
代理模式的中文含义就是帮别人做事,javascript 的解释为:把对一个对象的访问, 交给 另一个代理对象来操作.
保护代理:
// 保护代理
class Ad {
  constructor(public price: number) {
    this.price = price
  }
  getPrice() {
    return this.price
  }
}

const assistant = {
  init(ad: Ad) {
    const money = ad.getPrice()
    if (money > 300) {
      this.receiveAd(money)
    } else {
      this.rejectAd()
    }
  },
  receiveAd(price: number) {
    star.receiveAd(price)
  },
  rejectAd() {
    star.rejectAd()
  }
}

const star = {
  receiveAd(price: number) {
    console.log(`广告费${price}万元`)
  },
  rejectAd() {
    console.log(`拒绝小制作!`)
  }
}

assistant.init(new Ad(5)) // 拒绝小制作
assistant.init(new Ad(500)) // 广告费 500 万元
2
3
4
5
6
7
8
9
10
11
12
13
14
15
16
17
18
19
20
21
22
23
24
25
26
27
28
29
30
31
32
33
34
35
36
37
38
14.8 外观模式
外观模式是很常见。其实它就是通过编写一个单独的函数,来简化对一个或多个更大 型的,可能更为复杂的函数的访问。也就是说可以视外观模式为一种简化某些内容的手段
15.实操 css
15.1 写一个五星评价样式
<!DOCTYPE html>
<html lang="en">
  <head>
    <meta charset="UTF-8" />
    <meta http-equiv="X-UA-Compatible" content="IE=edge" />
    <meta name="viewport" content="width=device-width, initial-scale=1.0" />
    <title>Document</title>
    <style>
      body {
        background: black;
      }

      .box {
        margin: 300px auto;
        width: 400px;
        height: 150px;
        display: flex;
        flex-direction: row-reverse;
      }

      .box input {
        /* appearance: none; */
        /* display: none; */
        visibility: hidden;
      }

      .box label {
        background: url('./asset/1.svg') no-repeat;
        width: 40px;
        height: 40px;
        display: block;
      }

      .box > input:checked ~ label {
        background: url('./asset/2.svg') no-repeat;
        transition: 1s;
      }
    </style>
  </head>

  <body>
    <div class="box">
      <input type="radio" id="a" name="xing" />
      <label for="a"></label>
      <input type="radio" id="b" name="xing" />
      <label for="b"></label>
      <input type="radio" id="c" name="xing" />
      <label for="c"></label>
      <input type="radio" id="d" name="xing" />
      <label for="d"></label>
      <input type="radio" id="e" name="xing" />
      <label for="e"></label>
    </div>
  </body>
</html>
2
3
4
5
6
7
8
9
10
11
12
13
14
15
16
17
18
19
20
21
22
23
24
25
26
27
28
29
30
31
32
33
34
35
36
37
38
39
40
41
42
43
44
45
46
47
48
49
50
51
52
53
54
55
15.2 写一个开关
<!DOCTYPE html>
<html lang="en">
  <head>
    <meta charset="UTF-8" />
    <meta http-equiv="X-UA-Compatible" content="IE=edge" />
    <meta name="viewport" content="width=device-width, initial-scale=1.0" />
    <title>Document</title>
    <style>
      .father {
        width: 80px;
      }
      .box {
        height: 40px;
        background-color: #bbb;
        position: relative;
        transition: background-color 0.25s;
      }
      .box::before {
        content: '';
        background-color: #fff;
        position: absolute;
        width: 30px;
        height: 30px;
        left: 5px;
        top: 5px;
        transition: left 0.25s;
      }
      .box:hover {
        background-color: #555;
      }
      .box:hover::before {
        left: 55%;
      }
    </style>
  </head>

  <body>
    <div class="father">
      <div class="box"></div>
    </div>
  </body>
</html>
2
3
4
5
6
7
8
9
10
11
12
13
14
15
16
17
18
19
20
21
22
23
24
25
26
27
28
29
30
31
32
33
34
35
36
37
38
39
40
41
42
16.计算机网络和其他
16.1 进程和线程的区别
- 进程是系统资源分配的基本单位, 线程是调度的基本单位
- 进程是 cpu 资源分配的最小单位, 线程是 cpu 调度的最小单位
进程是一个具有一定独立功能的程序在一个数据集上的一次动态执行的过程,是操作系统进行资源分配和调度的一个独立单位,是应用程序运行的载体。进程是一种抽象的概念,从来没有统一的标准定义。
线程是程序执行中一个单一的顺序控制流程,是程序执行流的最小单元,是处理器调度和分派的基本单位。一个进程可以有一个或多个线程,各个线程之间共享程序的内存空间(也就是所在进程的内存空间)。一个标准的线程由线程 ID、当前指令指针(PC)、寄存器和堆栈组成。而进程由内存空间(代码、数据、进程空间、打开的文件)和一个或多个线程组成。
协程,英文 Coroutines,是一种基于线程之上,但又比线程更加轻量级的存在,这种由程序员自己写程序来管理的轻量级线程叫做『用户空间线程』,具有对内核来说不可见的特性。
16.2 tcp 和 udp 区别
- tcp(传输控制协议)是面向连接的、可靠的、基于字节流的运输层通信协议
- udp(用户数据报协议)是无连接的、不可靠、面向报文的协议.
- tcp 只能点到点、udp 支持一对一、一对多、多对一和多对多的交互通信
- tcp 工作效率较低、udp 有较好的实时性,适用于对高速传输和实时通信的应用
- tcp 消耗资源更多.tcp 首部有 20 个字节、udp 只有 8 个
- tcp 的逻辑通信信道是全双工的可靠信道,udp 则是不可靠信道
TCP 是面向链接的,而 UDP 是面向无连接的。
TCP 仅支持单播传输,UDP 提供了单播,多播,广播的功能。
TCP 的三次握手保证了连接的可靠性; UDP 是无连接的、不可靠的一种数据传输协议,首先不可靠性体现在无连接上,通信都不需要建立连接,对接收到的数据也不发送确认信号,发送端不知道数据是否会正确接收。
UDP 的头部开销比 TCP 的更小,数据传输速率更高,实时性更好。
16.3 tcp 如何保证可靠传输,保证方法有哪些?
- 确认和重传: 接收方收到报文就会确认,发送方发送一段时间后没有收到确认就重传
- 数据校验
- 数据合理分片和排序:
- UDP:IP 数据报大于 1500 字节,大于 MTU.这个时候发送方 IP 层就需要分片(fragmentation).把数据报分成若干片,使每一片都小于 MTU.而接收方 IP 层则需要进行数据报的重组.这样就会多做许多事情,而更严重的是,由于 UDP 的特性,当某一片数据传送中丢失时,接收方便无法重组数据报.将导致丢弃整个 UDP 数据报.tcp 会按 MTU 合理分片,接收方会缓存未按序到达的数据,重新排序后再交给应用层
- 流量控制: 当接收方来不及处理发送方的数据,能提示发送方降低发送的速率,防止包丢失
- 拥塞控制: 当网络拥塞时,减少数据的发送
17.前端面向对象
17.1 javascript 怎么实现继承?
- javascript 通过 prototype 实现继承,继承的属性方法是共享的.例如 Child 子类继承 Parent 父类.
Child.prototype = new Parent()(父类的实例对象指向子类的原型对象) - 在子类构造函数内执行父类构造函数,并传递子类作用域和参数,从而实现对父类构造函数的继承
17.2 简述怎么通过 new 构造函数
- 创建一个新的对象,这个对象类型是 Object
- 将 this 变量指向该对象
- 将对象的原型指向该构造函数的原型(
obj.__protp__ = Object.prototype) - 执行构造函数,通过 this 对象,为实例化对象添加自身属性方法(
constructor()) - 将 this 引用的新创建对象返回
17.3 面向对象特性
面向对象编程三大特点: 封装、继承、多态
- 抽象,就是忽略一个主题中与当前目标无关的那些方面,以便更充分地关注与当前目标相关的方面。
- 封装,利用抽象数据类型将数据和基于数据的操作封装在一起,使其构成一个不可分割的独立实体。数据存放在抽象数据类型的内部,尽可能地隐藏内部的细节,只保留一些对外接口,使之与外部发生联系。
- 继承,使用已存在的类的定义作为基础,建立新类的技术。新类的定义可以增加新的数据或新的功能,也可以用父类的功能,但不能选择性地继承父类。
- 程序中定义的引用变量所指向的具体类型和通过该引用变量触发的方法调用在编程时并不确定,而在程序运行期间才能确定,即一个引用变量到底会指向哪个类的实例对象,该引用变量触发的方法调用到底是哪个类中实现的方法,必须在程序运行期间才能决定
18.Vue2
18.1 基本使用
computed 和 watch:
- computed 有缓存,data 不变则不会重新计算
- watch 监听引用类型,拿不到 oldVal
v-if 和 v-for 优先级:
- vue2 中 v-for 优先级比 v-if 要高,所以应该将 v-if 放在父元素上
事件:
问题:
- event 参数,自定义参数
- 事件修饰符,按键修饰符
- 【观察】事件被绑定到哪里
<template>
  <div>
    <p>{{ num }}</p>
    <button @click="increment">+1</button>
    <button @click="increment2(2, $event)">+2</button>
  </div>
</template>

<script>
export default {
  name: '',
  data() {
    return {
      num: 0
    }
  },
  methods: {
    increment(event) {
      console.log('event', event, event.__proto__.constructor)
      console.log(event.target)
      console.log(event.currentTarget) // 注意,事件是被注册到当前元素的
      this.num++
    },
    increment2(val, event) {
      console.log('event2', event, event.__proto__.constructor)
      console.log(event.target)
      this.num = this.num + val
    }
  }
}
</script>

<style scoped></style>
2
3
4
5
6
7
8
9
10
11
12
13
14
15
16
17
18
19
20
21
22
23
24
25
26
27
28
29
30
31
32
33
由上面可知:
- event 是原生的
- 事件被挂载到当前元素
事件修饰符
<!-- 阻止单击事件继续传播 -->
<a @click.stop=""></a>
<!-- 提交事件不再重载页面 -->
<form @submit.prevent=""></form>
<!-- 修饰符可以串联 -->
<a @click.stop.prevent=""></a>
<!-- 只有修饰符 -->
<form @submit.prevent></form>
<!-- 添加事件监听器时使用事件捕获模式 -->
<!-- 即内部元素触发的事件先在此处理,然后才交由内部元素进行处理 -->
<div @click.capture=""></div>
<!-- 事件不是从内部元素触发的 -->
<div @click.self=""></div>
2
3
4
5
6
7
8
9
10
11
12
13
按键修饰符
<!-- 即使 Alt 或 Shift 被一同按下也会触发 -->
<button @click.ctrl=""></button>
<!-- 有且只有 Ctrl 被按下的时候才触发 -->
<button @click.ctrl.exact=""></button>
<!-- 没有任何系统修饰符被按下的时候才触发 -->
<button @click.exact=""></button>
2
3
4
5
6
表单写法
<template>
  <div>
    <p>输入框: {{ name }}</p>
    <input type="text" v-model.trim="name" />
    <input type="text" v-model.lazy="name" />
    <input type="text" v-model.number="age" />

    <p>多行文本</p>
    <textarea v-model="desc"></textarea>

    <p>复选框 {{ checked }}</p>
    <input type="checkbox" v-model="checked" />

    <p>多个复选框 {{ checkedNames }}</p>
    <input type="checkbox" id="jack" value="Jack" v-model="checkedNames" />
    <label for="jack">Jack</label>
    <input type="checkbox" id="john" value="John" v-model="checkedNames" />
    <label for="john">John</label>
    <input type="checkbox" id="mike" value="Mike" v-model="checkedNames" />
    <label for="mike">Mike</label>

    <p>单选 {{ gender }}</p>
    <input type="radio" id="male" value="male" v-model="gender" />
    <label for="male">男</label>
    <input type="radio" id="female" value="female" v-model="gender" />
    <label for="female">女</label>

    <p>下拉列表选择(单选){{ value }}</p>
    <select v-model="value">
      <option value="" disabled>请选择</option>
      <option>A</option>
      <option>B</option>
      <option>C</option>
    </select>

    <p>下拉列表选择(多选){{ selectedList }}</p>
    <select v-model="selectedList" multiple>
      <option value="" disabled>请选择</option>
      <option>A</option>
      <option>B</option>
      <option>C</option>
    </select>
  </div>
</template>

<script>
export default {
  name: '',
  data() {
    return {
      name: 'yuanke',
      age: 22,
      desc: 'i am desc',
      checked: true,
      checkedNames: [],
      gender: '',
      value: '',
      selectedList: []
    }
  },
  methods: {}
}
</script>

<style scoped></style>
2
3
4
5
6
7
8
9
10
11
12
13
14
15
16
17
18
19
20
21
22
23
24
25
26
27
28
29
30
31
32
33
34
35
36
37
38
39
40
41
42
43
44
45
46
47
48
49
50
51
52
53
54
55
56
57
58
59
60
61
62
63
64
65
18.2 父子通讯
- props 和 $emit
- 组件间通讯 - 自定义事件
- 组件生命周期
父子通讯和兄弟通讯:
App.vue:
<template>
  <div id="app">
    <Input @add="addHandler" />
    <ForDemo :list="list" @delete="deleteHandler" />
  </div>
</template>

<script>
import ForDemo from './components/ForDemo.vue'
import Input from './components/Input.vue'
export default {
  name: 'app',
  data() {
    return {
      list: [
        {
          id: 1,
          title: 'title1'
        },
        {
          id: 2,
          title: 'title2'
        }
      ]
    }
  },
  components: {
    ForDemo,
    Input
  },
  methods: {
    addHandler(title) {
      this.list.push({
        id: `id-${Date.now()}`,
        title
      })
    },
    deleteHandler(id) {
      this.list = this.list.filter(item => item.id !== id)
    }
  }
}
</script>

<style scoped></style>
2
3
4
5
6
7
8
9
10
11
12
13
14
15
16
17
18
19
20
21
22
23
24
25
26
27
28
29
30
31
32
33
34
35
36
37
38
39
40
41
42
43
44
45
Input.vue:
<template>
  <div>
    <input v-model="title" />
    <button @click="addTitle">add</button>
  </div>
</template>

<script>
import event from '../event'
export default {
  name: '',
  data() {
    return {
      title: ''
    }
  },
  methods: {
    addTitle() {
      this.$emit('add', this.title)
      // 调用自定义事件 - 触发兄弟组件
      event.$emit('onAddTitle', this.title)
      this.title = ''
    }
  }
}
</script>

<style scoped></style>
2
3
4
5
6
7
8
9
10
11
12
13
14
15
16
17
18
19
20
21
22
23
24
25
26
27
28
ForDemo.vue:
<template>
  <div>
    <ul>
      <li v-for="item in list" :key="item.id">
        {{ item.title }}
        <button @click="deleteItem(item.id)">删除</button>
      </li>
    </ul>
  </div>
</template>

<script>
import event from '../event'
export default {
  name: '',
  props: {
    list: {
      type: Array,
      default() {
        return []
      }
    }
  },
  data() {
    return {}
  },
  methods: {
    deleteItem(id) {
      this.$emit('delete', id)
    },
    addTitleHandler(title) {
      console.log('on add title', title)
    }
  },
  created() {
    console.log('list created')
  },
  mounted() {
    event.$on('onAddTitle', this.addTitleHandler)
  },
  beforeUpdate() {
    console.log('list before update')
  },
  updated() {
    console.log('list updated')
  },
  beforeDestroy() {
    // 及时销毁,否则可能造成内存泄露
    event.$off('onAddTitle', this.addTitleHandler)
  }
}
</script>

<style scoped></style>
2
3
4
5
6
7
8
9
10
11
12
13
14
15
16
17
18
19
20
21
22
23
24
25
26
27
28
29
30
31
32
33
34
35
36
37
38
39
40
41
42
43
44
45
46
47
48
49
50
51
52
53
54
event.js:
import Vue from 'vue'
export default new Vue()
2
18.3 生命周期
Created 和 Mounted 区别
- created 实例已经初始化,但是没渲染
- mounted 是网页已经绘制完成了
父子组件初始化,子组件更新时的生命周期
index 为父组件,list 为子组件
index beforeCreated
VM5980:1 index created
VM5980:1 index beforeMount
VM5980:1 list beforeCreated
VM5980:1 list created
VM5980:1 list beforeMount
VM5980:1 list mounted
VM5980:1 index mounted
VM5980:1 index before update
VM5980:1 list before update
VM5980:1 list updated
VM5980:1 index updated
2
3
4
5
6
7
8
9
10
11
12
18.4 Vue 高级特性
自定义 v-model
$nextTickslot动态、异步组件
keep-alivemixin
18.5 自定义 v-model
方法一
App.vue
<template>
  <div id="app">
    {{ name }}
    <ForDemo v-model="name" />
    <!-- 等效于 :value="name" @input="name = $event.target.value" -->
  </div>
</template>

<script>
import ForDemo from './components/ForDemo.vue'
export default {
  name: 'app',
  data() {
    return {
      name: 'yuanke'
    }
  },
  components: {
    ForDemo
  },
  methods: {}
}
</script>

<style scoped></style>
2
3
4
5
6
7
8
9
10
11
12
13
14
15
16
17
18
19
20
21
22
23
24
25
ForDemo.vue
<template>
  <div>
    <input type="text" :value="value" @input="$emit('input', $event.target.value)" />
  </div>
</template>

<script>
export default {
  name: '',
  props: ['value'],
  data() {
    return {}
  }
}
</script>

<style scoped></style>
2
3
4
5
6
7
8
9
10
11
12
13
14
15
16
17
方法二
App.vue
<template>
  <div id="app">
    {{ name }}
    <ForDemo v-model="name" />
    <!-- 等效于 :value="name" @input="name = $event.target.value" -->
  </div>
</template>

<script>
import ForDemo from './components/ForDemo.vue'
export default {
  name: 'app',
  data() {
    return {
      name: 'yuanke'
    }
  },
  components: {
    ForDemo
  },
  methods: {}
}
</script>

<style scoped></style>
2
3
4
5
6
7
8
9
10
11
12
13
14
15
16
17
18
19
20
21
22
23
24
25
ForDemo.vue
<template>
  <div>
    <input
      type="text"
      :value="val"
      @input="$emit('hasChanged', $event.target.value)" />
  </div>
</template>

<script>
export default {
  name: '',
  model: {
    prop: 'val',
    event: 'hasChanged'
  },
  props: {
    val: String,
    default() {
      return ''
    }
  },
  data() {
    return {}
  }
}
</script>

<style scoped></style>
2
3
4
5
6
7
8
9
10
11
12
13
14
15
16
17
18
19
20
21
22
23
24
25
26
27
28
29
18.6 $nextTick
- Vue 是异步渲染
- data 改变之后,DOM 不会立刻渲染
- $nextTick 会在 DOM 渲染之后被触发,以获取最新 DOM 节点
<template>
  <div>
    <ul ref="ul1">
      <li v-for="(item, index) in list" :key="index">
        {{ item }}
      </li>
    </ul>
    <button @click="addItem">添加一项</button>
  </div>
</template>

<script>
export default {
  name: 'son',
  data() {
    return {
      list: ['a', 'b', 'c']
    }
  },
  methods: {
    addItem() {
      this.list.push(`${Date.now()}`)
      this.list.push(`${Date.now()}`)
      this.list.push(`${Date.now()}`)
      // 异步渲染,$nextTick 待 DOM 渲染完后再回调
      // 页面渲染时会将 data 的修改做整合,多次 data 修改只会渲染一次
      this.$nextTick(() => {
        const ulElem = this.$refs.ul1
        console.log(ulElem.childNodes.length)
      })
    }
  }
}
</script>

<style scoped></style>
2
3
4
5
6
7
8
9
10
11
12
13
14
15
16
17
18
19
20
21
22
23
24
25
26
27
28
29
30
31
32
33
34
35
36
18.7 插槽
作用域插槽
将子组件数据传递给父组件
App.vue
<template>
  <div id="app">
    <ForDemo :url="website.url">
      <template v-slot="slotProps">
        {{ slotProps.slotData.title }}
      </template>
    </ForDemo>
  </div>
</template>

<script>
import ForDemo from './components/ForDemo.vue'
export default {
  name: 'app',
  data() {
    return {
      name: 'yuanke',
      website: {
        url: 'https://www.baidu.com',
        title: 'baidu',
        subTitle: 'search your like'
      }
    }
  },
  components: {
    ForDemo
  },
  methods: {}
}
</script>

<style scoped></style>
2
3
4
5
6
7
8
9
10
11
12
13
14
15
16
17
18
19
20
21
22
23
24
25
26
27
28
29
30
31
32
ForDemo.vue
<template>
  <div>
    <a :href="url">
      <slot :slotData="website">
        {{ website.subTitle }}
      </slot>
    </a>
  </div>
</template>

<script>
export default {
  name: 'son',
  props: {
    url: {
      type: String,
      default() {
        return 'haha'
      }
    }
  },
  data() {
    return {
      website: {
        url: 'bing.com',
        title: 'bing',
        subTitle: 'ai search'
      }
    }
  }
}
</script>

<style scoped></style>
2
3
4
5
6
7
8
9
10
11
12
13
14
15
16
17
18
19
20
21
22
23
24
25
26
27
28
29
30
31
32
33
34
18.8 动态组价
:is="component-name"用法- 需要根据数据,动态渲染的场景。即组件类型不确定
<template>
  <div id="app">
    <div v-for="(val, key) in newsData" :key="key">
      <component :is="val.type" />
    </div>
  </div>
</template>

<script>
import ForDemo from './components/ForDemo.vue'
import TplDemo from '@/components/TplDemo'
export default {
  name: 'app',
  data() {
    return {
      newsData: {
        1: {
          type: 'ForDemo'
        },
        2: {
          type: 'TplDemo'
        },
        3: {
          type: 'ForDemo'
        }
      }
    }
  },
  components: {
    ForDemo,
    TplDemo
  }
}
</script>
2
3
4
5
6
7
8
9
10
11
12
13
14
15
16
17
18
19
20
21
22
23
24
25
26
27
28
29
30
31
32
33
34
18.9 异步组件
类似 echarts 等打包进来体积特别大,应该使用异步组件
import()函数- 按需加载,异步加载大组件
<template>
  <div id="app">
    <ForDemo v-if="show" />
    <button @click="show = !show">show</button>
  </div>
</template>

<script>
export default {
  name: 'app',
  data() {
    return {
      show: false
    }
  },
  components: {
    // 异步加载,如果有一个
    ForDemo: () => import('./components/ForDemo.vue')
  }
}
</script>
2
3
4
5
6
7
8
9
10
11
12
13
14
15
16
17
18
19
20
21
18.10 keep-alive
在 tab 中切换的复杂逻辑的时候,不建议使用 v-show,而是应该使用 KeepAlive
- 缓存组件
- 频繁切换,不需要重复渲染
- 常见于 Vue 常见性能优化
<template>
  <div>
    <button @click="changeState('A')">A</button>
    <button @click="changeState('B')">B</button>
    <button @click="changeState('C')">C</button>

    <KeepAlive>
      <A v-if="state === 'A'" />
      <B v-if="state === 'B'" />
      <C v-if="state === 'C'" />
    </KeepAlive>
  </div>
</template>

<script>
import A from './A.vue'
import B from './B.vue'
import C from './C.vue'
export default {
  name: 'child',
  components: { A, B, C },
  data() {
    return {
      state: 'A'
    }
  },
  methods: {
    changeState(state) {
      this.state = state
    }
  }
}
</script>
2
3
4
5
6
7
8
9
10
11
12
13
14
15
16
17
18
19
20
21
22
23
24
25
26
27
28
29
30
31
32
33
18.11 mixin
- 多个组件有相同的逻辑,抽离出来
- mixin 并不是完美的解决方案,会有一些问题
- vue3 提出的 Composition API 旨在解决这些问题
缺点
变量来源不明确,不利于阅读
多 mixin 可能会造成命名冲突
mixin 和组件可能出现多对多的关系,复杂度较高
18.12 vuex
- 安装:
npm i vuex@3 - 配置 main.js:
import Vue from 'vue'
import App from './App'
import store from './store'

Vue.config.productionTip = false

new Vue({
  store,
  el: '#app',
  components: { App },
  template: '<App/>'
})
2
3
4
5
6
7
8
9
10
11
12
- store/index.js:
import Vue from 'vue'
import Vuex from 'vuex'

Vue.use(Vuex)

export default new Vuex.Store({
  state: {
    name: 'yuanke',
    info: {
      hobby: 'ball',
      address: 'beijing'
    }
  },
  getters: {
    cuteName: (state, getters) => {
      return `cute ${state.name}`
    }
  },
  mutations: {
    getName(state) {
      console.log(state.name)
    },
    setName(state, { name }) {
      state.name = name
    }
  },
  actions: {
    async slowlyGetName(context) {
      return (await context.state.name) + ' slowly'
    }
  }
})
2
3
4
5
6
7
8
9
10
11
12
13
14
15
16
17
18
19
20
21
22
23
24
25
26
27
28
29
30
31
32
- state 的用法:(getter 同理)
<template>
  <div>
    {{ name }}
  </div>
</template>

<script>
import { mapState } from 'vuex'

export default {
  name: 'child',
  methods: {},
  // 下面为计算属性名称与 state 子节点名称相同时的简写
  // computed: mapState(['name'])
  // computed: mapState({
  //   name: state => state.name
  // })

  // 对象展开运算符
  computed: {
    test() {
      return 'haha'
    },
    ...mapState({
      name: state => state.name
    })
  }
}
</script>
2
3
4
5
6
7
8
9
10
11
12
13
14
15
16
17
18
19
20
21
22
23
24
25
26
27
28
29
mutation 的用法:(和 action 用法一致)
<template>
  <div></div>
</template>

<script>
import { mapMutations } from 'vuex'

export default {
  name: 'child',
  methods: {
    // 函数名和 vuex 定义的一样时
    ...mapMutations(['getName']),
    ...mapMutations({
      set: 'setName'
    })
  },
  mounted() {
    this.set({ name: 'haha' })
    this.getName()
  }
}
</script>
2
3
4
5
6
7
8
9
10
11
12
13
14
15
16
17
18
19
20
21
22
18.13 vue router
hash 模式(默认)
history 模式
后者需要 server 端支持
18.14 面试题一
v-show 和 v-if 区别
- v-show 通过 css display 控制显示或隐藏
- v-if 组件真正渲染和销毁,而不是显示或隐藏
- 频繁切换 v-show,否则 v-if
为何在 v-for 使用 key
- 必须用 key,且不能是 index 和 random
- diff 算法中通过 tag 和 key 来判断,是否是 sameNode
- 减少渲染次数,提升渲染性能
Vue 组件如何通讯
- 父子组件 props 和 this.$emit
- 自定义事件 event.$no event.$off event.$emit
- vuex
描述组件渲染和更新的过程
- render 函数是将模板渲染为虚拟节点树。第一次渲染时,render 时会将触发 data 的 getter,然后 watcher 会收集依赖,然后进行虚拟节点树的渲染
- 当 data 中数据改变时,会触发 setter 从而被 watcher 监听,进行 re trigger 重新渲染
18.15 面试题二
双向数据绑定 v-model 的实现原理
- input 元素的
value = this.name - 绑定 input 事件:
this.name = $event.target.value - data 更新触发 re-render
computed 特点
- 缓存,data 不变不会重新计算
- 提高性能
为何组件 data 必须是一个函数
vue 组件编译后是一个类,每个 vue 都是类的实例化,如果 data 不是函数,将会导致变量重复
ajax 放在哪个生命周期
- mounted
- js 是单线程,ajax 异步获取数据
- 放在 mounted 之前没有用,只会让逻辑更加混乱
如何将组件所有 props 传递给子组件
- $props
- 用法
<User v-bind="$props" />
自定义 v-model
见 18.5
多个组件有相同的逻辑,如何抽离
- mixin 以及 mixin 的一些缺点
何时使用异步组件
- 加载大组件
- 路由异步加载
何时使用 keep-alive
缓存组件,不需要重复渲染
如多个静态 tab 页的切换
优化性能
18.16 面试题三
何时使用 beforeDestroy
- 解绑自定义事件
event.$off - 清除定时器
- 解绑自定义的 DOM 事件,如 window.scroll 等
什么是作用域插槽
- slot 中有自己的 data,如果想将这个 data 传给定义插槽的地方,就需要自定义插槽
Vuex 中的 action 和 mutation 有何区别
action 中处理异步,mutation 不行
mutation 做原子操作
action 中可以整合多个 mutation
18.17 面试题四
监听 data 变化的核心 API 是什么
Object.defineProperty- 深度监听、监听数组
Vue 如何监听数组变化
Object.defineProperty不能监听数组变化- 重新定义原型,重写 push、pop 等方法,实现监听
- proxy 可以原生支持监听数组变化
描述响应式原理
- 监听 data 变化
- 组件渲染和更新的流程
diff 算法的时间复杂度
- O(n)
- 在 O(n^3) 优化而来的
简述 diff 算法过程
patch(elem, vnode)和patch(vnode, newVnode)patchVnode和addVnodes和removeVnodesupdateChildren(key 的重要性)
Vue 为何是一步渲染,$nextTick 何用
- 异步渲染(以及合并 data 修改),以提高渲染性能
$nextTick在 DOM 更新完之后,触发回调
Vue 常见性能优化
合理使用 v-show、v-if
合理使用 computed
v-for 中加 key,以及避免和 v-if 同时使用(vue2 中 v-for 的优先级更高)
自定义事件、DOM 事件及时销毁
合理使用异步组件
合理使用 keep-alive
data 层级不要太深
使用 vue-loader 在开发环境中做预编译
webpack 层面的优化
前端通用优化,图片懒加载等
使用 SSR
19.Vue 原理
19.1 简介
组件化
响应式
vdom 和 diff
模版编译
渲染过程
前端路由
19.2 组件化基础
数据驱动视图
传统组件,只是静态渲染,更新还要依赖于操作 DOM
数据驱动视图 - Vue MVVM 和 React setState
MVVM 中,M 是 model,V 是 view,VM 是 viewModel。model 是 data 数据,view 是 dom 结构,viewModel 是连接层
19.3 监听 data 变化的核心 API 是什么
- 核心 API:Object.defineProperty
const data = {}
let name = 'zhangsan'
Object.defineProperty(data, 'name', {
  get() {
    console.log('get')
    return name
  },
  set(newVal) {
    console.log('set')
    name = newVal
  }
})

console.log(data.name)
data.name = 'lisi'
2
3
4
5
6
7
8
9
10
11
12
13
14
15
19.4 如何深度监听 data 变化
缺点
- 深度监听,需要递归到底,一次性计算量大
- 无法监听新增属性/删除属性(Vue.set、Vue.delete)
- 无法原生监听数组,需要特殊处理
简单版本
function updateView() {
  console.log(`updated - ${Date.now()}`)
}

function defineReactive(target, key, value) {
  // 深度监听
  observer(value)

  Object.defineProperty(target, key, {
    get() {
      return value
    },
    set(newValue) {
      if (newValue !== value) {
        // 设置新值
        // 注意,value 一直在闭包中,此处设置完之后,再 get 时也是
        value = newValue
        // 举一个例子,当 data.age = { real: 18 } 被设置后,如果再 data.age.real = 22 时,就无法触发响应式,因为 real 属性没有被监听到
        observer(newValue)
        updateView()
      }
    }
  })
}

// 监听对象属性
function observer(target) {
  if (typeof target !== 'object' || target == null) {
    // 不是对象或数组
    return target
  }
  for (let key in target) {
    defineReactive(target, key, target[key])
  }
}

const data = {
  name: 'yuanke',
  age: 18,
  info: {
    address: 'beijing'
  }
}

// 监听数据
observer(data)

// 测试
data.name = 'lisi'
data.age = 19
// data.x = '100' // 新增属性,监听不到 - 所以有 Vue.set
// delete data.name // 删除属性,监听不到 - 所以有 Vue.delete
data.info.address = '上海' // 深度监听
// data.nums.push(4) // 监听数组
2
3
4
5
6
7
8
9
10
11
12
13
14
15
16
17
18
19
20
21
22
23
24
25
26
27
28
29
30
31
32
33
34
35
36
37
38
39
40
41
42
43
44
45
46
47
48
49
50
51
52
53
54
监听数组
// 触发更新视图
function updateView() {
  console.log(`updated - ${Date.now()}`)
}

// 重新定义数组原型
const oldArrayProperty = Array.prototype
// 创建新对象,原型指向 oldArrayProperty,再拓展新的方法就不会影响原型
const arrProto = Object.create(oldArrayProperty)
!['push', 'pop', 'shift', 'unshift', 'splice'].forEach(methodName => {
  arrProto[methodName] = function () {
    updateView() // 触发视图更新
    oldArrayProperty[methodName].call(this, ...arguments)
  }
})

// 重新定义属性,监听起来
function defineReactive(target, key, value) {
  // 深度监听
  observer(value)

  Object.defineProperty(target, key, {
    get() {
      return value
    },
    set(newValue) {
      if (newValue !== value) {
        // 设置新值
        // 注意,value 一直在闭包中,此处设置完之后,再 get 时也是
        value = newValue
        // 举一个例子,当 data.age = { real: 18 } 被设置后,如果再 data.age.real = 22 时,就无法触发响应式,因为 real 属性没有被监听到
        observer(newValue)
        updateView()
      }
    }
  })
}

// 监听对象属性
function observer(target) {
  if (typeof target !== 'object' || target == null) {
    // 不是对象或数组
    return target
  }

  if (Array.isArray(target)) {
    target.__proto__ = arrProto
  }

  for (let key in target) {
    defineReactive(target, key, target[key])
  }
}

const data = {
  name: 'yuanke',
  age: 18,
  info: {
    address: 'beijing'
  }
}

// 监听数据
observer(data)

// 测试
data.name = 'lisi'
data.age = 19
// data.x = '100' // 新增属性,监听不到 - 所以有 Vue.set
// delete data.name // 删除属性,监听不到 - 所以有 Vue.delete
data.info.address = '上海' // 深度监听
// data.nums.push(4) // 监听数组
2
3
4
5
6
7
8
9
10
11
12
13
14
15
16
17
18
19
20
21
22
23
24
25
26
27
28
29
30
31
32
33
34
35
36
37
38
39
40
41
42
43
44
45
46
47
48
49
50
51
52
53
54
55
56
57
58
59
60
61
62
63
64
65
66
67
68
69
70
71
72
19.5 虚拟 DOM
vdom 就是用 js 模拟 dom 结构,计算出最小的变更,操作 dom
用 js 模拟 dom 结构(vnode)
新旧 vnode 对比,得出最小的更新范围,最后更新 dom
数据驱动视图的模式下,有效控制 dom 操作
19.6 diff 算法
树 diff 的时间复杂度 O(n^3)
- 第一,遍历 tree1;第二,遍历 tree2
- 第三,排序
- 1000 个节点,要计算 1 亿次,算法不可用
优化时间复杂度到 O(n)
只比较同一层级,不跨级比较
tag 不相同,则直接删掉重建,不再深度比较
tag 和 key,两者都相同,则认为是相同节点,不再深度比较
若 tag 相同,但是内容不同,就进行精细化比较:
四种命中查找:命中一种该节点就不进行命中判断了
- 新前与旧前
- 新后与旧后
- 新后与旧前
- 新前与旧后
4 情况下发生了,新前指向的节点,要移动到旧前之前(真实 dom 移动到旧前之前,原先的虚拟 dom 设置为 undefined)
3 情况发生了,新前指向的节点,要移动到旧后之后
diff 算法总结
patchVnode
addVnode、removeVnode
updateChildren(key 的重要性)
19.7 模板编译
- 前置知识:js 的 with 语法
- vue template compiler 将模板编译为 render 函数
- 执行 render 函数生成 vnode,再执行 patch 和 diff
- 使用 webpack vue-loader,会在开发环境下编译模版
with 语法
改变 {} 内自由变量的查找规则,当做 obj 属性来查找;如果找不到匹配的 obj 属性,就会报错;with 要慎用,它大破了作用域规则,易读性变差
const obj = {
  a: 100,
  b: 200
}

with (obj) {
  console.log(a) // 100
  console.log(b) // 200
}
2
3
4
5
6
7
8
9
19.8 总结
- 响应式:监听 data 属性 getter、setter(包括数组)
- 模板编译:模板到 render 函数,函数返回 vnode
- vdom:
patch(elem, vnode)和patch(vnode, newVnode)
组件渲染/更新过程
- 初次渲染过程
- 解析模板为 render 函数(或在开发环境已完成,vue-loader)
- 触发响应式,监听 data 属性 getter、setter
- 执行 render 函数(将 template 编译为 vnode),生成 vnode,
patch(elem, vnode)(会触发 getter)
- 更新过程
- 修改 data,触发 setter(此前已经在 getter 中被监听)
- 重新执行 render 函数,生成 newVnode
patch(vnode, newVnode)
- 异步渲染
- $nextTick 待 DOM 渲染完后回调
- 页面渲染时会将 data 的修改做整合,多次 data 修改只会执行一次
- 这可以减少 DOM 操作次数,提高性能
下面的模板应该改成 render 函数
19.9 前端路由原理
网页 url 组成部分
// http://127.0.0.0.1:8881/01-hash.html?a=100&b=20#/aaa/bbb
location.protocol // 'http:'
location.hostname // '127.0.0.1'
location.host // '127.0.0.1:8881'
location.port // '8881'
location.pathname // '01-hash.html'
location.search // '?a=100&b=20'
location.hash // '#/aaa/bbb'
2
3
4
5
6
7
8
hash 特点
- hash 变化会触发网页跳转,即浏览器的前进、后退
- hash 变化不会刷新页面,spa 必需的特点
- hash 永远不会提交到 server 端(前端自生自灭)
hash 变化
- js 修改 url
- 手动修改 url 的 hash
- 浏览器前进、后退
window.onhashchange = event => {
  console.log('old url', event.oldURL)
  console.log('new url', event.newURL)
  console.log('hash', location.hash)
}

// 页面初次加兹安,获取 hash
document.addEventListener('DOMContentLoaded', () => {
  console.log('hash:', location.hash)
})

// js 修改 url
document.querySelector('#btn1').addEventListener('click', function () {
  location.href = '#/user'
})
2
3
4
5
6
7
8
9
10
11
12
13
14
15
19.10 H5 history
- 用 url 规范的路由,但跳转时不刷新页面
// 页面初次加载,获取 pathname
document.addEventListener('DOMContentLoaded', function () {
  console.log('load', location.pathname)
})

// 打开一个新路由
document.querySelector('#btn1').addEventListener('click', function () {
  const state = { name: 'page1' }
  console.log('切换路由到', 'page1')
  history.pushState(state, '', 'page1')
})

// 监听浏览器前进、后退
window.onpopstate = function (event) {
  console.log('onpopstate', event.state, location.pathname)
}
2
3
4
5
6
7
8
9
10
11
12
13
14
15
16
20.Vue3
20.1 面试题
- Vue3 比 Vue2 有什么优势
答:1.性能更好;2.体积更小;3.更好的 ts 支持;4.更好的代码组织;5.更好的逻辑抽离;6.更多新功能
- 描述 Vue3 生命周期
答:部分生命周期名字更改:beforeDestroy -> beforeUnmount,destroyed -> unmounted
- 如何看待 Composition API 和 Option API(对比)
答:Composition 带来了更好的代码组织、更好的逻辑复用、更好的类型推导
如何理解 ref、toRef 和 toRefs
Vue3 升级了哪些重要的功能
Composition API 如何实现代码逻辑复用
Vue3 如何实现响应式
watch 和 watchEffect 的区别是什么
setup 中如何获取组件实例
Vue3 为什么比 Vue2 快
vite 是什么
Composition API 和 React Hooks 的对比
20.2 ref、toRef 和 toRefs
最佳使用方式:
- 用 reactive 做对象的响应式,用 ref 做值类型的响应式
- setup 中返回 toRefs(state),或者 toRef(state, 'xxx')
- ref 的变量命名都用 xxxRef
- 合成函数返回响应式对象时,用 toRefs
Ref
- 生成值类型的响应式数据
- 可用于模版和 reactive
- 通过 .value 修改值
<template>
  <p ref="elemRef">我是一行文字</p>
</template>

<script setup lang="ts">
import { onMounted, ref } from 'vue'

const elemRef = ref<HTMLElement | null>(null)
onMounted(() => {
  console.log('ref template', elemRef.value)
  console.log(elemRef.value?.innerHTML)
})
</script>
2
3
4
5
6
7
8
9
10
11
12
13
toRef
- 针对一个响应式对象(reactive 封装)的 prop
- 创建一个 ref,具有响应式
- 两者保持引用关系
const state = reactive({ age: 20, name: 'yuanke' }) const ageRef = toRef(state, 'age')
toRefs
- 将响应式对象(reactive 封装)转换为普通对象
- 对象的每个 prop 都是对应的 ref
- 两者保持引用关系
<template>{{ state.name }} - {{ nameRef }}</template>

<script setup lang="ts">
import { reactive, toRefs } from 'vue'

const state = reactive({
  age: 20,
  name: 'yuanke'
})
const stateAsRefs = toRefs(state)
const { name: nameRef, age: ageRef } = stateAsRefs
</script>
2
3
4
5
6
7
8
9
10
11
12
最佳实践 - 合成函数返回响应式对象
function useFeatureX() { const state = reactive({ x: 1, y: 2 }) return toRefs(state) }
// 不丢失响应式的情况下破坏结构 const { x, y } = useFeatureX()
2
20.3 ref 的一些面试问题
为什么需要 ref?
- 返回值类型,会丢失响应式
- 如在 setup、computed、合成函数,都有可能返回值类型
- Vue 如果不定义 ref,用户将自造 ref,反而混乱
为什么需要 .value?
- ref 是一个对象(不丢失响应式),value 存储值
- 通过 .value 属性的 get 和 set 实现响应式
- 用于模版、reactive 时,不需要 .value,其他情况都需要
为何需要 toRef、toRefs?
初衷:不丢失响应式的情况下,把对象数据分解和扩散
前提:针对的是响应式对象(reactive 封装的),非普通对象
注意:不创造响应式,而是延续响应式
20.4 Vue3 升级了哪些重要的功能
- createApp
vue2:const app = new Vue({ /* 选项 */ })
vue3:const app = Vue.createApp({ /* 选项 */ })
vue2:(Vue3 就是下面的 Vue 全部换成 app)
Vue.use()
Vue.mixin()
Vue.component()
Vue.directive()
2
3
4
- emits 属性
父:
<template>
  <Child @sayHello="sayHi" />
</template>

<script setup lang="ts">
import Child from './components/Child.vue'

const sayHi = (value: number) => {
  console.log('hello' + value)
}
</script>
2
3
4
5
6
7
8
9
10
11
子:
<template>
  <button @click="changeValue">{{ value }}</button>
</template>

<script setup lang="ts">
import { ref } from 'vue'

const value = ref(20)
const emit = defineEmits(['sayHello'])

const changeValue = () => {
  emit('sayHello', 30)
}
</script>
2
3
4
5
6
7
8
9
10
11
12
13
14
- 生命周期
- 多事件
<button @click="one($event), two($event)">
  Submit
</button>
2
3
Fragment
移除 .sync
异步组件的写法
移除 filter
Teleport
Suspense
Composition API
20.5.Composition API 实现逻辑复用
- 抽离逻辑到一个函数
- 函数命名约定为 useXxxx 格式(React Hooks 也是)
import { onMounted, onUnmounted, ref } from 'vue'

export default function useMousePosition() {
  const x = ref(0)
  const y = ref(0)

  function update(this: Window, e: MouseEvent) {
    x.value = e.pageX
    y.value = e.pageY
  }

  onMounted(() => {
    window.addEventListener('mousemove', update)
  })

  onUnmounted(() => {
    window.removeEventListener('mousemove', update)
  })

  return {
    x,
    y
  }
}
2
3
4
5
6
7
8
9
10
11
12
13
14
15
16
17
18
19
20
21
22
23
24
20.6 Vue3 如何实现响应式
Object.defineProperty 缺点
- 深度监听需要一次性递归
- 无法监听新增属性/删除属性(Vue.set Vue.delete)
- 无法原生监听数组,需要特殊处理
function reactive(target = {}) {
  if (typeof target !== 'object' || target == null) {
    return target
  }
  // 代理配置
  const proxyConf = {
    get(target, key, receiver) {
      // 只处理本身(非原型)的属性
      const ownKeys = Reflect.ownKeys(target)
      if (ownKeys.includes(key)) {
        console.log('get', key)
      }

      const result = Reflect.get(target, key, receiver)
      // 只有 get 的时候才会递归,所有性能会好很多
      return reactive(result) // 返回结果
    },
    set(target, key, val, receiver) {
      // 不重复修改数据
      const oldVal = target[key]
      if (val === oldVal) return true

      const result = Reflect.set(target, key, val, receiver)
      console.log('set', key, val)
      return result // 是否设置成功
    },
    deleteProperty(target, key) {
      const result = Reflect.deleteProperty(target, key)
      console.log('delete property', key)
      return result // 是否设置成功
    }
  }
  // 生成代理对象
  const observed = new Proxy(target, proxyConf)
  return observed
}

const data = {
  name: 'yuanke',
  age: 20,
  info: {
    city: 'beijing'
  }
}

const proxyData = reactive(data)

proxyData.info.city = 'guangzhou'
2
3
4
5
6
7
8
9
10
11
12
13
14
15
16
17
18
19
20
21
22
23
24
25
26
27
28
29
30
31
32
33
34
35
36
37
38
39
40
41
42
43
44
45
46
47
48
Reflect 作用
- 和 Proxy 能力一一对应
- 规范化、标准化、函数式
- 代替 Object 上的函数
Proxy 好处
深度监听,性能更好
可监听 新增/删除 属性
可监听数组变化
20.7 watch 和 watchEffect 的区别
- 两者都可以监听 data 属性变化
- watch 需要明确监听哪个属性
- watchEffect 会根据其中的属性,自动监听其变化
watch
<template>
  <p>{{ numberRef }}</p>
  <p>{{ name }} - {{ age }}</p>
</template>

<script setup lang="ts">
import { reactive, ref, toRefs, watch } from 'vue'

const numberRef = ref(100)
const state = reactive({
  name: 'yuanke',
  age: 20
})

watch(
  numberRef,
  (newNumber, oldNumber) => {
    console.log(`newNumber: ${newNumber}, oldNumber: ${oldNumber}`)
  },
  {
    immediate: true // 初始化前就监听
  }
)

watch(
  () => state.age,
  (newAge, oldAge) => {
    console.log(`state watch ${newAge} ${oldAge}`)
  },
  {
    immediate: true,
    deep: true // 深度监听
  }
)

setTimeout(() => {
  numberRef.value = 200
}, 1500)

setTimeout(() => {
  state.age = 25
}, 1500)

setTimeout(() => {
  state.name = 'yuanke'
}, 2500)

const { name, age } = toRefs(state)
</script>
2
3
4
5
6
7
8
9
10
11
12
13
14
15
16
17
18
19
20
21
22
23
24
25
26
27
28
29
30
31
32
33
34
35
36
37
38
39
40
41
42
43
44
45
46
47
48
49
watchEffect
<template>
  <p>{{ numberRef }}</p>
  <p>{{ name }} - {{ age }}</p>
</template>

<script setup lang="ts">
import { reactive, ref, toRefs, watchEffect } from 'vue'

const numberRef = ref(100)
const state = reactive({
  name: 'yuanke',
  age: 20
})
const { name, age } = toRefs(state)

watchEffect(() => {
  console.log('state name: ' + state.name)
})

setTimeout(() => {
  state.name = 'yuankeke'
}, 1500)
</script>
2
3
4
5
6
7
8
9
10
11
12
13
14
15
16
17
18
19
20
21
22
23
20.8 setup 中如何获取组件实例
可用过
getCurrentInstance获取当前实例
20.9 Vue3 为何比 Vue2 快
proxy 响应式
PatchFlag
- 编译模版时,动态节点做标记
- 标记,分为不同的类型,如 TEXT PROPS
- diff 算法时,可以区分静态节点,以及不同类型的动态节点
hoistStatic
- 将静态节点的定义,提升到父作用域,缓存起来
- 多个相邻的静态节点,会被合并起来
- 典型的拿空间换时间的优化策略
cacheHandler:缓存事件
SSR 优化
- 静态节点直接输出,绕过了 vdom
- 动态节点,还是需要动态渲染
tree-shaking
- 编译时,会根据不同情况,引入不同的 API
20.10 Vite 为什么启动非常快
- 开发环境使用 ES6 Module,无需打包 --- 非常快
- 生产环境使用 rollup,并不会快很多
<!DOCTYPE html>
<html lang="en">
  <head>
    <meta charset="UTF-8" />
    <meta http-equiv="X-UA-Compatible" content="IE=edge" />
    <meta name="viewport" content="width=device-width, initial-scale=1.0" />
    <title>Document</title>
  </head>
  <body>
    <p>ES Module demo</p>
    <script type="module">
      import add from './src/add.js'
      const res = add(10, 20)
      console.log('add res', res)
    </script>

    <script type="module">
      import { add, multi } from './src/math.js'
      console.log(`add res: ${add(10, 20)}, multi res: ${multi(10, 20)}`)
    </script>
  </body>
</html>
2
3
4
5
6
7
8
9
10
11
12
13
14
15
16
17
18
19
20
21
22
直接引用:
<script type="module">xxx</script>外链引用:
<script type="module" src="./src/wailian.js"></script>远程引用:
import { createApp } from 'https://xxx.mjs'动态引用:
document.querySelector('#btn1').addEventListener("click", async () => { const add = await import('./src/add.js') })(支持解构写法)
20.11 Composition API 和 React Hooks 对比
前者 setup 只会被调用一次,而后者函数会被多次调用
前者无需 useMemo、useCallback,因为 setup 只调用一次
前者无需顾虑调用顺序,而后者需要保证 hooks 的顺序一致
前者 reactive + ref 比后者 useState,更难理解
21.React
21.1 面试题
React 组件如何通讯
jsx 本质是什么
context 是什么,有何用途?
shouldComponentUpdate 的用途?
描述 redux 单项数据流
setState 是同步还是异步?
21.2 基本使用
原生字符串标签渲染成网页
import React from 'react'

export default class App extends React.Component {
  constructor(props) {
    super(props)
    this.state = {
      name: 'yuanke',
      flag: true
    }
  }
  render() {
    const rawHtml = '<span>text</span><i>font</i>'
    const rawHtmlData = {
      __html: rawHtml
    }
    const rawHtmlElem = (
      <div>
        <p dangerouslySetInnerHTML={rawHtmlData}></p>
        <p>{rawHtml}</p>
      </div>
    )
    return rawHtmlElem
  }
}
2
3
4
5
6
7
8
9
10
11
12
13
14
15
16
17
18
19
20
21
22
23
24
条件判断
import React, { Fragment } from 'react'

export default class App extends React.Component {
  constructor(props) {
    super(props)
    this.state = {
      theme: 'black'
    }
  }
  render() {
    const blackBtn = <button className='btn-black'>black btn</button>
    const whiteBtn = <button className='btn-whilte'>white btn</button>

    // // if 语句判断
    // if (this.state.theme === 'black') {
    //   return blackBtn
    // } else {
    //   return whiteBtn
    // }

    // // 三元表达式
    // return this.state.theme === 'black' ? blackBtn : whiteBtn

    // &&
    return (
      <Fragment>
        {this.state.theme === 'black' && blackBtn}
        {this.state.theme === 'white' && whiteBtn}
      </Fragment>
    )
  }
}
2
3
4
5
6
7
8
9
10
11
12
13
14
15
16
17
18
19
20
21
22
23
24
25
26
27
28
29
30
31
32
列表渲染
import React from 'react'

export default class App extends React.Component {
  constructor(props) {
    super(props)
    this.state = {
      list: [
        {
          id: 'id-1',
          title: '标题1'
        },
        {
          id: 'id-2',
          title: '标题2‘'
        },
        {
          id: 'id-3',
          title: '标题3'
        }
      ]
    }
  }
  render() {
    return (
      <ul>
        {this.state.list.map((item, index) => {
          return (
            <li key={item.id}>
              index: {index}; title: {item.title}
            </li>
          )
        })}
      </ul>
    )
  }
}
2
3
4
5
6
7
8
9
10
11
12
13
14
15
16
17
18
19
20
21
22
23
24
25
26
27
28
29
30
31
32
33
34
35
36
21.3 bind this 和事件
点击事件实现 - 方法一
import React from 'react'

export default class App extends React.Component {
  constructor(props) {
    super(props)
    this.state = {
      name: 'zhangsan',
      list: [
        {
          id: 'id-1',
          title: '标题1'
        },
        {
          id: 'id-2',
          title: '标题2‘'
        },
        {
          id: 'id-3',
          title: '标题3'
        }
      ]
    }
    // 修改方法的 this 指向
    this.clickHandler1 = this.clickHandler1.bind(this)
  }
  render() {
    return <p onClick={this.clickHandler1}>{this.state.name}</p>
  }
  clickHandler1() {
    console.log(this.state)
  }
}
2
3
4
5
6
7
8
9
10
11
12
13
14
15
16
17
18
19
20
21
22
23
24
25
26
27
28
29
30
31
32
点击事件 - 方法二:clickHandler = () => {}
- event 是 SyntheticEvent,模拟出来的 DOM 事件所有能力
- event.nativeEvent 是原生事件对象
- 所有的事件,都被挂载到 document 上(React 17 不是)
- 和 DOM 事件不一样,和 Vue 事件也不一样
React 17 事件绑定到 root
React 16 绑定到 document
React 17 事件绑定到 root 组件
有利于多个 React 版本共存,例如微前端
21.4 React 表单知识点串讲
- 受控组件
- input textarea select 用 value
- checkbox radio 用 checked
受控组件
表单里面的值已经受 state 的控制,就叫受控组件
import React from 'react'

export default class App extends React.Component {
  constructor(props) {
    super(props)
    this.state = {
      name: 'yuanke',
      info: 'person message',
      city: 'guangzhou',
      flag: true,
      gender: 'male'
    }
  }
  render() {
    return (
      <div>
        <p>{this.state.name}</p>
        <label htmlFor='inputName'>姓名:</label>
        <input id='inputName' value={this.state.name} onChange={this.onInputChange} />
      </div>
    )
  }
  onInputChange = e => {
    this.setState({
      name: e.target.value
    })
  }
}
2
3
4
5
6
7
8
9
10
11
12
13
14
15
16
17
18
19
20
21
22
23
24
25
26
27
28
select
import React from 'react'

export default class App extends React.Component {
  constructor(props) {
    super(props)
    this.state = {
      name: 'yuanke',
      info: 'person message',
      city: 'guangzhou',
      flag: true,
      gender: 'male'
    }
  }
  render() {
    return (
      <div>
        <select value={this.state.city} onChange={this.onSelectChage}>
          <option value='beijing'>北京</option>
          <option value='shanghai'>上海</option>
          <option value='shenzhen'>深圳</option>
        </select>
      </div>
    )
  }
  onSelectChage = e => {
    this.setState({
      city: e.target.value
    })
  }
}
2
3
4
5
6
7
8
9
10
11
12
13
14
15
16
17
18
19
20
21
22
23
24
25
26
27
28
29
30
checkbox
import React from 'react'

export default class App extends React.Component {
  constructor(props) {
    super(props)
    this.state = {
      name: 'yuanke',
      info: 'person message',
      city: 'guangzhou',
      flag: true,
      gender: 'male'
    }
  }
  render() {
    return (
      <div>
        {this.state.flag ? 'true' : 'false'}
        <input
          type='checkbox'
          checked={this.state.flag}
          onChange={this.onCheckboxChange}
        />
      </div>
    )
  }
  onCheckboxChange = e => {
    this.setState({
      flag: !this.state.flag
    })
  }
}
2
3
4
5
6
7
8
9
10
11
12
13
14
15
16
17
18
19
20
21
22
23
24
25
26
27
28
29
30
31
radio
import React from 'react'

export default class App extends React.Component {
  constructor(props) {
    super(props)
    this.state = {
      name: 'yuanke',
      info: 'person message',
      city: 'guangzhou',
      flag: true,
      gender: 'male'
    }
  }
  render() {
    return (
      <div>
        {this.state.gender}
        <input
          type='radio'
          checked={this.state.gender === 'male'}
          onChange={this.onRadioChange}
        />
        <input
          type='radio'
          checked={this.state.gender === 'female'}
          onChange={this.onRadioChange}
        />
      </div>
    )
  }
  onRadioChange = e => {
    this.setState({
      gender: this.state.gender === 'male' ? 'female' : 'male'
    })
  }
}
2
3
4
5
6
7
8
9
10
11
12
13
14
15
16
17
18
19
20
21
22
23
24
25
26
27
28
29
30
31
32
33
34
35
36
21.5 组件使用
- props 传递数据
- props 传递函数
- props 类型检查
import React, { Fragment } from 'react'
import PropTypes from 'prop-types'

export default class App extends React.Component {
  render() {
    return <TodoListDemo />
  }
}

// todoList demo
class TodoListDemo extends React.Component {
  constructor(props) {
    super(props)
    this.state = {
      list: [
        {
          id: 'id-1',
          title: '标题1'
        },
        {
          id: 'id-2',
          title: '标题2'
        },
        {
          id: 'id-3',
          title: '标题3'
        }
      ]
    }
  }
  render() {
    return (
      <Fragment>
        <Input submitTitle={this.onSubmitTitle} />
        <List list={this.state.list} />
      </Fragment>
    )
  }
  onSubmitTitle = title => {
    this.setState({
      list: this.state.list.concat({
        id: `id-${Date.now}`,
        title
      })
    })
  }
}

// 搜索框
class Input extends React.Component {
  constructor(props) {
    super(props)
    this.state = {
      title: ''
    }
  }
  render() {
    return (
      <Fragment>
        <input value={this.state.title} onChange={this.onTitleChange} />
        <button onClick={this.onSubmit}>提交</button>
      </Fragment>
    )
  }
  onTitleChange = e => {
    this.setState({
      title: e.target.value
    })
  }
  onSubmit = e => {
    const { submitTitle } = this.props
    submitTitle(this.state.title)
    this.setState({
      title: ''
    })
  }
}
Input.propTypes = {
  submitTitle: PropTypes.func.isRequired
}

// 列表
class List extends React.Component {
  render() {
    const { list } = this.props
    return (
      <ul>
        {list.map((item, index) => {
          return <li key={item.id}>{item.title}</li>
        })}
      </ul>
    )
  }
}
List.propTypes = {
  list: PropTypes.arrayOf(PropTypes.object).isRequired
}
2
3
4
5
6
7
8
9
10
11
12
13
14
15
16
17
18
19
20
21
22
23
24
25
26
27
28
29
30
31
32
33
34
35
36
37
38
39
40
41
42
43
44
45
46
47
48
49
50
51
52
53
54
55
56
57
58
59
60
61
62
63
64
65
66
67
68
69
70
71
72
73
74
75
76
77
78
79
80
81
82
83
84
85
86
87
88
89
90
91
92
93
94
95
96
97
21.6 setState
- 不可变值
import React, { Fragment } from 'react'

export default class App extends React.Component {
  constructor(props) {
    super(props)
    this.state = {
      count: 0,
      list: [1, 2, 3],
      obj: {
        name: 'zhangsan'
      }
    }
  }
  render() {
    return (
      <Fragment>
        <p>{this.state.count}</p>
        <button onClick={this.increase}>累加</button>
      </Fragment>
    )
  }
  increase = () => {
    // const listCopy = this.state.list.slice()
    // listCopy.push(20)
    this.setState({
      count: this.state.count + 1
      // list: this.state.list.concat(100) // 追加
      // list: [...this.state.list, 100] // 追加
      // list: this.state.list.slice(0, 3) // 截取
      // list: this.state.list.filter(item => item > 100) // 筛选
      // list: listCopy // 其他操作
    })

    // 不可变值 - 对象
    this.setState({
      // obj: Object.assign({}, this.state.obj, { a: 100 })
      obj: { ...this.state.obj, a: 100 }
    })
  }
}
2
3
4
5
6
7
8
9
10
11
12
13
14
15
16
17
18
19
20
21
22
23
24
25
26
27
28
29
30
31
32
33
34
35
36
37
38
39
40
- 可能是异步更新
当 setTimeout、setInterval、自定义监听事件时,setState 是同步的。仅限于 react 18 以下!!!
import React, { Fragment } from 'react'

export default class App extends React.Component {
  constructor(props) {
    super(props)
    this.state = {
      count: 0
    }
  }
  render() {
    return (
      <Fragment>
        <p>{this.state.count}</p>
        <button onClick={this.increase}>累加</button>
      </Fragment>
    )
  }
  increase = () => {
    // // setState 后直接 console.log 会得不到最新的值
    // this.setState(
    //   {
    //     count: this.state.count + 1
    //   },
    //   () => {
    //     // 相当于 vue 的 $nextTick
    //     console.log('count', this.state.count)
    //   }
    // )
    // setTimeout 中 setState 是同步的
    // setTimeout(() => {
    //   this.setState({
    //     count: this.state.count + 1
    //   })
    //   console.log(this.state.count)
    // }, 0)
  }

  bodyClickHandler = () => {
    this.setState({
      count: this.state.count + 1
    })
    console.log('count in body event', this.state.count)
  }

  componentDidMount() {
    // 自定义的 dom 事件,setState 也是同步的
    document.body.addEventListener('click', this.bodyClickHandler)
  }

  componentWillUnmount() {
    document.body.removeEventListener('click', this.bodyClickHandler)
  }
}
2
3
4
5
6
7
8
9
10
11
12
13
14
15
16
17
18
19
20
21
22
23
24
25
26
27
28
29
30
31
32
33
34
35
36
37
38
39
40
41
42
43
44
45
46
47
48
49
50
51
52
53
- 可能会被合并
传入对象,会进行合并
这种情况不会被合并
this.setState((prevState, props) => {
  return {
    count: prevState.count + 1
  }
})
this.setState((prevState, props) => {
  return {
    count: prevState.count + 1
  }
})
2
3
4
5
6
7
8
9
10
21.7 高级特性
函数组件
非受控组件
Protals
context
异步组件
性能优化
高阶组件 HOC
render props
21.8 非受控组件
- ref
- defaultValue defaultChecked
- 手动操作 DOM 元素
基本操作
import React, { createRef, Fragment } from 'react'

export default class App extends React.Component {
  constructor(props) {
    super(props)
    this.state = {
      name: 'yuanke',
      flag: true
    }
    this.nameInputRef = createRef() // 创建 ref
    this.fileInputRef = createRef()
  }
  render() {
    return (
      <Fragment>
        <input defaultValue={this.state.name} ref={this.nameInputRef} />
        <span>state.name: {this.state.name}</span>
        <br />
        <button onClick={this.alertName}>alert name</button>
      </Fragment>
    )
  }
  alertName = () => {
    const elem = this.nameInputRef.current // 通过 ref 获取 dom 节点
    alert(elem.value)
  }
  alertFile = () => {
    const elem = this.fileInputRef.current
    alert(elem.files[0].name)
  }
}
2
3
4
5
6
7
8
9
10
11
12
13
14
15
16
17
18
19
20
21
22
23
24
25
26
27
28
29
30
31
文件上传必须使用非受控组件
某些富文本编辑器,也需要传入 dom 元素
import React, { createRef, Fragment } from 'react'

export default class App extends React.Component {
  constructor(props) {
    super(props)
    this.state = {}
    this.fileInputRef = createRef()
  }
  render() {
    return (
      <Fragment>
        <input type='file' ref={this.fileInputRef} />
        <button onClick={this.alertFile}>alert file</button>
      </Fragment>
    )
  }
  alertFile = () => {
    const elem = this.fileInputRef.current
    alert(elem.files[0].name)
  }
}
2
3
4
5
6
7
8
9
10
11
12
13
14
15
16
17
18
19
20
21
比较受控组件和非受控组件
优先使用受控组件,符合 React 设计原则
必须操作 dom 时,再是哦后非受控组件
21.9 Portals
- 组件默认会按照既定层级嵌套渲染
- 如何让组件渲染到父组件以外
使用场景
- overflow: hidden
- 父组件 z-index 值太小
- fixed 需要放在 body 第一层级
render() {
  return createPortal(
    <div className='modal'>{this.props.children}</div>,
    document.body
  )
}
2
3
4
5
6
21.10 context
context 的必要性
- 公共信息(语言、主题)传递给每个组件
- 使用 props 太繁琐
- 用 redux 小题大做
import React, { Component, createContext, Fragment } from 'react'

// 创建 Context 填入默认值(任何一个 js 变量)
const ThemeContext = createContext('light')

export default class App extends Component {
  constructor(props) {
    super(props)
    this.state = {
      theme: 'light'
    }
  }
  render() {
    return (
      // 这里提供值
      <ThemeContext.Provider value={this.state.theme}>
        <Toolbar />
        <hr />
        <button onClick={this.changeTheme}>change theme</button>
      </ThemeContext.Provider>
    )
  }
  changeTheme = () => {
    this.setState({
      theme: this.state.theme === 'light' ? 'dark' : 'light'
    })
  }
}

function Toolbar(props) {
  return (
    <Fragment>
      <ThemedButton />
      <ThemedLink />
    </Fragment>
  )
}

class ThemedButton extends Component {
  // static contextType = ThemeContext
  render() {
    // class 组件的消费值
    const theme = this.context
    return (
      <Fragment>
        <p>button's theme is {theme}</p>
      </Fragment>
    )
  }
}
ThemedButton.contextType = ThemeContext // 指定 contextType 读取当前的 theme context

function ThemedLink(props) {
  // 不是 class 组件,故使用 ThemeContext.Consumer 来实现传值
  return (
    // function 组件的消费值
    <ThemeContext.Consumer>
      {value => <p>link's theme is {value}</p>}
    </ThemeContext.Consumer>
  )
}
2
3
4
5
6
7
8
9
10
11
12
13
14
15
16
17
18
19
20
21
22
23
24
25
26
27
28
29
30
31
32
33
34
35
36
37
38
39
40
41
42
43
44
45
46
47
48
49
50
51
52
53
54
55
56
57
58
59
60
61
21.11 异步加载组件
- import()
- React.lazy
- React.Suspense
import { Component, Fragment, lazy, Suspense } from 'react'

const ContextDemo = lazy(() => import('./ContextDemo'))

export default class App extends Component {
  constructor(props) {
    super(props)
    this.state = {
      theme: 'light'
    }
  }
  render() {
    return (
      <Fragment>
        <p>引入一个动态组件</p>
        <Suspense fallback={<div>loading...</div>}>
          <ContextDemo />
        </Suspense>
      </Fragment>
    )
  }
}
2
3
4
5
6
7
8
9
10
11
12
13
14
15
16
17
18
19
20
21
22
21.12 生命周期
创建时
- constructor():1.来初始化函数内部 state;2.为 事件处理函数open in new window 绑定实例
- static getDerivedStateFromProps(nextProps, state):参数: 第一个参数为即将更新的
props, 第二个参数为上一个状态的state, 可以比较props和state来加一些限制条件,防止无用的 state 更新;返回值:返回一个对象来更新state, 如果返回null则不更新任何内容 - render()
- componentDidMount():发送网络请求、启用事件监听方法的好时机
更新时
- static getDerivedStateFromProps()
- shouldComponentUpdate(nextProps, nextState):控制组件是否进行更新, 返回 true 时组件更新, 返回 false 则不更新
- render()
- getSnapshotBeforeUpdate(prevProps, prevState):在最近一次的渲染输出被提交之前调用。也就是说,在 render 之后,即将对组件进行挂载时调用
- componentDidUpdate(prevProps, prevState, snapshot)
卸载时
- componentWillUnmount()
22.React 性能优化
22.1 SCU 的核心问题在哪里
shouldComponentUpdatePureComponent和React.memo- 不可变值 immutable.js
SCU 的核心问题在哪里
- React 默认:父组件有更新,子组件则无条件也更新
- 通过前后值的对比,避免重复渲染,就能提升性能
- SCU 不一定每次都用,浅层比较就差不多了
import { Component, Fragment } from 'react'

export default class App extends Component {
  constructor(props) {
    super(props)
    this.state = {
      count: 1
    }
  }
  render() {
    return (
      <Fragment>
        <p>{this.state.count}</p>
        <button onClick={this.changeCount}>change count</button>
      </Fragment>
    )
  }
  changeCount = () => {
    this.setState((prevState, props) => {
      return {
        count: prevState.count + 1
      }
    })
  }
  shouldComponentUpdate(nextProps, nextState) {
    if (
      nextState.count !== this.state.count ||
      nextProps.length !== this.props.length
    ) {
      return true // 可以渲染
    }
    return false // 不可渲染
  }
}
2
3
4
5
6
7
8
9
10
11
12
13
14
15
16
17
18
19
20
21
22
23
24
25
26
27
28
29
30
31
32
33
34
22.2 PureComponent 和 memo
- PureComponent,SCU 中实现了浅比较
- memo,函数组件中的 PureComponent
- 浅比较已适用大部分情况(尽量不要做深度比较)
PureComponent
class App extends PureComponent
memo
function MyComponent(props) {}
function MyComponent2(props) {}
export default React.memo(MyComponent, MyComponent2)
2
3
22.3 immutable.js
彻底拥抱 "不可变值"
基于共享数据(不是深拷贝),速度好
22.4 关于组件公共逻辑的抽离
- mixin:已被 React 弃用
- 高阶组件 Hoc
- Render Props
HOC vs Render Props
- HOC:模式简单,但会增加组件层级
- Render Props:代码简介,学习成本较高
高阶组件 - HOC
传入组件,返回组件
import React from 'react'

// 高阶组件
const whthMouse = Component => {
  class withMouseComponent extends React.Component {
    constructor(props) {
      super(props)
      this.state = { x: 0, y: 0 }
    }
    handleMouseMove = event => {
      this.setState({
        x: event.clientX,
        y: event.clientY
      })
    }
    render() {
      return (
        <div style={{ height: '500px' }} onMouseMove={this.handleMouseMove}>
          {/* 1.透传所有 props 2.增加 mouse 属性 */}
          <Component {...this.props} mouse={this.state} />
        </div>
      )
    }
  }
  return withMouseComponent
}

const App = props => {
  const { x, y } = props.mouse
  return (
    <div style={{ height: '500px' }}>
      <h1>
        The mouse position is ({x}, {y})
      </h1>
    </div>
  )
}
export default whthMouse(App)
2
3
4
5
6
7
8
9
10
11
12
13
14
15
16
17
18
19
20
21
22
23
24
25
26
27
28
29
30
31
32
33
34
35
36
37
38
Render Props
通过一个函数将 class 组件的 state 作为 props 传递给纯函数组件
import React from 'react'
import PropTypes from 'prop-types'

// 高阶组件
class Mouse extends React.Component {
  constructor(props) {
    super(props)
    this.state = { x: 0, y: 0 }
  }
  handleMouseMove = event => {
    this.setState({
      x: event.clientX,
      y: event.clientY
    })
  }
  render() {
    return (
      <div style={{ height: '500px' }} onMouseMove={this.handleMouseMove}>
        {this.props.render(this.state)}
      </div>
    )
  }
}
Mouse.propTypes = {
  render: PropTypes.func.isRequired
}

const App = () => {
  return (
    <div style={{ height: '500px' }}>
      <Mouse
        render={({ x, y }) => (
          <h1>
            the mouse position is ({x}, {y})
          </h1>
        )}
      />
    </div>
  )
}
export default App
2
3
4
5
6
7
8
9
10
11
12
13
14
15
16
17
18
19
20
21
22
23
24
25
26
27
28
29
30
31
32
33
34
35
36
37
38
39
40
41
23.Redux 和 Router
23.1 Redux
- 基本概念
- 单项数据流
- react-redux
- 异步 action
- 中间件
基本概念
- store state:唯一该改变状态树(state tree)的方法就是创建 action
- action:一个描述发生了什么的对象,并将其 dispatch 给 store
- reducer:reducer 函数根据旧 state 和 action 计算新 state
单项数据流概述
- dispatch(action) 引起 state 状态树更新
- reducer -> newState
- subscribe 触发通知
import { createStore } from 'redux'

function counterReducer(state = { value: 0 }, action) {
  switch (action.type) {
    case 'counter/incremented':
      return { value: state.value + 1 }
    case 'counter/decremented':
      return { value: state.value - 1 }
    default:
      return state
  }
}

// 创建一个包含应用程序 state 的 Redux store
let store = createStore(counterReducer)

// 可以使用 subscribe() 来更新 UI 以相应 state 的更改
store.subscribe(() => console.log(store.getState()))

// 改变内部状态的唯一方法就是 dispatch 一个 action
store.dispatch({ type: 'counter/incremented' })
store.dispatch({ type: 'counter/decremented' })
store.dispatch({ type: 'counter/decremented' })
2
3
4
5
6
7
8
9
10
11
12
13
14
15
16
17
18
19
20
21
22
23
redux toolkit
import { createSlice, configureStore } from '@reduxjs/toolkit'

const counterSlice = createSlice({
  name: 'counter',
  initialState: {
    value: 0
  },
  reducers: {
    incremented: state => {
      // Redux Toolkit 允许在 reducers 中编写 "mutating" 逻辑。
      // 它实际上并没有改变 state,因为使用的是 Immer 库,检测到“草稿 state”的变化并产生一个全新的
      // 基于这些更改的不可变的 state。
      state.value += 1
    },
    decremented: state => {
      state.value -= 1
    }
  }
})

export const { incremented, decremented } = counterSlice.actions

const store = configureStore({
  reducer: counterSlice.reducer
})

// 可以订阅 store
store.subscribe(() => console.log(store.getState()))

// 将我们所创建的 action 对象传递给 `dispatch`
store.dispatch(incremented())
// {value: 1}
store.dispatch(incremented())
// {value: 2}
store.dispatch(decremented())
// {value: 1}
2
3
4
5
6
7
8
9
10
11
12
13
14
15
16
17
18
19
20
21
22
23
24
25
26
27
28
29
30
31
32
33
34
35
36
23.2 Router
- 路由模式(hash、history)
- 路由配置(动态路由、懒加载)
懒加载使用 Suspense + lazy 就行
24.React 原理
24.1 原理一
jsx 本质和 vdom
- jsx 即 createElement 函数
- 执行生成 vnode
- patch(elem, vnode) patch(vnode, newVnode)
回顾 vdom 和 diff
- 只比较同一层级,不跨级比较
- tag 不相同,则直接删掉重建,不再深度比较
- tag 和 key,两者都相同,则认为是相同节点,不再深度比较
jsx 是什么
- React.createElement 即 h 函数,返回 vnode
- 第一个参数,可能是组件,页可能是 html、tag
- 组件名,首字母必须大写(React 规定)
24.2 合成事件机制
- 所有事件都是挂载到 document 上(React 17 之后不是)
- event 不是原生的,是 SyntheticEvent 合成事件对象
- 和 Vue 事件不同,和 DOM 事件也不同
为什么要合成事件机制
- 更好的兼容性和跨平台
- 载到 document,减少内存消耗,避免频繁解绑
- 方便事件的统一管理(如事务机制)
React17 事件绑定到 root
- 有利于多个 React 版本并存,例如微前端
24.3 batchUpdate 机制
- 有时是异步的,有时同步(setTimeout、DOM 事件)
- 有时合并(对象形式),有时不合并(函数形式)
- 后者比较好理解(像 Object.assign),主要讲前者
核心要点
- setState 主流程
- batchUpdate 机制
- transaction 事务机制
setState 是异步韩式同步
- setState 无所谓异步还是同步
- 看是否能命中 batchUpdate 机制
- 每个函数开始时都会有一个 isBatchingUpdate = false,函数结束时又将其变为 true。如果函数体内有异步函数,则 isBatchingUpdate 为 false,则 setState 为同步,反之为异步
哪些可以命中 batchUpdate 机制
生命周期(和它调用的函数)
React 中注册的事件(和它调用的函数)
React 可以 "管理" 的入口
24.4 组件渲染过程
- props state
- render() 生成 vnode
- patch(elem, vnode)
更新过程
setState(newState) --> dirtyComponents(可能有子组件)
render() 生成 newVnode
patch(vnode, newVnode)
24.5 fiber(react 自带的)
问题:js 是单线程,且和 dom 渲染共用一个线程。当组件足够复杂,组件更新时计算和渲染压力大,此时再有 dom 操作需求(动画、鼠标拖拽等)将会导致卡顿
将 reconciliation 阶段进行任务拆分(commit 无法拆分)‘
dom 需要渲染时暂停,空闲时回复
window.requestIdleCallback
24.5 面试题一
组件之间如何通讯
- 父子组件 props
- 自定义事件
- Redux 和 Context
jsx 本质
- createElement
- 执行返回 vnode
Context 是什么,如何应用
- 父组件,向其下所有子孙组件传递信息
- 如一些简单的公共信息:主题色、语言等
- 复杂的公共信息,用 redux
shouldComponentUpdate 用途
- 性能优化
- 与不可变值一起使用,否则会报错
redux 单项数据流
View -> Action -> Dispatch -> Reducer -> state -> View
24.6 面试题二
setState 的值:React 17 及以下才有效!!!!!!!!!!!!!!!!
import React, { Fragment } from 'react'

class App extends React.Component {
  constructor(props) {
    super(props)
    this.state = {
      count: 0
    }
  }
  componentDidMount() {
    this.setState({ count: this.state.count + 1 })
    console.log('1 ', this.state.count)
    this.setState({ count: this.state.count + 1 })
    console.log('2 ', this.state.count)
    setTimeout(() => {
      this.setState({ count: this.state.count + 1 })
      console.log('3 ', this.state.count)
    })
    setTimeout(() => {
      this.setState({ count: this.state.count + 1 })
      console.log('4 ', this.state.count)
    })
  }
  render() {
    return (
      <Fragment>
        <p>nihao</p>
        <p>good</p>
      </Fragment>
    )
  }
}
export default App
2
3
4
5
6
7
8
9
10
11
12
13
14
15
16
17
18
19
20
21
22
23
24
25
26
27
28
29
30
31
32
33
什么是纯函数
- 返回一个新值,没有副作用(不会 "偷偷" 修改其他值)
- 重点:不可变值
- 如 arr1 = arr.slice()
渲染列表,为何使用 key
- 同 Vue。必须使用 key,且不能是 index 和 random
- diff 算法中通过 tag 和 key 来判断,是否是 sameNode
- 减少渲染次数,提升渲染性能
函数组件和 class 组件区别
- 纯函数,输入 props,输出 jsx
- 没有实例,没有生命后期,没有 state
- 不能扩展其他方法
什么是受控组件
- 表单的值,受到 state 控制
- 需要自行监听 onChange,更新 state
何时使用异步组件
- 加载大组件
- 路由懒加载
多个组件有公共逻辑,如何抽离
- 高阶组件
- Render Props
- mixin 已被 React 废弃
redux 如何进行异步请求
- 使用异步 action,如 redux-thunk
PureComponent 有何区别
- 实现了浅比较的 shouldComponentUpdate
- 优化性能
- 要结合不可变值使用
React 事件和 DOM 事件区别
- 所有事件挂载到 document 上(React 17 之后是挂载到 root 上)
- event 不是原生的,是 SyntheticEvent 合成事件对象
- dispatchEvent
性能优化
- 渲染列表时加 key
- 自定义事件、DOM 事件及时销毁
- 合理使用异步组件
- 减少函数 bind this 的次数
- 合理使用 SCU PureComponent 和 memo
- 合理使用 Immutable.js
- webpack 层面优化
- 前端通用的性能优化,如图片懒加载
- 使用 SSR
React 和 Vue 的区别
都支持组件化
都是数据驱动视图
都是用 vdom 操作 dom
React 使用 jsx 拥抱 js,Vue 使用模版拥抱 html
React 函数式编程,Vue 声明式编程
React 需要更多自力更生,Vue 把想要的都给你
25.webpack
25.1 简介
- webpack 已是前端打包构建的不二选择
- 每日必用,面试必考
- 成熟的工具,重点在于配置和使用,原理并不考虑
讲解范围
- 基本配置
- 高级配置
- 优化打包效率
- 优化产出代码
- 构建流程概述
- babel
问题
前端代码为什么要进行构建和打包
module、chunk 和 bundle 分别是什么意思?有何区别?
loader 和 plugin 的区别
webpack 如何实现懒加载
webpack 常见性能优化
babel-runtime 和 babel-polyfill 的区别
25.2 基本配置串讲
- css-loader:解析 css
- style-loader:将解析的 css 插进 html
基本配置
拆分配置和 merge
启动本地服务
处理 ES6
处理样式
处理图片
模块化
25.3 多入口
- entry 配置:
entry: {
  // 有多个入口文件,多入口
  app: './src/app.js',
  main: './src/main.js'
},
2
3
4
5
- output 配置:
output: {
  path: path.resolve(__dirname, 'dist'),
  filename: '[name].js' // webpack 命名方式,[name] 以文件名自己命名,可以再加一个 contenthash:8,以便命中缓存
},
2
3
4
- 多个 HtmlWebpackPlugin({}):
plugins: [
  new HtmlWebpackPlugin({
    template: path.resolve(__dirname, 'public/app.html'),
    filename: 'app.html',
    chunk: ['app'] // 只引用 app.js
  }),
  new HtmlWebpackPlugin({
    template: path.resolve(__dirname, 'public/main.html'),
    filename: 'main.html',
    chunk: ['main'] // 只引用 main.js
  })
],
2
3
4
5
6
7
8
9
10
11
12
25.4 抽离 css 文件
- 利用 postcss-loader -> css-loader -> MiniCssExtractPlugin.loader 进行解析
new MiniCssExtractPlugin({ filename: 'css/main.[contenthash:8].css' })optimization: { minimizer: [new TerserJSPlugin({}), new OptimizeCSSAssetsPlugin()] }
25.5 抽离公共代码
optimization: {
  splitChunks: {
    // 代码分割配置
    chunks: 'all', // 对所有模块都进行分割
    // 修改配置
    cacheGroups: {
      // 第三方模块
      vendor: {
        name: 'vendor', // chunk 名称
        priority: 1, // 权限更高,优先抽离,重要
        test: /node_modules/,
        minSize: 0, // 大小限制
        minChunks: 1 // 最少复用过几次
      },
      // 公共的模块
      common: {
        name: 'common', // chunk 名称
        priority: 0, // 优先级
        minSize: 0, // 公共模块的大小限制
        minChunk: // 公共模块最少复用过几次
      }
    }
  }
}
2
3
4
5
6
7
8
9
10
11
12
13
14
15
16
17
18
19
20
21
22
23
24
规定哪些需要代码分割
plugins: [
  new HtmlWebpackPlugin({
    template: path.resolve(__dirname, 'public/app.html'),
    filename: 'app.html',
    chunk: ['app', 'vendor', 'common']
  }),
  new HtmlWebpackPlugin({
    template: path.resolve(__dirname, 'public/main.html'),
    filename: 'main.html',
    chunk: ['main', 'common']
  })
],
2
3
4
5
6
7
8
9
10
11
12
25.6 懒加载
import('./xxx').then(res => {
  console.log(res.default.message) // 注意 default
})
2
3
25.7 处理 jsx、处理 vue
react 解析:@babel/preset-react
vue 解析:vue-loader
25.8 module chunk bundle 区别
module:各个源码文件,webpack 中一切皆模块
chunk:多模块合并成的,如 entry import() splitChunk
bundle:最终的输出文件
25.9 webpack 性能优化
- 优化 babel-loader:用于开发环境
{
  test: /\.js$/,
  use: ['babel-loader?cacheDirectory'], // 开启缓存
  include: path.resolve(__dirname, 'src') // 明确方位
}
2
3
4
5
- IgnorePlugin:用于生产环境
避免引用无用模块。例如
import moment from 'moment',会默认引入所有语言 js 代码,代码过大
// 忽略 moment 下的 /locale 目录
new webpack.IgnorePlugin(/\.\/locale/, /moment/)

1
// 下面是 index.js
import moment from 'moment'
import 'moment/locale/zh-cn'
moment.locale('zh-cn') // 设置语言为中文
console.log('date', moment().format('ll'))
2
3
4
5
6
7
8
9
- noParse:用于生产环境
避免重复打包
module: {
  noParse: [/react\.min\.js$/]
}
2
3
- happyPack:可以生产环境
多进程打包
const HappyPack = require('happypack')

module: {
  rules: [
    {
      test: /\.js$/,
      use: ['happypack/loader?id=babel'],
      include: path.resolve(__dirname, 'src')
    }
  ]
}

plugins: [
  new HappyPack({
    // 用唯一的标识符 id 来代替当前的 HappyPack 是用来处理一类特定的文件
    id: 'babel',
    // 如果处理 .js 文件,用法和 Loader 配置中一样
    loaders: ['babel-loader?cacheDirectory']
  })
]
2
3
4
5
6
7
8
9
10
11
12
13
14
15
16
17
18
19
20
- ParallelUglifyPlugin:用于生成环境
多进程压缩 js
new ParallelUglifyPlugin({
  // 传递给 UglifyJS 的参数
  // (还是使用 UglifyJS 压缩,只不过帮助开启了多进程)
  uglifyJS: {
    output: {
      beautify: false, // 最紧凑的输出
      comments: false // 删除所有的注释
    },
    compress: {
      // 删除所有的 `console` 语句,可以兼容 ie
      drop_console: true,
      // 内嵌定义了但是只用一次的变量
      collapse_vars: true,
      // 提取出出现多次但是没有定义成变量去引用的静态值
      reduce_vars: true
    }
  }
})
2
3
4
5
6
7
8
9
10
11
12
13
14
15
16
17
18
- 自动刷新:用 devServer 代替就行了,不能用于生产环境
module.exports = {
  watch: true,
  watchOptions: {
    ignored: /node_modules/,
    // 监听到变化发生后会等 300ms 再去执行动作,防止文件更新太快导致重新编译频率太高
    aggregateTimeout: 300, // 默认 300ms
    poll: 1000 // 默认每隔 1000 毫秒询问一次
  }
}
2
3
4
5
6
7
8
9
- 热更新:不能用于生产环境
- DLLPlugin:不能用于生产环境
前端框架如 vue、React,体积大,构建慢。但是较稳定,不常升级版本。同一个版本可以只构建一次,不用每次都构建
IgnorePlugin vs noParse
- IgnorePlugin 直接不引入,代码里没有
- noParse 引入,但是不打包
热更新和自动刷新
整个网页全部刷新,速度较慢,状态会丢失
热更新:新代码生效,网页不刷新,状态不丢失
25.10 产出代码 - 性能优化
- 体积更小
- 合理分包,不重复加载
- 速度更快、内存使用更少
小图片 base64 编码
bundle 加 hash,例如:
output: {filename: '[name].[contenthash:8].js'}懒加载
提取公共代码
IngorePlugin 避免引用无用模块
使用 cdn 加速
使用 production
scope hosting
25.11 什么是 tree shaking
使用 production
- 自动开启代码压缩
- vue、react 等会自动删掉调试代码(如开发环境的 warning)
- 启动 Tree-Shaking
25.12 ES Mudule 和 CommonJs 区别
只有 ES Module 可以做 tree-shaking
- es6 module 静态引入,编译时引入
- Commonjs 动态引入,执行时引入
- 只有 es6 module 才能静态分析,实现 tree-shaking
let apiList = require('../config/api.js')
if (isDev) {
  apiList = require('../config/api_dev.js')
}
2
3
4
import apiList from '../config/api.js'
if (isDev) {
  // 编译时报错,只能静态引入
  import apiList from '../config/api_dev.js'
}
2
3
4
5
25.13 scope hosting
- 代码体积更小
- 创建函数作用域更少
- 代码可读性更好
const ModuleConcatenationPlugin = require('webpack/lib/optimize/ModuleConcatenationPlugin')

module.exports = {
  resolve: {
    // 针对 npm 中的第三方模块有限采用 jsnext:main 中指向的 es6 模块化语法的文件
    mainFields: ['jsnext:main', 'browser', 'main']
  },
  plugins: [new ModuleConcatenationPlugin()]
}
2
3
4
5
6
7
8
9
25.14 babel
- 环境搭建 & 基本配置
- babel-polyfill:已启用,使用 corejs
- babel-runtime:不会污染原有的全局环境,例如
Promise.resolve = function () {console.log('haha')}
{
  "presets": [
    [
      "@babel/preset-env",
      {
        "useBuiltIns": "usage",
        "corejs": 3
      }
    ]
  ],
  "plugins": [
    [
      "@babel/plugin-transform-runtime",
      {
        "absoluteRuntime": false,
        "corejs": 3,
        "helpers": true,
        "regenerator": true,
        "useESModules": false
      }
    ]
  ]
}
2
3
4
5
6
7
8
9
10
11
12
13
14
15
16
17
18
19
20
21
22
23
25.15 面试一
为什么要进行打包和构建
- 体积更小(Tree-Shaking、压缩、合并),加载更好
- 编译高级语法或语言(TS ES6+ 模块化 scss)
- 兼容性和错误检查(Polyfill、postcss、eslint)
- 统一高效的开发环境
- 统一的构建流程和产出标准
- 集成公司构建规范(提测、上线等)
module、chunk、bundle 区别
- module - 各个源码文件,webpack 中一切皆模块
- chunk - 多模块合并成的,如 entry import() splitChunk
- bundle - 最终的输出文件
loader 和 plugin 区别
- loader 模块转换器,如 less -> css
- plugin 拓展插件,如 HtmlWebpackPlugin
常见 loader 和 plugin
这个很简单
babel 和 webpack 区别
- babel - js 新语法编译工具,不关心模块化
- webpack - 打包构建工具,是多个 loader、plugin 的集合
如何产出一个 lib
output: {
  // lib 的文件名
  filename: 'lodash.js',
  // 输出 lib 到 dist 目录下
  path: distPath,
  // lib 的全局变量名
  library: 'lodash'
}
2
3
4
5
6
7
8
babel-polyfill 和 babel-runtime 区别
- babel-polyfill 会污染全局
- babel-runtime 不会污染全局
- 产出第三方 lib 要用 babel-runtime
懒加载
- import() 语法
- 结合 Vue React 异步组件
- 结合 Vue-router 和 React-router 异步加载路由
为何 Proxy 不能被 Polyfill
Class 可以用 function 模拟
Promise 可以用 callback 模拟
但 Proxy 的功能用
Object.defineProperty无法被模拟
25.16 面试二
webpack 构建速度优化
- 优化 babel-loader
- IgnorePlugin:避免无用模块
- noParse:避免无用打包
- happyPack:多进程打包
- ParallelUglifyPlugin:多进程压缩 js
不能用于生产环境的优化
- 自动刷新
- 热更新
- DllPlugin
优化产出代码
小图片 base64 编码
bundle 加 hash
懒加载
提取公共代码
使用 cdn 加速
IgnorePlugin
使用 production
scope hosting
26.项目设计和流程
26.1 React 实现 Todo List
- 用数据描述所有内容
- 数据要结构化,易于程序操作(遍历、查找)
- 数据要可拓展,以便增加新的功能
import React, { Fragment } from 'react'

export default class App extends React.Component {
  constructor(props) {
    super(props)
    this.state = {
      list: [
        {
          id: 1,
          title: '标题1',
          completed: false
        },
        {
          id: 2,
          title: '标题2',
          completed: true
        }
      ]
    }
  }
  render() {
    return (
      <Fragment>
        <Input addItem={this.addItem} />
        <List
          list={this.state.list}
          deleteItem={this.deleteItem}
          toggleCompleted={this.toggleCompleted}
        />
      </Fragment>
    )
  }
  addItem = title => {
    const list = this.state.list
    this.setState({
      list: [
        ...list,
        {
          id: Math.random().toString().slice(-5),
          title,
          completed: false
        }
      ]
    })
  }
  deleteItem = id => {
    this.setState({
      list: this.state.list.filter(item => item.id !== id)
    })
  }
  toggleCompleted = id => {
    this.setState({
      list: this.state.list.map(item => {
        const completed = item.id === id ? !item.completed : item.completed
        return {
          ...item,
          completed
        }
      })
    })
  }
}

class Input extends React.Component {
  constructor(props) {
    super(props)
    this.state = {
      title: ''
    }
  }
  render() {
    return (
      <Fragment>
        <input value={this.state.title} onChange={this.changeHandler} />
        <button onClick={this.clickHandler}>新增</button>
      </Fragment>
    )
  }
  changeHandler = event => {
    this.setState({
      title: event.target.value
    })
  }
  clickHandler = () => {
    const { addItem } = this.props
    addItem(this.state.title)
    this.setState({
      title: ''
    })
  }
}

class List extends React.Component {
  render() {
    const { list = [] } = this.props
    return (
      <Fragment>
        {list.map(item => (
          <div key={item.id} style={{ marginTop: '10px' }}>
            <input
              type='checkbox'
              checked={item.completed}
              onChange={this.completedChangeHandler(item)}
            />
            <span style={{ textDecoration: item.completed ? 'line-through' : 'none' }}>
              {item.title}
            </span>
            <button onClick={this.deleteHandler(item)}>删除</button>
          </div>
        ))}
      </Fragment>
    )
  }
  completedChangeHandler = item => event => {
    const { toggleCompleted } = this.props
    toggleCompleted(item.id)
  }
  deleteHandler = item => event => {
    const { deleteItem } = this.props
    deleteItem(item.id)
  }
}
2
3
4
5
6
7
8
9
10
11
12
13
14
15
16
17
18
19
20
21
22
23
24
25
26
27
28
29
30
31
32
33
34
35
36
37
38
39
40
41
42
43
44
45
46
47
48
49
50
51
52
53
54
55
56
57
58
59
60
61
62
63
64
65
66
67
68
69
70
71
72
73
74
75
76
77
78
79
80
81
82
83
84
85
86
87
88
89
90
91
92
93
94
95
96
97
98
99
100
101
102
103
104
105
106
107
108
109
110
111
112
113
114
115
116
117
118
119
120
121
122
26.2 React 实现购物车
import { Component, Fragment } from 'react'
import PropTypes from 'prop-types'

export default class App extends Component {
  constructor(props) {
    super(props)
    this.state = {
      shopList: [
        {
          id: 0,
          title: '商品1',
          price: 10,
          num: 0
        },
        {
          id: 1,
          title: '商品2',
          price: 15,
          num: 0
        },
        {
          id: 2,
          title: '商品3',
          price: 20,
          num: 0
        }
      ],
      myList: []
    }
  }
  render() {
    return (
      <Fragment>
        <ShopList shopList={this.state.shopList} addToShopList={this.addToShopList} />
        {this.state.myList.length ? (
          <MyList
            myList={this.state.myList}
            addNum={this.addNum}
            decreaseNum={this.decreaseNum}
          />
        ) : null}
        <Total myList={this.state.myList} />
      </Fragment>
    )
  }
  addToShopList = item => {
    let currentItem = null
    this.setState(
      {
        myList: this.state.myList.map(ele => {
          currentItem = ele.id === item.id ? ele : null
          if (currentItem) {
            return {
              ...currentItem,
              num: (currentItem.num += 1)
            }
          }
          return ele
        })
      },
      () => {
        if (!currentItem) {
          this.setState({
            myList: [...this.state.myList, item]
          })
        }
      }
    )
  }
  addNum = id => {
    this.setState({
      myList: this.state.myList.map(item => {
        const currentNum = item.id === id ? item.num : 0
        return {
          ...item,
          num: currentNum + 1
        }
      })
    })
  }
  decreaseNum = id => {
    this.setState({
      myList: this.state.myList.map(item => {
        const currentNum = item.id === id ? item.num : 0
        return {
          ...item,
          num: currentNum - 1
        }
      })
    })
  }
}

class ShopList extends Component {
  render() {
    const { shopList } = this.props
    return (
      <Fragment>
        {shopList.map((item, index) => {
          return (
            <div key={item.id}>
              <span>
                {item.title} - {item.price}元
              </span>
              <button onClick={this.addToShopListHandler(item)}>加入购物车</button>
            </div>
          )
        })}
      </Fragment>
    )
  }
  addToShopListHandler = item => event => {
    const { addToShopList } = this.props
    addToShopList({
      ...item,
      num: (item.num += 1)
    })
  }
}
ShopList.propTypes = {
  shopList: PropTypes.arrayOf(PropTypes.object).isRequired,
  addToShopListHandler: PropTypes.func.isRequired
}

class MyList extends Component {
  render() {
    const { myList } = this.props
    return (
      <Fragment>
        {myList.map((item, index) => {
          return (
            <div key={item.id}>
              <span>
                {item.title} (数量{item.num})
              </span>
              <button onClick={this.addHandler(item)}>增加</button>
              <button onClick={this.decreaseHandler(item)}>减少</button>
            </div>
          )
        })}
      </Fragment>
    )
  }
  addHandler = item => event => {
    const { addNum } = this.props
    addNum(item.id)
  }
  decreaseHandler = item => event => {
    const { decreaseNum } = this.props
    decreaseNum(item.id)
  }
}
MyList.propTypes = {
  myList: PropTypes.arrayOf(PropTypes.object).isRequired,
  addNum: PropTypes.func.isRequired,
  decreaseNum: PropTypes.func.isRequired
}

class Total extends Component {
  constructor(props) {
    super(props)
    this.state = {
      total: 0
    }
  }
  render() {
    const { myList } = this.props
    return (
      <span>
        总价:
        {myList.reduce((oldItem, newItem) => {
          return oldItem + newItem.price * newItem.num
        }, 0)}
      </span>
    )
  }
}
Total.propTypes = {
  myList: PropTypes.arrayOf(PropTypes.object).isRequired
}
2
3
4
5
6
7
8
9
10
11
12
13
14
15
16
17
18
19
20
21
22
23
24
25
26
27
28
29
30
31
32
33
34
35
36
37
38
39
40
41
42
43
44
45
46
47
48
49
50
51
52
53
54
55
56
57
58
59
60
61
62
63
64
65
66
67
68
69
70
71
72
73
74
75
76
77
78
79
80
81
82
83
84
85
86
87
88
89
90
91
92
93
94
95
96
97
98
99
100
101
102
103
104
105
106
107
108
109
110
111
112
113
114
115
116
117
118
119
120
121
122
123
124
125
126
127
128
129
130
131
132
133
134
135
136
137
138
139
140
141
142
143
144
145
146
147
148
149
150
151
152
153
154
155
156
157
158
159
160
161
162
163
164
165
166
167
168
169
170
171
172
173
174
175
176
177
178
179
180
27.React Hooks
27.1 面试题
为什么有 React Hooks,它解决了哪些问题?
React Hooks 如何模拟组件生命周期?
如何自定义 Hook?
React Hooks 性能优化
使用 React Hooks 遇到哪些坑?
Hooks 相比 HOC 和 Render Prop 有哪些优点
27.2 class 组件有什么问题
函数组件特点
- 没有组件实例
- 没有生命周期
- 没有 state 和 setState,只能接收 props
class 组件问题
- 大型组件很难拆分和重构,很难测试(即 class 不易拆分)
- 相同业务逻辑,分散到各个方法中,逻辑混乱
- 复用逻辑变的复杂,如 Mixins、HOC、Render Prop
函数组件好处
React 提倡函数式编程,
view = fn(props)函数更灵活,更易拆分,更易测试
但函数组件太简单,需要增强能力 --- Hooks
27.3 useState
默认函数组件没有 state
函数组件是一个纯函数,执行完即销毁,无法存储 state
需要 State Hook,即把 state 功能 "钩" 到纯函数中
27.4 useEffect
useEffect 让纯函数有了副作用
- 默认情况下,执行纯函数,输入参数,返回结果,无副作用
- 所谓副作用,就是对函数之外造成影响,如设置全局定时任务
- 而组件需要副作用,所有需要 useEffect "钩" 入纯函数中
- 默认函数组件没有生命周期
- 函数组件是一个纯函数,执行完即销毁,自己无法实现生命周期
- 通过 Effect hook 可以将生命周期钩入
模拟 didMount 和 didUpdate
useEffect(() => {
  xxx
})
2
3
模拟 didMount
useEffect(() => {}, [])
模拟 didUpdate
useEffect(() => {
  xxx
}, [count, name])
2
3
模拟 willUnmount
并不是完全相等于 ComponentWillUnmount
useEffect(() => {
  let timerId = window.setInterval(() => {
    console.log(Date.now())
  }, 1000)
  // 此处并不完全等同于 ComponentWillUnmount,props 发生变化时,也会执行监听
  // 准确的说: 返回的函数,会在下一次 effect 执行之前被执行,无论更新或卸载
  return () => {
    window.clearInterval(timerId)
  }
}, [])
2
3
4
5
6
7
8
9
10
27.5 useRef 和 useContext
useRef
import { Fragment, useEffect, useRef } from 'react'

export function FriendStatus() {
  const btnRef = useRef(null) // 初始值

  useEffect(() => {
    console.log(btnRef.current)
  }, [])

  return (
    <Fragment>
      <button ref={btnRef}>click</button>
    </Fragment>
  )
}
2
3
4
5
6
7
8
9
10
11
12
13
14
15
useContext
import { createContext, useContext } from 'react'
import { FriendStatus } from './FriendStatus'

// 主题颜色
const Theme = {
  light: {
    foreground: '#000',
    background: '#eee'
  },
  dark: {
    foreground: '#fff',
    background: '#222'
  }
}

const ThemeContext = createContext(Theme.light)

export default function App(props) {
  return (
    <ThemeContext.Provider value={Theme.dark}>
      <FriendStatus />
    </ThemeContext.Provider>
  )
}

export const useTheme = () => {
  const context = useContext(ThemeContext)
  if (!context) throw new Error('useTheme 只能在 ThemeContext 中使用')
  return context
}
2
3
4
5
6
7
8
9
10
11
12
13
14
15
16
17
18
19
20
21
22
23
24
25
26
27
28
29
30
27.6 useReducer
- useReducer 是 useState 的代替方案,用于 state 复杂变化
- useReducer 是单个组件状态管理,组件通讯还需要 props
- redux 是全局的状态管理,多组件共享数据
import { Fragment, useReducer } from 'react'

const initialState = { count: 0 }

const reducer = (state, action) => {
  switch (action.type) {
    case 'increment':
      return { count: state.count + 1 }
    case 'decrement':
      return { count: state.count - 1 }
    default:
      return state
  }
}

export default function App(props) {
  const [state, dispatch] = useReducer(reducer, initialState)
  return (
    <Fragment>
      <span>count: {state.count}</span>
      <button onClick={() => dispatch({ type: 'increment' })}>increment</button>
      <button onClick={() => dispatch({ type: 'decrement' })}>decrement</button>
    </Fragment>
  )
}
2
3
4
5
6
7
8
9
10
11
12
13
14
15
16
17
18
19
20
21
22
23
24
25
27.7 useMemo
- React 默认会更新所有子组件
- class 组件使用 SCU 和 PureComponent 做优化
- Hooks 中使用 useMemo,但优化的原理是一样的
- 父组件要传给子组件的值使用
useMemo包裹:
import { Fragment, useMemo, useState } from 'react'
import { FriendStatus } from './FriendStatus'

export default function App() {
  const [count, setCount] = useState(0)
  const [name, setName] = useState('laoshi')
  // 用 useMemo 缓存数据,有依赖
  const userInfo = useMemo(() => ({ name, age: 20 }), [name])

  return (
    <Fragment>
      {count}
      <FriendStatus userInfo={userInfo} />
      <button onClick={() => setCount(count + 1)}>click</button>
    </Fragment>
  )
}
2
3
4
5
6
7
8
9
10
11
12
13
14
15
16
17
- 子组件使用 memo 包裹住,对更新的 props 进行浅比较:
import { Fragment, memo } from 'react'

export const FriendStatus = memo(({ userInfo }) => {
  console.log('child render...', userInfo)
  return (
    <Fragment>
      <p>
        this is child {userInfo.name} {userInfo.age}
      </p>
    </Fragment>
  )
})
2
3
4
5
6
7
8
9
10
11
12
27.8 useCallback
同上。
useMemo 最好与 memo 搭配使用
useCallback 最好与 memo 搭配使用
27.9 自定义 hook
最简单的自定义 hook
import axios from 'axios'
import { useEffect, useState } from 'react'

export default function useAxios(url) {
  const [loading, setLoading] = useState(false)
  const [data, setData] = useState()
  const [error, setError] = useState()

  useEffect(() => {
    // 利用 axios 发送网络请求
    setLoading(true)
    axios
      .get(url)
      .then(res => setData(res))
      .catch(err => setError(err))
  }, [url])

  return [loading, data, error]
}
2
3
4
5
6
7
8
9
10
11
12
13
14
15
16
17
18
19
27.10 Hooks 使用规范
只能用于 React 函数组件和自定义 Hook 中,其他地方不可以
只能用于顶层代码,不能在循环、判断中使用 Hooks
eslint 插件 eslint-plugin-react-hooks 可以帮助规范
27.11 为何 Hooks 要依赖于调用顺序
函数组件是纯函数,执行完后会立即销毁
所以,无论组件从初始化(render)还是组件更新(re-render),都会重新执行一次这个函数,获取最新的组件
render:初始化 state 的值,re-render:读取 state 的值
render:添加 effect 函数,re-render:替换 effect 函数(内部的函数也会重新定义)
如果 hooks 出现在循环、判断里,则无法保证顺序一致
27.12 class 组件逻辑复用的问题
- mixins 早已废弃
- 高阶组件 HOC
- Render Props
mixins 缺点
- 变量作用域来源不清
- 属性重名
- mixins 引入过多会导致顺序冲突
HOC 缺点
- 组件层级嵌套过多,不易渲染、不易调试
- HOC 会劫持 props,必须严格规范,容易出现疏漏
Render Prop
学习成本高,不易理解
只能传递纯函数,而默认情况下纯函数功能有限
27.13 Hooks 组件逻辑复用有哪些好处
- 完全符合 Hooks 原有规则,没有其他要求,易理解记忆
- 变量作用域明确
- 不会产生组件嵌套
import { useEffect, useState } from 'react'

export function useMousePosition() {
  const [x, setX] = useState(0)
  const [y, setY] = useState(0)

  useEffect(() => {
    function mouseMoveHandler(event) {
      setX(event.clientX)
      setY(event.clientY)
    }
    document.body.addEventListener('mousemove', mouseMoveHandler)
    return () => document.body.removeEventListener('mousemove', mouseMoveHandler)
  }, [])

  return [x, y]
}
2
3
4
5
6
7
8
9
10
11
12
13
14
15
16
17
27.14 React Hooks 注意事项
useState 初始化值,只有第一次有效:
render - 初始化 state;re-render - 只恢复初始化的 state 值,不会再重新设置新的值,只能用 setName 修改!!!
useEffect 内部不能修改 state(在依赖项是 [] 的时候!!!!即依赖项为空时,re-render 就不会执行 effect 函数)
如果有依赖,则依赖改变时,就在 useEffect 可以获得外面 state 的最新值,就是可以修改 state 了
- useEffect 可能出现死循环
依赖中如果有对象或者数组,会死循环