DOM / BOM 操作
1. DOM 基本
1.1 DOM 树
DOM(Document Object Model,简称 DOM),是 W3C 阻止推荐的处理可拓展标记语言(HTML 或 XML)的标准编程接口
- 文档:一个页面就是一个文档,DOM 中使用 document 表示
- 元素:页面中的所有标签都是元素,DOM 中使用 element 表示
- 节点(节点是什么):网页中的所有内容都是节点(标签、属性、文本、注释等),DOM 中使用 node 表示。
DOM 把以上内容都看作是对象
2. 获取 / 操作元素
2.1 获取元素方法
- 根据 ID 获取:
getElementById() - 根据 标签名 获取:
getElementsByTagName() - 通过 HTML5 新增的方法获取:
getElementsByClassName()、document.querySelectorAll()、document.querySelector('选择器') - 特殊元素获取
2.2 getElementById()
官网:document.getElementById - Web API 接口参考 | MDN (mozilla.org)open in new window
- 返回的是一个元素对象
- 使用
console.dir打印返回的元素对象,更好地查看属性和方法 - 若没元素则为 null
2.3 getElementsByTagName()
官网:Document.getElementsByTagName() - Web API 接口参考 | MDN (mozilla.org)open in new window
- 返回的是获取过来元素对象的集合,以伪数组的形式存储
- 可以通过真数组的方法遍历之:for、forEach()、map()、filter()、some()、every()、reduce()、for of、keys()、values()、entries()
- 若没元素则为空的伪数组
// 返回的是获取过来元素对象的集合,以伪数组的形式存储的
const lis = document.getElementsByTagName('li')
const arr = Array.from(lis) // 将伪数组变成数组
for(let item of arr) {
    console.log(item.innerText) // 1 2 3
}
2
3
4
5
6
element.getElementsByTagName('标签名'):获取父元素中的子元素。代码如下:
const ol = document.getElementsByTagName('ol')
console.log(ol[0].getElementsByTagName('li'))

// 一般这样获取父元素中的子元素
// const ol = document.getElementById('ol')
// console.log(ol.getElementsByTagName('li'))
2
3
4
5
6
2.4 H5 新增的获取元素方式
document.getElementsByClassName('类名'):返回元素对象集合document.querySelector('选择器'):根据指定选择器返回第一个元素集合document.querySelectorAll('选择器'):根据指定选择器返回
<body>
  <div class="box">盒子</div>
  <div class="box">盒子</div>
  <div id="nav">
    <ul>
      <li>首页</li>
      <li>产品</li>
    </ul>
  </div>
  <script>
    // 1.getElementsByClassName()
    const boxs = document.getElementsByClassName('box')
    console.log(boxs)
    // 2.querySelector():只能指定第一个元素对象
    const firstBox = document.querySelector('.box')
    console.log(firstBox)
    const nav = document.querySelector('#nav')
    console.log(nav)
    const li = document.querySelector('li')
    console.log(li)
    // 3.querySelectorAll():返回指定选择器的所有元素对象集合(伪数组)
    const allBox = document.querySelectorAll('.box')
    console.log(allBox)
    const lis = document.querySelectorAll('li')
    console.log(lis)
  </script>
</body>
2
3
4
5
6
7
8
9
10
11
12
13
14
15
16
17
18
19
20
21
22
23
24
25
26
27
2.5 获取 body 和 html
<body>
  <script>
    // 1.获取 body 元素
    const bodyEle = document.body
    console.log(bodyEle)
    // 2.获取 html 元素
    // const htmlEle = document.html
    const htmlEle = document.documentElement
    console.log(htmlEle)
  </script>
</body>
2
3
4
5
6
7
8
9
10
11
3. 事件基础
3.1 事件三要素
- 事件源:事件被触发的对象
- 事件类型:比如鼠标点击(onclick)、经过、键盘按下等
- 事件处理程序:通过一个函数赋值的方式完成
<body>
  <button id="btn">唐伯虎</button>
  <script>
    // 1.事件源
    const btn = document.querySelector('#btn')
    // 2.事件类型:onclick
    // 3.事件处理程序
    btn.onclick = function() {
      alert('点秋香')
    }
  </script>
</body>
2
3
4
5
6
7
8
9
10
11
12
3.2 修改元素内容 - innerText
element.innerText:可以不需要事件类型,而是页面加载时就渲染,可以使用下述代码末尾部分实现
<head>
  <meta charset="UTF-8">
  <meta http-equiv="X-UA-Compatible" content="IE=edge">
  <meta name="viewport" content="width=device-width, initial-scale=1.0">
  <title>Document</title>
  <style>
    div,
    p {
      width: 300px;
      height: 30px;
      line-height: 30px;
      color: #fff;
      background-color: pink;
    }
  </style>
</head>

<body>
  <button>显示当前系统时间</button>
  <div>某个时间</div>
  <p>1123</p>
  <script>
    // 1.获取元素
    const btn = document.querySelector('button')
    const div = document.querySelector('div')
    // 2.注册事件
    btn.onclick = function () {
      div.innerText = getDate()
    }

    function getDate() {
      const date = new Date()
      const year = date.getFullYear()
      const month = date.getMonth() + 1
      const dates = date.getDate()
      let arr = ['星期日', '星期一', '星期二', '星期三', '星期四', '星期五', '星期六']
      const day = date.getDay()
      return `今天是:${year}年${month}月${dates}日${arr[day]}`
    }

    // 页面加载就直接使用了
    var p = document.querySelector('p')
    p.innerText = getDate()

  </script>
</body>
2
3
4
5
6
7
8
9
10
11
12
13
14
15
16
17
18
19
20
21
22
23
24
25
26
27
28
29
30
31
32
33
34
35
36
37
38
39
40
41
42
43
44
45
46
3.3 修改元素内容 - innerHTML
element.innerHTML:
- 与 innerText 比较:
- innerText 不识别 html 标签,ie 的非标准写法,会自动去除空格和换行
- innerHTML 识别 html 标签,是 w3c 标准
- 这两个属性是可读写的,可以获取元素里面的内容
<body>
  <div></div>
  <p>
    abc123
    <span>123</span>
  </p>
  <script>
    // 写
    const div = document.querySelector('div')
    div.innerText = '<strong>我没变粗</strong>'
    div.innerHTML = '<strong>我变粗了</strong>'

    // 读
    const p = document.querySelector('p')
    console.log(p.innerText) // abc123 123
    console.log(p.innerHTML) // abc123 <span>123</span>(保留了空格和换行)
  </script>
</body>
2
3
4
5
6
7
8
9
10
11
12
13
14
15
16
17
18
3.4 常用元素的属性操作
- innerText、innerHTML 改变元素内容
- src、href
- id、alt、title
<body>
  <button id="img1">图片1</button>
  <button id="img2">图片2</button>
  <img src="../static/img/1.jpg" alt="图片" title="图片1">

  <script>
    // 1.获取元素
    const img1 = document.getElementById('img1')
    const img2 = document.getElementById('img2')
    const img = document.querySelector('img')
    // 2.注册事件  处理程序
    img2.onclick = function() {
      img.src = '../static/img/2.jpg'
      img.title = '图片2'
    }
    img1.onclick = function() {
      img.src = '../static/img/1.jpg'
      img.title = '图片1'
    }
  </script>
</body>
2
3
4
5
6
7
8
9
10
11
12
13
14
15
16
17
18
19
20
21
3.5 不同时间获得不同图片和文字
<body>
  <span></span>
  <img src="" alt="">
</body>

<script>
  const span = document.querySelector('span')
  const img = document.querySelector('img')
  const date = new Date()
  let hour = date.getHours()
  if (hour < 12) {
    span.innerHTML = '上午好'
    img.src = '../static/img/1.jpg'
  } else if (hour < 18) {
    span.innerHTML = '下午好',
      img.src = '../static/img/2.jpg'
  } else {
    span.innerHTML = '晚上好',
      img.src = '../static/img/3.jpg'
  }
</script>
2
3
4
5
6
7
8
9
10
11
12
13
14
15
16
17
18
19
20
21
3.6 修改表单属性
利用 DOM 可以操作表单元素的属性:type、value、checked、selected、disabled
表单元素的值的读取与修改是:[inputElement].value 而非 [Element].innerHTML
<body>
  <button>按钮</button>
  <label for="content">
    <input type="text" value="输入内容" id="content">
  </label>

  <script>
    // 1.获取元素
    const btn = document.querySelector('button')
    const input = document.querySelector('input')
    // 2.注册事件、处理程序
    btn.onclick = function () {
      // input.innerHTML = '显示不出来' // 这个是普通盒子比如 div 标签里面的内容
      // 表单里面的值,文字内容是通过 value 来修改的
      input.value = '被点击了'
      // 如果想要某个表单被禁用,不能再点击 disabled,想要 button 禁用
      // btn.disabled = true
      // this 指向的是事件函数的调用者
      this.disabled = true
    }
  </script>
</body>
2
3
4
5
6
7
8
9
10
11
12
13
14
15
16
17
18
19
20
21
22
3.7 仿京东显示隐藏密码铭文案例
<!DOCTYPE html>
<html lang="en">

<head>
  <meta charset="UTF-8">
  <meta http-equiv="X-UA-Compatible" content="IE=edge">
  <meta name="viewport" content="width=device-width, initial-scale=1.0">
  <title>Document</title>
  <style>
    .box {
      position: relative;
      width: 400px;
      border-bottom: 1px solid #ccc;
      margin: 100px auto;
    }

    .box input {
      width: 170px;
      height: 30px;
      border: 0;
      outline: none;
    }

    .box img {
      position: absolute;
      top: 2px;
      right: 2px;
      width: 24px;
    }
  </style>
</head>

<body>
  <div class="box">
    <label for="pwd">
      <img src="../static/images/close.png" title="show your password" id="eye">
    </label>
    <input type="password" name="password" id="pwd">
  </div>

  <script>
    // 1.获取元素
    const eye = document.getElementById('eye')
    const pwd = document.getElementById('pwd')
    // 2.注册事件、处理程序
    let flag = 0
    eye.onclick = function () {
      if (!flag) {
        pwd.type = 'text'
        eye.src = '../static/images/open.png'
        flag = 1
      } else {
        pwd.type = 'password'
        eye.src = '../static/images/close.png'
        flag = 0
      }
    }
  </script>
</body>

</html>
2
3
4
5
6
7
8
9
10
11
12
13
14
15
16
17
18
19
20
21
22
23
24
25
26
27
28
29
30
31
32
33
34
35
36
37
38
39
40
41
42
43
44
45
46
47
48
49
50
51
52
53
54
55
56
57
58
59
60
61
3.8 修改样式属性
可以通过 js 修改元素大小、颜色、位置等样式
方法一:element.style:行内样式操作
方法二:element.className:类名样式操作
注意:
- JS 里面的样式采取驼峰命名法,例如:
div.style.backgroundColor = 'red'、this.style.width = '30px' - JS 修改 style 样式操作,产生的是行内样式,CSS 权重比较高
示例代码:
<!DOCTYPE html>
<html lang="en">
<head>
  <meta charset="UTF-8">
  <meta http-equiv="X-UA-Compatible" content="IE=edge">
  <meta name="viewport" content="width=device-width, initial-scale=1.0">
  <title>Document</title>
  <style>
    div {
      width: 200px;
      height: 200px;
      background-color: pink;
    }
  </style>
</head>
<body>
  <div></div>

  <script>
    // 1.获取元素
    const div = document.querySelector('div')
    // 2.注册事件、处理程序
    div.onclick = function () {
      // div.style.backgroundColor = 'red'
      this.style.backgroundColor = 'red'
      this.style.width = '250px'
    }
  </script>
</body>
</html>
2
3
4
5
6
7
8
9
10
11
12
13
14
15
16
17
18
19
20
21
22
23
24
25
26
27
28
29
30
3.9 仿淘宝关闭二维码案例
核心思路:
- 利用样式的显示和隐藏完成,
display: none;隐藏元素,display: block显示元素 - 点击按钮,就让这个二维码盒子隐藏起来即可
<!DOCTYPE html>
<html lang="en">

<head>
  <meta charset="UTF-8">
  <meta http-equiv="X-UA-Compatible" content="IE=edge">
  <meta name="viewport" content="width=device-width, initial-scale=1.0">
  <title>Document</title>
  <style>
    .box {
      position: relative;
      width: 74px;
      height: 88px;
      border: 1px solid red;
      font-size: 12px;
      margin: 100px auto;
      text-align: center;
      color: #f40;
    }

    img {
      width: 60px;
      margin-top: 5px;
    }

    .close-btn {
      position: absolute;
      top: -1px;
      left: -16px;
      width: 14px;
      height: 14px;
      border: 1px solid #ccc;
      line-height: 14px;
      font-family: Arial, Helvetica, sans-serif;
      cursor: pointer;
    }
  </style>
</head>

<body>
  <div class="box">
    淘宝二维码
    <img src="../static/images/tao.png" alt="">
    <i class="close-btn">×</i>
  </div>

  <script>
    // 1.获取元素
    const btn = document.querySelector('.close-btn')
    const box = document.querySelector('.box')
    // 2.注册事件 程序处理
    btn.onclick = function () {
      box.style.display = 'none'
    }
  </script>
</body>

</html>
2
3
4
5
6
7
8
9
10
11
12
13
14
15
16
17
18
19
20
21
22
23
24
25
26
27
28
29
30
31
32
33
34
35
36
37
38
39
40
41
42
43
44
45
46
47
48
49
50
51
52
53
54
55
56
57
58
3.10 精灵图
<!DOCTYPE html>
<html lang="en">
<head>
  <meta charset="UTF-8">
  <meta http-equiv="X-UA-Compatible" content="IE=edge">
  <meta name="viewport" content="width=device-width, initial-scale=1.0">
  <title>Document</title>
  <style>
    * {
      margin: 0;
      padding: 0;
    }

    li {
      list-style-type: none;
    }

    .box {
      width: 250px;
      margin: 100px auto;
    }

    .box li {
      float: left;
      width: 24px;
      height: 24px;
      background-color: pink;
      margin: 15px;
      background: url(../static/images/sprite.png) no-repeat;
    }
  </style>
</head>
<body>
  <div class="box">
    <ul>
      <li></li>
      <li></li>
      <li></li>
      <li></li>
      <li></li>
      <li></li>
      <li></li>
      <li></li>
      <li></li>
      <li></li>
      <li></li>
      <li></li>
    </ul>
  </div>

  <script>
    // 获取元素
    const lis = document.querySelectorAll('li')
    for (let i = 0; i < lis.length; i++) {
      // 让索引号乘以 44 就是每个 li 的背景 y 坐标
      const index = i * 44
      lis[i].style.backgroundPosition = `0 -${index}px`
    }
  </script>
</body>
</html>
2
3
4
5
6
7
8
9
10
11
12
13
14
15
16
17
18
19
20
21
22
23
24
25
26
27
28
29
30
31
32
33
34
35
36
37
38
39
40
41
42
43
44
45
46
47
48
49
50
51
52
53
54
55
56
57
58
59
60
61
3.11 (onfocus、onblur)显示隐藏文本框内容
表单的两个新事件:
- 获得焦点 onfocus
- 失去焦点 onblur
案例分析:
- 首先表单需要 2 个新事件,即上面那俩事件
- 如果获得焦点,判断表单里面内容是否为默认文字,如果是默认文字,就清空表单内容
- 如果失去焦点,判断表单内容是否为空,如果为空,则表单内容改为默认文字
示例代码:
<!DOCTYPE html>
<html lang="en">

<head>
  <meta charset="UTF-8">
  <meta http-equiv="X-UA-Compatible" content="IE=edge">
  <meta name="viewport" content="width=device-width, initial-scale=1.0">
  <title>Document</title>
  <style>
    input {
      color: #999;
      outline: none;
    }
  </style>
</head>

<body>
  <label for="search">
    <input type="text" value="手机" id="search">
  </label>
  <script>
    const text = document.querySelector('input')
    // 获得焦点事件 onfocus
    text.onfocus = function () {
      if (this.value === '手机') {
        this.value = ''
      }
      // 获得焦点需要把文本框里面的文字变黑
      this.style.color = '#333'
    }
    // 失去焦点事件 onblur
    text.onblur = function () {
      if (this.value === '') {
        this.value = '手机'
      }
      // 失去焦点需要把文本框里面的文字颜色变浅色
      this.style.color = '#999'
    }
  </script>
</body>

</html>
2
3
4
5
6
7
8
9
10
11
12
13
14
15
16
17
18
19
20
21
22
23
24
25
26
27
28
29
30
31
32
33
34
35
36
37
38
39
40
41
42
3.12 className 修改样式属性
使用 element.style 获得修改元素样式,如果样式比较少或者功能简单的情况下使用;样式如果较多,推荐 className
注意:
className 会直接更改元素的类名,会覆盖原先的类名!
不覆盖原先类名的方法:
this.className = 'first change',其中 first 是原来的类,change 为新添加的类
举例代码:
<!DOCTYPE html>
<html lang="en">

<head>
  <meta charset="UTF-8">
  <meta http-equiv="X-UA-Compatible" content="IE=edge">
  <meta name="viewport" content="width=device-width, initial-scale=1.0">
  <title>Document</title>
  <style>
    div {
      width: 200px;
      height: 200px;
      background-color: pink;
    }
    .change {
      background-color: purple;
      color: #fff;
      font-size: 25px;
      margin-top: 100px;
    }
  </style>
</head>

<body>
  <div>文本</div>
  <script>
    const div = document.querySelector('div')
    div.onclick = function () {
      // this.style.backgroundColor = 'purple'
      // this.style.color === '#fff'
      // this.style.fontSize = '25px'
      // this.style.marginTop = '100px'

      // 让当前元素类名改成了 change
      this.className = 'change'
    }
  </script>
</body>

</html>
2
3
4
5
6
7
8
9
10
11
12
13
14
15
16
17
18
19
20
21
22
23
24
25
26
27
28
29
30
31
32
33
34
35
36
37
38
39
40
3.13 密码框验证信息
<!DOCTYPE html>
<html lang="en">

<head>
  <meta charset="UTF-8">
  <meta http-equiv="X-UA-Compatible" content="IE=edge">
  <meta name="viewport" content="width=device-width, initial-scale=1.0">
  <title>Document</title>
  <style>
    div {
      width: 600px;
      margin: 100px auto;
    }

    .message {
      display: inline-block;
      font-size: 12px;
      color: #999;
      background: url(../static/images/mess.png) no-repeat left center;
      padding-left: 20px;
    }

    .wrong {
      color: red;
      background: url(../static/images/wrong.png) no-repeat left center;
    }

    .right {
      color: green;
      background: url(../static/images/right.png) no-repeat left center;
    }
  </style>
</head>

<body>
  <div class="register">
    <input type="password" class="ipt">
    <p class="message">请输入6~16位密码</p>
  </div>
  <script>
    const ipt = document.querySelector('.ipt')
    const message = document.querySelector('.message')
    ipt.onblur = function () {
      // 根据表单里面值的长度 ipt.value.length
      if (this.value.length < 6 || this.value.length > 16) {
        message.className = 'message wrong'
        message.innerHTML = '您输入的位数不对,要求6-16位密码'
      } else {
        message.className = 'message right'
        message.innerHTML = '输入正确'
      }
    }
  </script>
</body>

</html>
2
3
4
5
6
7
8
9
10
11
12
13
14
15
16
17
18
19
20
21
22
23
24
25
26
27
28
29
30
31
32
33
34
35
36
37
38
39
40
41
42
43
44
45
46
47
48
49
50
51
52
53
54
55
56
3.14 排他思想(算法)
首先先排除其他的样式,然后才设置自己的样式,这种思想称为排他思想
<!DOCTYPE html>
<html lang="en">

<head>
  <meta charset="UTF-8">
  <meta http-equiv="X-UA-Compatible" content="IE=edge">
  <meta name="viewport" content="width=device-width, initial-scale=1.0">
  <title>Document</title>
</head>

<body>
  <button>按钮1</button>
  <button>按钮2</button>
  <button>按钮3</button>
  <button>按钮4</button>
  <button>按钮5</button>

  <script>
    // 获取所有按钮元素
    const btns = document.getElementsByTagName('button')
    // btns 得到的是伪数组,里面的每一个元素 btns[i]
    for (let i = 0; i < btns.length; i++) {
      btns[i].onclick = function () {
        // 1.先把所有按钮颜色去掉
        for (let i = 0; i < btns.length; i++) {
          btns[i].style.backgroundColor = ''
        }
        // 2.然后才让当前元素背景颜色设置为 pink
        this.style.backgroundColor = 'pink'
      }
    }
  </script>
</body>

</html>
2
3
4
5
6
7
8
9
10
11
12
13
14
15
16
17
18
19
20
21
22
23
24
25
26
27
28
29
30
31
32
33
34
35
3.15 (重要)百度换肤效果
遇到的问题:
- 四张图片在父元素中无法居中对齐。解决办法:设置图片为 inline-block,然后对父元素设置
text-align: center; - 图片底部有空隙。原因:设置为 inline-block,仍有由于行内元素的影响使图片基于基线对齐而非底线对齐。解决办法:图片设置
vertical: bottom; - 图片间间隙较小。解决办法:设置
margin: 0 20px,不能单独设置 margin-left 或 margin-right,会导致对齐不了
代码:
<!DOCTYPE html>
<html lang="en">

<head>
  <meta charset="UTF-8">
  <meta http-equiv="X-UA-Compatible" content="IE=edge">
  <meta name="viewport" content="width=device-width, initial-scale=1.0">
  <title>Document</title>
  <style>
    .box {
      margin: 50px auto;
      /* border: 1px solid red; */
      /* 由于下面设置了 inline-box,则可通过之将 4 张图片水平居中 */
      text-align: center;
    }

    img {
      display: inline-block;
      width: 150px;
      /* 解决图片间过于紧密的问题 */
      margin-left: 20px;
      margin-right: 20px;
      /* 去除图片因是行内元素造成的对齐基线而不是底线的问题 */
      vertical-align: bottom;
      cursor: pointer;
    }
  </style>
</head>

<body>
  <div class="box">
    <img src="../static/images/1.jpg" alt="图片">
    <img src="../static/images/2.jpg" alt="图片">
    <img src="../static/images/3.jpg" alt="图片">
    <img src="../static/images/4.jpg" alt="图片">
  </div>

  <script>
    const imgs = document.querySelector('.box').querySelectorAll('img')
    for (let i = 0; i < imgs.length; i++) {
      imgs[i].onclick = function () {
        document.body.style.backgroundImage = `url(${this.src})`
      }
    }
  </script>
</body>

</html>
2
3
4
5
6
7
8
9
10
11
12
13
14
15
16
17
18
19
20
21
22
23
24
25
26
27
28
29
30
31
32
33
34
35
36
37
38
39
40
41
42
43
44
45
46
47
48
3.16 onmouseover / onmouseout
作用:
- onmouseover:鼠标经过时
- onmouseout:鼠标离开时
代码:
<!DOCTYPE html>
<html lang="en">

<head>
  <meta charset="UTF-8">
  <meta name="viewport" content="width=device-width, initial-scale=1.0">
  <meta http-equiv="X-UA-Compatible" content="ie=edge">
  <title>Document</title>
  <style>
    table {
      width: 800px;
      margin: 100px auto;
      text-align: center;
      border-collapse: collapse;
      font-size: 14px;
    }

    thead tr {
      height: 30px;
      background-color: skyblue;
    }

    tbody tr {
      height: 30px;
    }

    tbody td {
      border-bottom: 1px solid #d7d7d7;
      font-size: 12px;
      color: blue;
    }

    .bg {
      background-color: pink;
    }
  </style>
</head>

<body>
  <table>
    <thead>
      <tr>
        <th>代码</th>
        <th>名称</th>
        <th>最新公布净值</th>
        <th>累计净值</th>
        <th>前单位净值</th>
        <th>净值增长率</th>
      </tr>
    </thead>
    <tbody>
      <tr>
        <td>003526</td>
        <td>农银金穗3个月定期开放债券</td>
        <td>1.075</td>
        <td>1.079</td>
        <td>1.074</td>
        <td>+0.047%</td>
      </tr>
      <tr>
        <td>003526</td>
        <td>农银金穗3个月定期开放债券</td>
        <td>1.075</td>
        <td>1.079</td>
        <td>1.074</td>
        <td>+0.047%</td>
      </tr>
      <tr>
        <td>003526</td>
        <td>农银金穗3个月定期开放债券</td>
        <td>1.075</td>
        <td>1.079</td>
        <td>1.074</td>
        <td>+0.047%</td>
      </tr>
      <tr>
        <td>003526</td>
        <td>农银金穗3个月定期开放债券</td>
        <td>1.075</td>
        <td>1.079</td>
        <td>1.074</td>
        <td>+0.047%</td>
      </tr>
      <tr>
        <td>003526</td>
        <td>农银金穗3个月定期开放债券</td>
        <td>1.075</td>
        <td>1.079</td>
        <td>1.074</td>
        <td>+0.047%</td>
      </tr>
      <tr>
        <td>003526</td>
        <td>农银金穗3个月定期开放债券</td>
        <td>1.075</td>
        <td>1.079</td>
        <td>1.074</td>
        <td>+0.047%</td>
      </tr>
    </tbody>
  </table>
  <script>
    const trs = document.querySelector('tbody').querySelectorAll('tr')
    for (let i = 0; i < trs.length; i++) {
      trs[i].onmouseover = function () {
        this.className = 'bg'
      }
      trs[i].onmouseout = function () {
        this.className = ''
      }
    }
  </script>
</body>

</html>
2
3
4
5
6
7
8
9
10
11
12
13
14
15
16
17
18
19
20
21
22
23
24
25
26
27
28
29
30
31
32
33
34
35
36
37
38
39
40
41
42
43
44
45
46
47
48
49
50
51
52
53
54
55
56
57
58
59
60
61
62
63
64
65
66
67
68
69
70
71
72
73
74
75
76
77
78
79
80
81
82
83
84
85
86
87
88
89
90
91
92
93
94
95
96
97
98
99
100
101
102
103
104
105
106
107
108
109
110
111
112
113
114
115
3.17 表单全选、取消全选(checked)
<!DOCTYPE html>
<html lang="en">

<head>
  <meta charset="UTF-8">
  <meta http-equiv="X-UA-Compatible" content="IE=edge">
  <meta name="viewport" content="width=device-width, initial-scale=1.0">
  <title>Document</title>
  <style>
    * {
      padding: 0;
      margin: 0;
    }

    .wrap {
      width: 300px;
      margin: 100px auto 0;
    }

    table {
      border-collapse: collapse;
      border-spacing: 0;
      /* border: 1px solid #c0c0c0; */
      width: 300px;
    }

    th,
    td {
      border: 1px solid #d0d0d0;
      color: #404060;
      padding: 10px;
    }

    th {
      background-color: #09c;
      font: bold 16px "微软雅黑";
      color: #fff;
    }

    td {
      font: 14px "微软雅黑";
    }

    tbody tr {
      background-color: #f0f0f0;
    }

    tbody tr:hover {
      cursor: pointer;
      background-color: #fafafa;
    }
  </style>
</head>

<body>
  <div class="wrap">
    <table>
      <thead>
        <tr>
          <th>
            <input type="checkbox" aria-label="全选" id="j_cbAll" />
          </th>
          <th>商品</th>
          <th>价钱</th>
        </tr>
      </thead>
      <tbody id="j_tb">
        <tr>
          <td>
            <input type="checkbox" aria-label="选中" />
          </td>
          <td>iPhone8</td>
          <td>8000</td>
        </tr>
        <tr>
          <td>
            <input type="checkbox" aria-label="选中" />
          </td>
          <td>iPad Pro</td>
          <td>5000</td>
        </tr>
        <tr>
          <td>
            <input type="checkbox" aria-label="选中" />
          </td>
          <td>iPad Air</td>
          <td>2000</td>
        </tr>
        <tr>
          <td>
            <input type="checkbox" aria-label="选中" />
          </td>
          <td>Apple Watch</td>
          <td>2000</td>
        </tr>

      </tbody>
    </table>
  </div>

  <script>
    const j_cbAll = document.getElementById('j_cbAll')
    const j_tbs = document.getElementById('j_tb').getElementsByTagName('input')
    j_cbAll.onclick = function () {
      for (let i = 0; i < j_tbs.length; i++) {
        j_tbs[i].checked = this.checked
      }
    }
    for (let i = 0; i < j_tbs.length; i++) {
      j_tbs[i].onclick = function () {
        // flag 控制全选按钮是否选中
        let flag = true
        // 每次点击下面的复选框都要循环检查 4 个小按钮是否全被选中
        for (let i = 0; i < j_tbs.length; i++) {
          if (!j_tbs[i].checked) {
            flag = false
            break
          }
        }
        j_cbAll.checked = flag
      }
    }
  </script>
</body>

</html>
2
3
4
5
6
7
8
9
10
11
12
13
14
15
16
17
18
19
20
21
22
23
24
25
26
27
28
29
30
31
32
33
34
35
36
37
38
39
40
41
42
43
44
45
46
47
48
49
50
51
52
53
54
55
56
57
58
59
60
61
62
63
64
65
66
67
68
69
70
71
72
73
74
75
76
77
78
79
80
81
82
83
84
85
86
87
88
89
90
91
92
93
94
95
96
97
98
99
100
101
102
103
104
105
106
107
108
109
110
111
112
113
114
115
116
117
118
119
120
121
122
123
124
125
126
3.18 getAttribute()
element.属性:获取属性值element.getAttribute('属性');
区别:
element.属性:获取内置属性值(元素本身自带的属性)element.getAttribute('属性'):主要获得自定义的属性(标准)
举例:
<!DOCTYPE html>
<html lang="en">

<head>
  <meta charset="UTF-8">
  <meta http-equiv="X-UA-Compatible" content="IE=edge">
  <meta name="viewport" content="width=device-width, initial-scale=1.0">
  <title>Document</title>
</head>

<body>
  <div id="demo" index="1"></div>
  <script>
    const div = document.querySelector('div')
    console.log(div.getAttribute('id')) // demo
    console.log(div.getAttribute('index')) // 1
    console.log(div.id) // demo
    console.log(div.index) // undefined
  </script>
</body>

</html>
2
3
4
5
6
7
8
9
10
11
12
13
14
15
16
17
18
19
20
21
22
3.19 setAttribute()、removeAttribute()
element.属性 = '值':设置内置属性值element.setAttribute('属性', '值'):设置属性值element.removeAttribute('属性'):移除属性
举例:
<!DOCTYPE html>
<html lang="en">

<head>
  <meta charset="UTF-8">
  <meta http-equiv="X-UA-Compatible" content="IE=edge">
  <meta name="viewport" content="width=device-width, initial-scale=1.0">
  <title>Document</title>
</head>

<body>
  <div id="demo" index="1" class="nav"></div>
  <script>
    const div = document.querySelector('div')
    div.id = 'test'
    // div.className = 'navs'
    div.setAttribute('index', 2)
    div.setAttribute('class', 'footer') // class 特殊,不是 className
    div.removeAttribute('index')
  </script>
</body>

</html>
2
3
4
5
6
7
8
9
10
11
12
13
14
15
16
17
18
19
20
21
22
23
3.20 (重点)tab 栏切换
思路分析:
- tab 栏切换有 2 个大模块
- 上面的模块选项卡,点击某一个,当前这一个的底色会是红色,其余不变(排他思想)修改类名的方式
- 下面的模块内容,会跟随上面的选项卡变化。所以下面模块变化写到点击事件里面
- 规律:下面的模块显示内容和上面的选项卡一一对应,相匹配
- 核心思路:给上面的 tab_list 里面所有的 li 添加自定义属性,属性值从 0 开始编号
代码:
<!DOCTYPE html>
<html lang="en">

<head>
  <meta charset="UTF-8">
  <meta name="viewport" content="width=device-width, initial-scale=1.0">
  <meta http-equiv="X-UA-Compatible" content="ie=edge">
  <title>Document</title>
  <style>
    * {
      margin: 0;
      padding: 0;
    }

    li {
      list-style-type: none;
    }

    .tab {
      width: 978px;
      margin: 100px auto;
    }

    .tab_list {
      height: 39px;
      border: 1px solid #ccc;
      background-color: #f1f1f1;
    }

    .tab_list li {
      float: left;
      height: 39px;
      line-height: 39px;
      padding: 0 20px;
      text-align: center;
      cursor: pointer;
    }

    .tab_list .current {
      background-color: #c81623;
      color: #fff;
    }

    .item_info {
      padding: 20px 0 0 20px;
    }

    .item {
      display: none;
    }
  </style>
</head>

<body>
  <div class="tab">
    <div class="tab_list">
      <ul>
        <li class="current">商品介绍</li>
        <li>规格与包装</li>
        <li>售后保障</li>
        <li>商品评价(50000)</li>
        <li>手机社区</li>
      </ul>
    </div>
    <div class="tab_con">
      <div class="item" style="display: block;">
        商品介绍模块内容
      </div>
      <div class="item">
        规格与包装模块内容
      </div>
      <div class="item">
        售后保障模块内容
      </div>
      <div class="item">
        商品评价(50000)模块内容
      </div>
      <div class="item">
        手机社区模块内容
      </div>

    </div>
  </div>
  <script>
    // 1.获取元素
    const tab_list = document.querySelector('.tab_list')
    const lis = tab_list.querySelectorAll('li')
    const items = document.querySelectorAll('.item')
    // for 循环绑定点击事件
    for (let i = 0; i < lis.length; i++) {
      // 开始给 5 个 li 设置索引号
      lis[i].setAttribute('index', i)
      lis[i].onclick = function () {
        // 所有的 li 清除 class 这个类
        for (let i = 0; i < lis.length; i++) {
          lis[i].className = ''
        }
        // 留下点击的 li
        this.className = 'current'
        // 下面显示内容模块
        let index = this.getAttribute('index')
        // 排他算法
        for (let i = 0; i < items.length; i++) {
          items[i].style.display = 'none'
        }
        items[index].style.display = 'block'
      }
    }
  </script>
</body>

</html>
2
3
4
5
6
7
8
9
10
11
12
13
14
15
16
17
18
19
20
21
22
23
24
25
26
27
28
29
30
31
32
33
34
35
36
37
38
39
40
41
42
43
44
45
46
47
48
49
50
51
52
53
54
55
56
57
58
59
60
61
62
63
64
65
66
67
68
69
70
71
72
73
74
75
76
77
78
79
80
81
82
83
84
85
86
87
88
89
90
91
92
93
94
95
96
97
98
99
100
101
102
103
104
105
106
107
108
109
110
111
112
3.21 H5 自定义属性
自定义属性用 element.属性获取不到,只能用 element.getAttribute('属性') 得到。这就容易引起歧义,难以判断是内置属性还是自定义属性
1. 设置 H5 自定义属性规范:
H5 规定自定义属性 data- 开头作为属性名并且赋值
2. 获取 H5 自定义属性:
- 兼容性获取:
element.getAttribute('属性名') - H5 新增(如有自定义属性 data-index = "haha"):
element.dataset.index或者element.dateset['index'],若自定义属性有多个 - 链接的单词,应采用驼峰命名法
4. 事件进阶
4.1 节点简介
- 利用 DOM 提供的方法获取元素
document.getElementById()document.getElementByTagName()document.querySelector()等- 逻辑性不强,繁琐
- 利用节点层级关系获取元素
- 利用父子兄弟节点关系获取元素
- 逻辑性强,但是兼容性稍差
节点是什么?节点的定义
节点基本属性:一般来说,节点至少拥有 nodeType(节点类型)、nodeName(节点名称)、nodeValue(节点值)这三个基本属性
节点类型(nodeType):
- 元素节点 nodeType 为 1
- 属性节点 nodeType 为 2
- 文本节点 nodeType 为 3(文本节点包括文字、空格、换行等)
开发时,主要是操作属性节点!
4.2 父节点
父级节点:node.parentNode
<!DOCTYPE html>
<html lang="en">

<head>
  <meta charset="UTF-8">
  <meta http-equiv="X-UA-Compatible" content="IE=edge">
  <meta name="viewport" content="width=device-width, initial-scale=1.0">
  <title>Document</title>
</head>

<body>
  <div class="box">
    <span class="erweima"></span>
  </div>
  <script>
    // 1.父节点 parentNode
    const erweima = document.querySelector('.erweima')
    // const box = document.querySelector('box')
    // 得到的是李元素最近的父级节点,若找不到就返回为 null
    console.log(erweima.parentNode)
  </script>
</body>

</html>
2
3
4
5
6
7
8
9
10
11
12
13
14
15
16
17
18
19
20
21
22
23
24
4.3 子节点
子级节点:parentNode.childNodes、parentNode.children(推荐)
- childNodes(标准):如果指向要获得里面的元素节点,需要专门处理:
const ul = document.querySelector('ul')
for (let i = 0; i < ul.childNodes.length; i++) {
    if (ul.childNodes[i].nodeType === 1) {
        // ul.childNodes[i] 是元素节点
        console.log(ul.childNodes[i])
    }
}
2
3
4
5
6
7
- children(非标准):开发通常用这个
<!DOCTYPE html>
<html lang="en">

<head>
  <meta charset="UTF-8">
  <meta http-equiv="X-UA-Compatible" content="IE=edge">
  <meta name="viewport" content="width=device-width, initial-scale=1.0">
  <title>Document</title>
</head>

<body>
  <ul>
    <li>我是li</li>
    <li>我是li</li>
    <li>我是li</li>
    <li>我是li</li>
  </ul>
  <script>
    // DOM 提供的方法
    const ul = document.querySelector('ul')
    console.log(ul.children)
  </script>
</body>

</html>
2
3
4
5
6
7
8
9
10
11
12
13
14
15
16
17
18
19
20
21
22
23
24
25
4.4 节点层级(第一个元素和最后一个元素)
1. parentNode.firstChild:
获得一个子节点,不论是文本节点还是元素节点
2. parentNode.lastChild:
获得最后一个子节点,不论是文本节点还是元素节点
3. parentNode.firstElementChild:(有兼容性问题,>=ie9)
获得第一个子元素节点
4. parentNode.lastElementChild:(有兼容性问题)
获得最后一个子元素节点
第一个 / 最后一个 子元素节点的兼容性写法:
const ol = document.querySelector('ol')
// firstChild 能获取第一个子节点,不论是文本节点还是元素节点,所以用 firstElementChild 获取元素节点比较好。但是后者有兼容性问题,故应该用以下的写法:
console.log(ol.children[0])
console.log(ol.children[ol.children.length - 1])
2
3
4
4.5 多个下拉框
<!DOCTYPE html>
<html lang="en">

<head>
  <meta charset="UTF-8">
  <meta name="viewport" content="width=device-width, initial-scale=1.0">
  <meta http-equiv="X-UA-Compatible" content="ie=edge">
  <title>Document</title>
  <style>
    * {
      margin: 0;
      padding: 0;
    }

    li {
      list-style-type: none;
    }

    a {
      text-decoration: none;
      font-size: 14px;
    }

    .nav {
      margin: 100px;
    }

    .nav>li {
      position: relative;
      float: left;
      width: 80px;
      height: 41px;
      text-align: center;
    }

    .nav li a {
      display: block;
      width: 100%;
      height: 100%;
      line-height: 41px;
      color: #333;
    }

    .nav>li>a:hover {
      background-color: #eee;
    }

    .nav ul {
      display: none;
      position: absolute;
      top: 41px;
      left: 0;
      width: 100%;
      border-left: 1px solid #FECC5B;
      border-right: 1px solid #FECC5B;
    }

    .nav ul li {
      border-bottom: 1px solid #FECC5B;
    }

    .nav ul li a:hover {
      background-color: #FFF5DA;
    }
  </style>
</head>

<body>
  <ul class="nav">
    <li>
      <a href="#">微博</a>
      <ul>
        <li>
          <a href="">私信</a>
        </li>
        <li>
          <a href="">评论</a>
        </li>
        <li>
          <a href="">@我</a>
        </li>
      </ul>
    </li>
    <li>
      <a href="#">微博</a>
      <ul>
        <li>
          <a href="">私信</a>
        </li>
        <li>
          <a href="">评论</a>
        </li>
        <li>
          <a href="">@我</a>
        </li>
      </ul>
    </li>
    <li>
      <a href="#">微博</a>
      <ul>
        <li>
          <a href="">私信</a>
        </li>
        <li>
          <a href="">评论</a>
        </li>
        <li>
          <a href="">@我</a>
        </li>
      </ul>
    </li>
    <li>
      <a href="#">微博</a>
      <ul>
        <li>
          <a href="">私信</a>
        </li>
        <li>
          <a href="">评论</a>
        </li>
        <li>
          <a href="">@我</a>
        </li>
      </ul>
    </li>
  </ul>

  <script>
    // 1.获取元素
    const nav = document.querySelector('.nav')
    const lis = nav.children // 得到 4 个 li
    // 2.循环注册事件
    for (let i = 0; i < lis.length; i++) {
      lis[i].onmouseover = function () {
        this.children[1].style.display = 'block'
      }
      lis[i].onmouseout = function () {
        this.children[1].style.display = 'none'
      }
    }
  </script>
</body>

</html>
2
3
4
5
6
7
8
9
10
11
12
13
14
15
16
17
18
19
20
21
22
23
24
25
26
27
28
29
30
31
32
33
34
35
36
37
38
39
40
41
42
43
44
45
46
47
48
49
50
51
52
53
54
55
56
57
58
59
60
61
62
63
64
65
66
67
68
69
70
71
72
73
74
75
76
77
78
79
80
81
82
83
84
85
86
87
88
89
90
91
92
93
94
95
96
97
98
99
100
101
102
103
104
105
106
107
108
109
110
111
112
113
114
115
116
117
118
119
120
121
122
123
124
125
126
127
128
129
130
131
132
133
134
135
136
137
138
139
140
141
142
143
144
4.6 兄弟节点
- nextSibling:下一个兄弟节点,包含元素节点或者文本节点等等
- previousSibling:上一个兄弟节点,包含元素节点或者文本节点等等
- **nextElementSibling:**返回当前元素下一个兄弟元素节点,找不到返回 null
- **previousElementSibling:**返回当前元素上一个兄弟元素节点,找不到返回 null
兼容性写法:兄弟的元素节点写法:自己封装一个兼容性的函数
function getNextElementSibling (element) {
    var el = element
    while (el = el.nextSibling) {
        if (el.nodeType === 1) {
            return el
        }
    }
    return null
}
2
3
4
5
6
7
8
9
4.7 创建、添加节点
创建节点方式:
document.createElement('tagName')
追加节点方式:
node.appendChild(child)
插入节点方式:
node.insertBefore(child, 指定元素)
举例:
<body>
  <ul>
    <li>123</li>
  </ul>
  <script>
    // 1.创建元素节点
    const li = document.createElement('li')
    // 2.添加节点 node.appendChild(child) node 父级 child 子级 后面追加元素
    const ul = document.querySelector('ul')
    ul.appendChild(li)
    // 3.添加节点 node.insertBefore(child, 指定元素)
    const lili = document.createElement('li')
    ul.insertBefore(lili, ul.children[0])
    // 4.页面想添加一个新的元素:1.创建元素;2.添加元素
  </script>
</body>
2
3
4
5
6
7
8
9
10
11
12
13
14
15
16
4.8 发布内容
<!DOCTYPE html>
<html lang="en">

<head>
  <meta charset="UTF-8">
  <meta name="viewport" content="width=device-width, initial-scale=1.0">
  <meta http-equiv="X-UA-Compatible" content="ie=edge">
  <title>Document</title>
  <style>
    * {
      margin: 0;
      padding: 0;
    }

    body {
      padding: 100px;
    }

    textarea {
      width: 200px;
      height: 100px;
      border: 1px solid pink;
      outline: none;
    }

    ul {
      margin-top: 50px;
    }

    li {
      width: 300px;
      padding: 5px;
      background-color: rgb(245, 209, 243);
      color: red;
      font-size: 14px;
      margin: 15px 0;
    }
  </style>
</head>

<body>
  <textarea name="" id="" aria-label="content"></textarea>
  <button>发布</button>
  <ul>

  </ul>
  <script>
    // 获取元素
    const btn = document.querySelector('button')
    const text = document.querySelector('textarea')
    const ul = document.querySelector('ul')
    // 注册事件
    btn.onclick = function () {
      if (!text.value) {
        alert('你没有输入内容')
        return false
      }
      const li = document.createElement('li')
      li.innerHTML = text.value
      ul.insertBefore(li, ul.children[0])
      text.value = ''
    }
  </script>
</body>

</html>
2
3
4
5
6
7
8
9
10
11
12
13
14
15
16
17
18
19
20
21
22
23
24
25
26
27
28
29
30
31
32
33
34
35
36
37
38
39
40
41
42
43
44
45
46
47
48
49
50
51
52
53
54
55
56
57
58
59
60
61
62
63
64
65
66
4.9 删除节点
删除节点方式:
parentNode.removeChild(child)
举例:
<!DOCTYPE html>
<html lang="en">

<head>
  <meta charset="UTF-8">
  <meta name="viewport" content="width=device-width, initial-scale=1.0">
  <meta http-equiv="X-UA-Compatible" content="ie=edge">
  <title>Document</title>
  <style>
    * {
      margin: 0;
      padding: 0;
    }

    body {
      padding: 100px;
    }

    textarea {
      width: 200px;
      height: 100px;
      border: 1px solid pink;
      outline: none;
    }

    ul {
      margin-top: 50px;
    }

    li {
      width: 300px;
      padding: 5px;
      background-color: rgb(245, 209, 243);
      color: red;
      font-size: 14px;
      margin: 15px 0;
    }

    li a {
      float: right;
    }
  </style>
</head>

<body>
  <textarea name="" id="" aria-label="content"></textarea>
  <button>发布</button>
  <ul>

  </ul>
  <script>
    // 获取元素
    const btn = document.querySelector('button')
    const text = document.querySelector('textarea')
    const ul = document.querySelector('ul')
    // 注册事件
    btn.onclick = function () {
      if (!text.value) {
        alert('你没有输入内容')
        return false
      }
      // 1.创建元素
      const li = document.createElement('li')
      // 先有 li 才能赋值
      li.innerHTML = text.value + "<a href='javascript:;'>删除</a>"
      // 2.添加元素
      ul.insertBefore(li, ul.children[0])
      text.value = ''
      // 3.删除元素,删除的是当前链接的 li ---- 它的父亲
      const as = document.querySelectorAll('a')
      for (let i = 0; i < as.length; i++) {
        as[i].onclick = function () {
          // parentNode.removeChild(child) // 删除的是 li 当前 a 所在的 li
          ul.removeChild(this.parentNode)
        }
      }
    }
  </script>
</body>

</html>
2
3
4
5
6
7
8
9
10
11
12
13
14
15
16
17
18
19
20
21
22
23
24
25
26
27
28
29
30
31
32
33
34
35
36
37
38
39
40
41
42
43
44
45
46
47
48
49
50
51
52
53
54
55
56
57
58
59
60
61
62
63
64
65
66
67
68
69
70
71
72
73
74
75
76
77
78
79
80
81
4.10 复制节点
node.cloneNode():
方法返回调用该方法的节点的一个副本,也称为克隆节点 / 拷贝节点
注意:
- 如果括号参数为空或者为 false,则是浅拷贝,即只克隆复制节点本身,不克隆里面的子节点
- 若括号参数里面为 true,则为深拷贝
实例代码:
<!DOCTYPE html>
<html lang="en">

<head>
  <meta charset="UTF-8">
  <meta http-equiv="X-UA-Compatible" content="IE=edge">
  <meta name="viewport" content="width=device-width, initial-scale=1.0">
  <title>Document</title>
</head>

<body>
  <ul>
    <li>1</li>
    <li>2</li>
    <li>3</li>
  </ul>
  <script>
    const ul = document.querySelector('ul')
    // 深拷贝
    const lili = ul.children[0].cloneNode(true)
  </script>
</body>

</html>
2
3
4
5
6
7
8
9
10
11
12
13
14
15
16
17
18
19
20
21
22
23
24
4.11 (极为重要)动态生成表格-创建学生数据
<!DOCTYPE html>
<html lang="en">

<head>
  <meta charset="UTF-8">
  <meta http-equiv="X-UA-Compatible" content="IE=edge">
  <meta name="viewport" content="width=device-width, initial-scale=1.0">
  <title>Document</title>
  <style>
    * {
      margin: 0;
      padding: 0;
    }

    a {
      text-decoration: none;
    }

    th,
    td {
      border: 1px solid #333;
      text-align: center;
      padding: 10px;
    }

    thead th {
      background-color: #999;
    }

    table {
      border-collapse: collapse;
      margin: 50px auto;
    }
  </style>
</head>

<body>
  <table>
    <thead>
      <tr>
        <th>姓名</th>
        <th>科目</th>
        <th>成绩</th>
        <th>操作</th>
      </tr>
    </thead>
    <tbody>

    </tbody>
  </table>

  <script>
    // 一.先初始化学生的数据
    const datas = [
      {
        name: '魏璎珞',
        subject: 'JavaScript',
        score: 100
      },
      {
        name: '弘历',
        subject: 'JavaScript',
        score: 98
      },
      {
        name: '傅恒',
        subject: 'JavaScript',
        score: 99
      },
      {
        name: '明玉',
        subject: 'JavaScript',
        score: 88
      }
    ]
    // 二.往 tbody 里创建行:有几个人就创建几行(数组长度)
    const tbody = document.querySelector('tbody')
    for (let i = 0; i < datas.length; i++) { // 外面的 for 循环管行 tr
      // 1.创建 tr 行
      const tr = document.createElement('tr')
      tbody.appendChild(tr)
      // 2.行里面创建单元格 td,单元格的数量取决于每个对象里面的属性个数
      for (let k in datas[i]) { // 里面的 for 循环管列 td
        const td = document.createElement('td')
        // 把对象里面的属性值给 td
        td.innerHTML = datas[i][k]
        tr.appendChild(td)
      }
      // 3.创建有删除两个字的单元格
      const td = document.createElement('td')
      td.innerHTML = '<a href="javascript:;">删除</a>'
      tr.appendChild(td)
    }
    // 4.删除操作
    const as = document.querySelectorAll('a')
    for (let i = 0; i < as.length; i++) {
      as[i].onclick = function () {
        // 点击 a 删除当前 a 所在的行 node.removeChild(child)
        tbody.removeChild(this.parentNode.parentNode)
      }
    }
  </script>
</body>

</html>
2
3
4
5
6
7
8
9
10
11
12
13
14
15
16
17
18
19
20
21
22
23
24
25
26
27
28
29
30
31
32
33
34
35
36
37
38
39
40
41
42
43
44
45
46
47
48
49
50
51
52
53
54
55
56
57
58
59
60
61
62
63
64
65
66
67
68
69
70
71
72
73
74
75
76
77
78
79
80
81
82
83
84
85
86
87
88
89
90
91
92
93
94
95
96
97
98
99
100
101
102
103
104
105
4.12 (强烈不推荐)document.write 创建标签
三种动态创建元素区别:
document.write():直接将内容写入页面的内容流,但是文档流执行完毕,则它会导致页面全部重绘element.innerHTMLdocument.createElement()
document.write() 用法举例:
document.write('<div>666</div>')
4.13 innerHTML 和 createElement 效率对比
document.write是直接将内容写入页面的内容流,但是文档流执行完毕,则它会导致页面全部重绘innerHTML将内容写入某个 DOM 节点,不会导致页面全部重绘。若采取拼接方法写入,效率极低innerHTML创建多个元素效率更高(采取数组形式拼接),结构稍微复杂,不同浏览器下,innerHTML 比 createElement() 效率高createElement()创建多个元素效率稍微低一点点,但是结构更清晰
示例代码:
<!DOCTYPE html>
<html lang="en">

<head>
  <meta charset="UTF-8">
  <meta http-equiv="X-UA-Compatible" content="IE=edge">
  <meta name="viewport" content="width=device-width, initial-scale=1.0">
  <title>Document</title>
</head>

<body>
  <div class="inner"></div>
  <div class="create"></div>
  <script>
    const inner = document.querySelector('.inner')
    // 效率特别慢
    // for (let i = 0; i < 10; i++) {
    //   inner.innerHTML += '<a href="javascript:;">百度</a>'
    // }

    // 效率最高
    const arr = []
    for (let i = 0; i < 10; i++) {
      arr.push('<a href="javascript:;">百度</a>')
    }
    inner.innerHTML = arr.join('')

    // 效率极高
    const create = document.querySelector('.create')
    for (let i = 0; i < 10; i++) {
      const a = document.createElement('a')
      a.innerHTML = '<a href="javascript:;">百度</a>'
      create.appendChild(a)
    }
  </script>
</body>

</html>
2
3
4
5
6
7
8
9
10
11
12
13
14
15
16
17
18
19
20
21
22
23
24
25
26
27
28
29
30
31
32
33
34
35
36
37
38
4.14 总结-DOM重点核心
创建:
- document.write
- innerHTML
- createElement
增:
- appendChild
- insertBefore
删:
- removeChild
改:
- 修改元素属性:src、href、title 等
- 修改普通元素内容:innerHTML、innerText
- 修改表单元素:value、type、disabled 等
- 修改元素样式:style、className
查:
- DOM 提供的 API 方法:getElementById、getElementsByTagName 古老用法,不推荐
- H5 提供的新方法:querySelector、querySelectorAll 提倡
- 利用节点操作获取元素:父(parentNode)、子(children)、兄(previousElementSibling)、nextElementSibling 提倡
属性操作:
- setAttribute:设置 dom 的属性值
- getAtrribute:得到 dom 的属性值
- removeAttribute:移除属性
事件操作:
| 鼠标事件 | 触发条件 |
|---|---|
| onclick | 鼠标点击左键触发 |
| onmouseover | 鼠标经过触发 |
| onmouseout | 鼠标离开触发 |
| onfocus | 获得鼠标焦点触发 |
| onblur | 失去鼠标焦点触发 |
| onmousemove | 鼠标移动触发 |
| onmouseup | 鼠标弹起触发 |
| onmousedown | 鼠标按下触发 |
5. 事件高级
目标:
- 元素注册事件的两种方式
- 删除事件的两种方式
- DOM 事件流的三个阶段
- 利用事件对象完成跟随鼠标案例
- 封装阻止冒泡的兼容性函数
- 事件委托的原理
- 常用的鼠标和键盘操作
5.1 注册事件两种方式
传统方式和方法监听注册方式
传统注册方式:
- 利用 on 开头的事件 onclick
<button onclick="alert('hi')">hi</button>btn.onclick = function () {}- 特点:注册事件的唯一性
- 同一个元素(例如 button 元素)同一个事件只能设置一个处理函数,最后注册的处理函数将会覆盖前面注册的处理函数
<body>
  <button>传统注册事件</button>
  <button>方法监听注册事件</button>
  <script>
    // 第一个按钮点击显示 hello,第二个按钮点击没反应了
    const btns = document.querySelectorAll('button')
    btns[0].onclick = function () {
      alert('hi')
    }
    btns[0].onclick = function () {
      alert('hello')
    }
  </script>
</body>
2
3
4
5
6
7
8
9
10
11
12
13
14
方法监听注册方式:
eventTargete.addEventListener(type, listener[, useCapture])
- w3c 标准推荐方式
- addEventListener():它是一个方法
- 同一个元素,同一个事件可以添加多个侦听器(事件处理程序)
- type:事件类型字符串,比如 click、mouseover,不要带 on
- listener:事件处理函数,事件发生时,会调用该监听函数
- useCapture:可选参数,默认值为 false
<body>
  <button>传统注册事件</button>
  <button>方法监听注册事件</button>
  <script>
    const btns = document.querySelectorAll('button')
    btns[1].addEventListener('click', function () {
      alert(22)
    })
    btns[0].addEventListener('click', function () {
      alert(33)
    })
  </script>
</body>
2
3
4
5
6
7
8
9
10
11
12
13
5.2 (ie,不推荐)attachEvent 注册事件
**注意:**只有 ie9 之前才支持!
eventTarget.attachEvent(eventNameWithOn, callback)
兼容性写法:
function addEventListener(element, eventName, fn) {
    // 判断当前浏览器是否支持 addEventListener 方法
    if (element.addEventListener) {
        element.addEventListener(eventName, fn) // 第三个参数默认为 false
    } else if (element.attachEvent) {
        element.attachEvent('on' + eventName, fn)
    } else {
        // 相当于 element.onclick = fn
        element['on' + eventName] = fn
    }
}
2
3
4
5
6
7
8
9
10
11
5.2 删除事件
- 传统注册事件
eventTarget.onclick = null
- 方法监听注册方式
eventTarget.removeEventListener(type, listener[, userCapture])
<!DOCTYPE html>
<html lang="en">

<head>
  <meta charset="UTF-8">
  <meta http-equiv="X-UA-Compatible" content="IE=edge">
  <meta name="viewport" content="width=device-width, initial-scale=1.0">
  <title>Document</title>
  <style>
    div {
      width: 100px;
      height: 100px;
      background-color: pink;
    }
  </style>
</head>

<body>
  <div>1</div>
  <div>2</div>
  <script>
    const divs = document.querySelectorAll('div')
    // 1.传统方式解绑事件
    divs[0].onclick = function () {
      alert(11)
      divs[0].onclick = null
    }
    // 2.方法监听解绑事件
    divs[1].addEventListener('click', fn)
    function fn() {
      alert(22)
      divs[1].removeEventListener('click', fn)
    }
  </script>
</body>

</html>
2
3
4
5
6
7
8
9
10
11
12
13
14
15
16
17
18
19
20
21
22
23
24
25
26
27
28
29
30
31
32
33
34
35
36
37
5.3 DOM 事件流理论
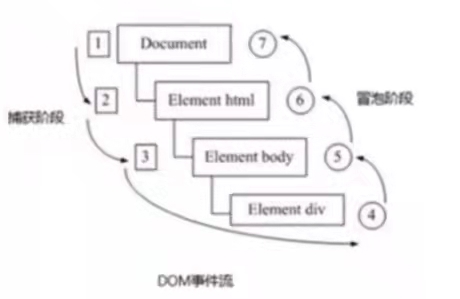
DOM 事件流分为 3 个阶段:
- 捕获阶段:网景公司提出
- 当前目标阶段
- 冒泡阶段:ie 提出
注意
- JS 代码只能执行捕获或者冒泡其中一个阶段
- onclick 和 attachEvent 只能得到冒泡阶段
addEventListener(type, listener(, useCapture))第三个参数若为 true,表示在事件捕获阶段调用事件处理程序,否则在事件冒泡阶段调用事件处理函数- 一般使用 事件冒泡
- 有些事件是没有冒泡的,例如 onblur、onfocus、onmouseenter、onmouseleave
示例代码
<!DOCTYPE html>
<html lang="en">

<head>
  <meta charset="UTF-8">
  <meta http-equiv="X-UA-Compatible" content="IE=edge">
  <meta name="viewport" content="width=device-width, initial-scale=1.0">
  <title>Document</title>
  <style>
    .father {
      position: relative;
      width: 300px;
      height: 300px;
      background-color: #bfa;
    }

    .son {
      position: absolute;
      transform: translate(50%, 50%);
      margin: 0 auto;
      width: 150px;
      height: 150px;
      background-color: pink;
    }
  </style>
</head>

<body>
  <div class="father">
    <div class="son">son盒子</div>
  </div>
  <script>
    // // 捕获阶段:先弹出 father,再弹出 son
    // const son = document.querySelector('.son')
    // son.addEventListener('click', function () {
    //   alert('son')
    // }, true)
    // const father = document.querySelector('.father')
    // father.addEventListener('click', function () {
    //   alert('father')
    // }, true)

    // 冒泡阶段:先弹出 son,再弹出 father
    const son = document.querySelector('.son')
    son.addEventListener('click', function () {
      alert('son')
    })
    const father = document.querySelector('.father')
    father.addEventListener('click', function () {
      alert('father')
    })
  </script>
</body>

</html>
2
3
4
5
6
7
8
9
10
11
12
13
14
15
16
17
18
19
20
21
22
23
24
25
26
27
28
29
30
31
32
33
34
35
36
37
38
39
40
41
42
43
44
45
46
47
48
49
50
51
52
53
54
55
5.4 事件对象
event 就是一个事件对象,写到侦听函数的小括号里,当形参来看
事件对象只有了事件才会存在,它是自动创建的
事件对象是事件一系列相关数据的集合,是事件相关的。例如:鼠标点击里就包括了鼠标的相关信息如鼠标坐标。若是键盘事件,就包含键盘信息如判断用户按下了哪个键
在 ie6-8 里面,必须写成 window.event,必须一字不落
兼容性写法:
e = e || window.event
实践对象常见属性与方法:
| 事件对象属性方法 | 说明 |
|---|---|
| e.target | 返回 触发 事件的对象(标准) |
| e.type | 返回事件的类型,比如 click mouseover 不带 on |
| e.preventDefault() | 该方法阻止默认事件(默认行为,标准,例如不让链接跳转) |
| e.stopPropagation() | 阻止冒泡(标准) |
5.5 e.target 和 this 的区别
- e.target 返回的是触发事件的对象(元素),给父元素绑定事件用这个最好
- this 返回的是绑定事件的对象
<body>
  <div>123</div>
  <ul>
    <li>abc</li>
    <li>abc</li>
    <li>abc</li>
  </ul>
  <script>
    const div = document.querySelector('div')
    div.addEventListener('click', function (e) {
      // 下面俩打印都一样
      console.log(e.target)
      console.log(this)
    })

    const ul = document.querySelector('ul')
    ul.addEventListener('click', function (e) {
      // 给父元素绑定了事件,this 就指向了 ul
      console.log(this) // ul 的对象
      console.log(e.target) // 点击的 li 的对象
    })
  </script>
</body>
2
3
4
5
6
7
8
9
10
11
12
13
14
15
16
17
18
19
20
21
22
23
- (了解)与 this 有个非常相似的属性 currentTarget(ie678 不兼容)
5.6 阻止默认行为
<body>
  <a href="https://www.baidu.com">百度</a>
  <form action="https://www.baidu.com">
    <input type="submit" value="提交" name="sub">
  </form>

  <script>
    // 阻止默认行为:让链接不跳转,让提交按钮不提交
    const a = document.querySelector('a')
    a.addEventListener('click', function (e) {
      e.preventDefault() // dom 标准写法
    })
  </script>
</body>
2
3
4
5
6
7
8
9
10
11
12
13
14
5.7 阻止冒泡
标准写法:利用事件对象里面的 stop.stopPropagation() 方法
<!DOCTYPE html>
<html lang="en">

<head>
  <meta charset="UTF-8">
  <meta http-equiv="X-UA-Compatible" content="IE=edge">
  <meta name="viewport" content="width=device-width, initial-scale=1.0">
  <title>Document</title>
  <style>
    .father {
      position: relative;
      width: 300px;
      height: 300px;
      background-color: pink;
      margin: 0 auto;
    }

    .son {
      position: absolute;
      width: 150px;
      height: 150px;
      background-color: #bfa;
      transform: translate(50%, 50%);

    }
  </style>
</head>

<body>
  <div class="father">
    <div class="son">son儿子</div>
  </div>

  <script>
    const son = document.querySelector('.son')
    son.addEventListener('click', function (e) {
      alert('son')
      e.stopPropagation()
    })
    const father = document.querySelector('.father')
    father.addEventListener('click', function (e) {
      alert('father')
      e.stopPropagation()
    })
    document.addEventListener('click', function () {
      alert('document')
    })
  </script>
</body>

</html>
2
3
4
5
6
7
8
9
10
11
12
13
14
15
16
17
18
19
20
21
22
23
24
25
26
27
28
29
30
31
32
33
34
35
36
37
38
39
40
41
42
43
44
45
46
47
48
49
50
51
5.8 事件委托
事件委托也称为事件代理,在 jQuery 里面称为事件委托
事件委托的原理:
不是每个子节点单独设置事件监听器,而是事件监听器设置在其父节点上,然后利用冒泡原理影响设置每个子节点。
举个例子:
给 ul 注册点击事件,然后利用事件对象的 target 来找到当前点击的 li,因为点击 li,事件会冒泡到 ul 上,ul 有注册事件,就会触发事件监听器
示例代码:
<body>
  <ul>
    <li>你好</li>
    <li>hello</li>
    <li>布里威</li>
  </ul>

  <script>
    const ul = document.querySelector('ul')
    ul.addEventListener('click', function (e) {
      e.target.style.backgroundColor = 'pink'
    })
  </script>
</body>
2
3
4
5
6
7
8
9
10
11
12
13
14
5.9 禁止选中文字和禁止右键菜单
禁止鼠标右键菜单
// contextmenu 可以禁用右键菜单
document.addEventListener('contextmenu', function (e) {
    e.preventDefault()
})
2
3
4
禁止鼠标选中(selectstart 开始选中)
// selectstart 可以禁用选中文字
document.addEventListener('selectstart', function (e) {
    e.preventDefault()
})
2
3
4
5.10 获得鼠标在页面中的坐标
| 鼠标事件对象 | 说明 |
|---|---|
| e.clientX | 鼠标相对于浏览器窗口 可视区 的 X 坐标 |
| e.clientY | 鼠标相对于浏览器窗口 可视区 的 Y 坐标 |
| e.pageX | 鼠标相对于 文档页面 的 X 坐标 |
| e.pageY | 鼠标相对于 文档页面 的 Y坐标 |
| e.screenX | 鼠标相对于 电脑屏幕 的 X 坐标 |
| e.screenY | 鼠标相对于 电脑屏幕 的 Y 坐标 |
<!DOCTYPE html>
<html lang="en">

<head>
  <meta charset="UTF-8">
  <meta http-equiv="X-UA-Compatible" content="IE=edge">
  <meta name="viewport" content="width=device-width, initial-scale=1.0">
  <title>Document</title>
  <style>
    body {
      height: 3000px;
    }
  </style>
</head>

<body>
  <script>
    document.addEventListener('click', function (e) {
      // 可视区域
      console.log(e.clientX)
      console.log(e.clientY)
      console.log('-------')
      // 页面文档
      console.log(e.pageX)
      console.log(e.pageY)
      console.log('-------')
      // 电脑屏幕
      console.log(e.screenX)
      console.log(e.screenY)
    })
  </script>
</body>

</html>
2
3
4
5
6
7
8
9
10
11
12
13
14
15
16
17
18
19
20
21
22
23
24
25
26
27
28
29
30
31
32
33
34
5.11 跟随鼠标的天使
- 使用鼠标移动事件:mousemove
- 给 document 注册事件
- 图片要移动举例,而且不占位置,使用绝对定位
<!DOCTYPE html>
<html lang="en">

<head>
  <meta charset="UTF-8">
  <meta http-equiv="X-UA-Compatible" content="IE=edge">
  <meta name="viewport" content="width=device-width, initial-scale=1.0">
  <title>Document</title>
  <style>
    img {
      position: absolute;
    }
  </style>
</head>

<body>
  <img src="../static/images/angel.gif" alt="天使">
  <script>
    const pic = document.querySelector('img')
    document.addEventListener('mousemove', function (e) {
      const x = e.pageX
      const y = e.pageY
      pic.style.left = x - 50 + 'px'
      pic.style.top = y - 40 + 'px'
    })
  </script>
</body>

</html>
2
3
4
5
6
7
8
9
10
11
12
13
14
15
16
17
18
19
20
21
22
23
24
25
26
27
28
29
5.12 常用键盘事件
| 键盘事件 | 触发条件 |
|---|---|
| onkeyup | 某个键盘按键被松开时触发 |
| onkeydown | 某个键盘按键被按下时触发 |
| onkeypress | 某个键盘按键被按下时触发,但是它不识别功能键例如 Ctrl、shift、箭头等 |
执行顺序:最先 keydown -- keypress -- keyup 最后
<body>
  <script>
    document.addEventListener('keyup', function () {
      console.log('keyup')
    })
    document.addEventListener('keydown', function () {
      console.log('keydown')
    })
    document.addEventListener('keypress', function () {
      console.log('keypress')
    })
  </script>
</body>
2
3
4
5
6
7
8
9
10
11
12
13
5.13 keyCode 判断用户按下哪个键
<body>
  <script>
    // keyCode 属性可以得到对应键的 ASCII 码值
    // key 属性直接能得到对应键的值,但是兼容性差
    document.addEventListener('keyup', function (e) {
      if (e.keyCode === 65) {
        alert('你按下的是 a 键')
      }
      if (e.key === 'b') {
        alert('你按下的是 b 键')
      }
    })
  </script>
</body>
2
3
4
5
6
7
8
9
10
11
12
13
14
5.14 模拟京东按键输入内容
<body>
  <input type="text" aria-label="搜索">
  <script>
    const search = document.querySelector('input')
    document.addEventListener('keyup', function (e) {
      if (e.keyCode === 83) {
        search.focus()
      }
    })
  </script>
</body>
2
3
4
5
6
7
8
9
10
11
5.15 京东快递查询单号
注意:
keydown 和 keypress 在文本框里面的特点:他们两个事件触发的时候,文字还没有落入文本框中
代码:
<!DOCTYPE html>
<html lang="en">

<head>
  <meta charset="UTF-8">
  <meta http-equiv="X-UA-Compatible" content="IE=edge">
  <meta name="viewport" content="width=device-width, initial-scale=1.0">
  <title>Document</title>
  <style>
    * {
      margin: 0;
      padding: 0;
    }

    .search {
      position: relative;
      width: 178px;
      margin: 100px;
    }

    .con {
      display: none;
      position: absolute;
      top: -40px;
      width: 171px;
      border: 1px solid rgba(0, 0, 0, .2);
      box-shadow: 0 2px 4px rgba(0, 0, 0, .2);
      padding: 5px 0;
      font-size: 18px;
      line-height: 20px;
      color: #333;
    }

    .con::before {
      content: '';
      width: 0;
      height: 0;
      position: absolute;
      top: 28px;
      left: 18px;
      border: 8px solid #000;
      border-style: solid dashed dashed;
      border-color: #fff transparent transparent;
    }
  </style>
</head>

<body>
  <div class="search">
    <div class="con">123</div>
    <input type="text" placeholder="请输入您的快递单号" class="jd">
  </div>

  <script>
    // 输入时显示框框
    const con = document.querySelector('.con')
    const jd_input = con.nextElementSibling
    jd_input.addEventListener('keyup', function () {
      if (this.value === '') {
        con.style.display = 'none'
      } else {
        con.style.display = 'block'
        con.innerHTML = this.value
      }
    })
    // 失去焦点隐藏 con 盒子
    jd_input.addEventListener('blur', function () {
      con.style.display = 'none'
    })
    // 获得焦点显示 con 盒子
    jd_input.addEventListener('focus', function () {
      if (this.value !== '') {
        con.style.display = 'block'
      }
    })
  </script>
</body>

</html>
2
3
4
5
6
7
8
9
10
11
12
13
14
15
16
17
18
19
20
21
22
23
24
25
26
27
28
29
30
31
32
33
34
35
36
37
38
39
40
41
42
43
44
45
46
47
48
49
50
51
52
53
54
55
56
57
58
59
60
61
62
63
64
65
66
67
68
69
70
71
72
73
74
75
76
77
78
79
6. BOM 基础
6.1 BOM 概述
BOM(Browser Object Model)即 浏览器对象模型,它提供了独立于内容而与 浏览器窗口进行交互的对象,其核心对象是 window
- BOM 比 DOM 更大,它包括 DOM
- DOM 顶级元素是 document,BOM 顶级元素是 window
- window 包括 document、location、navigation、screen、history。举个例子:
document.querySelector()等同于window.document.querySelector() - window 对象是浏览器的顶级对象,它具有双重角色:它是 JS 访问浏览器窗口的一个接口,它也是一个全局对象,定义在全局作用域中的变量,函数都会变成 window 对象的属性和方法
- window 下有一个特殊属性 window.name,所以建议不要用 name 作为变量
6.2 页面加载事件
window.onload 是窗口(页面)加载事件,当文档内容完全加载完成后会触发该事件(包括图像、脚本文件、CSS文件等),就调用的处理函数
- 有了 window.onload 就可以把 JS 代码写在页面元素的上方,因为 onload 是等页面内容全部加载完毕,再去执行处理函数
- window.onload 传统注册事件方式只能写一次,如果有多个,会以最后一个 window.onload 为准。但是如果使用监听方式,则可以写多个
document.addEventListener('DOMContentLoaded', function () {})点击查看
以前的 window.onload 的写法:
<!DOCTYPE html>
<html lang="en">

<head>
  <meta charset="UTF-8">
  <meta http-equiv="X-UA-Compatible" content="IE=edge">
  <meta name="viewport" content="width=device-width, initial-scale=1.0">
  <title>Document</title>
  <script>
    window.onload = function () {
      const btn = document.querySelector('button')
      btn.addEventListener('click', function () {
        alert('good')
      })
    }
  </script>
</head>

<body>
  <button>点击我</button>
</body>

</html>
2
3
4
5
6
7
8
9
10
11
12
13
14
15
16
17
18
19
20
21
22
23
现在提倡的写法:
<!DOCTYPE html>
<html lang="en">

<head>
  <meta charset="UTF-8">
  <meta http-equiv="X-UA-Compatible" content="IE=edge">
  <meta name="viewport" content="width=device-width, initial-scale=1.0">
  <title>Document</title>
  <script>
    window.addEventListener('load', function () {
      const btn = document.querySelector('button')
      btn.addEventListener('click', function () {
        alert('good')
      })
    })
    window.addEventListener('load', function () {
      const btn = document.querySelector('button')
      btn.addEventListener('click', function () {
        alert('22')
      })
    })
  </script>
</head>

<body>
  <button>点击我</button>
</body>

</html>
2
3
4
5
6
7
8
9
10
11
12
13
14
15
16
17
18
19
20
21
22
23
24
25
26
27
28
29
→ 窗口加载事件
document.addEventListener('DOMContentLoaded', function () {})
- DOMContentLoaded 事件触发时,仅当 DOM 加载完成,不包括样式表、图片、flash等等,ie9 以上支持
- 好处:若页面图片特别多,从用户访问到 onload 触发可能需要较长的事件,交互效果就不能实现,必然影响用户体验,此时使用 DOMContentLoaded 事件比较合适
6.3 调整窗口大小事件(响应式布局)
window.onresize = function () {} / window.addEventListener('resize', function () {})
- 只要窗口大小发生像素变化,就会触发这个事件
- 经常利用这个事件完成响应式布局,window.innerWidth 当前屏幕的宽度
响应式布局:当宽度小于 900px 时,隐藏方块:
<!DOCTYPE html>
<html lang="en">

<head>
  <meta charset="UTF-8">
  <meta http-equiv="X-UA-Compatible" content="IE=edge">
  <meta name="viewport" content="width=device-width, initial-scale=1.0">
  <title>Document</title>
  <style>
    div {
      width: 200px;
      height: 200px;
      background-color: pink;
    }
  </style>
</head>

<body>
  <script>
    window.addEventListener('load', function () {
      const div = document.querySelector('div')
      window.addEventListener('resize', function () {
        console.log(window.innerWidth)
        if (window.innerWidth <= 800) {
          div.style.display = 'none'
        } else {
          div.style.display = 'block'
        }
      })
    })
  </script>

  <div></div>
</body>

</html>
2
3
4
5
6
7
8
9
10
11
12
13
14
15
16
17
18
19
20
21
22
23
24
25
26
27
28
29
30
31
32
33
34
35
36
6.4 定时器 setTimeout()
window.setTimeout(function () {}, time) / window.setTimeout(() => {}, time)
基础例子:
<body>
  <script>
    window.addEventListener('load', () => {
      setTimeout(() => {
        console.log('internet explorer')
      }, 2000);
    })
  </script>

  <div></div>
</body>
2
3
4
5
6
7
8
9
10
11
5s 后自动关闭广告案例:
<body>
  <img src="../static/images/wb.jpg" alt="ad" class="ad">
  <script>
    window.addEventListener('load', () => {
      const ad = document.querySelector('.ad')
      setTimeout(() => {
        ad.style.display = 'none'
      }, 5000);
    })
  </script>
</body>
2
3
4
5
6
7
8
9
10
11
6.5 清除定时器 clearTimeout
<body>
  <script>
    window.addEventListener('load', () => {
      const btn = document.querySelector('button')
      const timer = setTimeout(() => {
        console.log('爆炸了')
      }, 1000);
      btn.addEventListener('click', function () {
        clearTimeout(timer)
      })
    })
  </script>

  <button>点击停止定时器</button>
</body>
2
3
4
5
6
7
8
9
10
11
12
13
14
15
6.6 setInterval()
setInterval() 方法重复调用一个函数,每隔这段时间,就回去调用一次回调函数
用法和上同。
倒计时实例:
<!DOCTYPE html>
<html lang="en">

<head>
  <meta charset="UTF-8">
  <meta http-equiv="X-UA-Compatible" content="IE=edge">
  <meta name="viewport" content="width=device-width, initial-scale=1.0">
  <title>Document</title>
  <style>
    div {
      margin: 200px;
    }

    span {
      display: inline-block;
      width: 40px;
      height: 40px;
      background-color: #333;
      font-size: 20px;
      color: #fff;
      text-align: center;
      line-height: 40px;
    }
  </style>
</head>

<body>
  <div>
    <span class="hour">1</span>
    <span class="minute">2</span>
    <span class="second">3</span>
  </div>

  <script>
    const hour = document.querySelector('.hour')
    const minute = hour.nextElementSibling
    const second = minute.nextElementSibling
    let inputTime = new Date('2022-10-28 18:00:00')
    countDown() // 先调用一次此函数,防止第一次刷新页面有空白
    // 开启定时器
    setInterval(countDown, 1000)

    function countDown() {
      let nowTime = new Date()
      let times = (inputTime - nowTime) / 1000 // times 是剩余事件的秒数
      let d = parseInt(times / 60 / 60 / 24) // 天
      d = d < 10 ? '0' + d : d
      let h = parseInt(times / 60 / 60 % 24) // 时
      h = h < 10 ? '0' + h : h
      hour.innerHTML = h
      let m = parseInt(times / 60 % 60) // 分
      m = m < 10 ? '0' + m : m
      minute.innerHTML = m
      let s = parseInt(times % 60)
      s = s < 10 ? '0' + s : s
      second.innerHTML = s
      return d + '天' + h + '时' + m + '分' + s + '秒'
    }

  </script>
</body>

</html>
2
3
4
5
6
7
8
9
10
11
12
13
14
15
16
17
18
19
20
21
22
23
24
25
26
27
28
29
30
31
32
33
34
35
36
37
38
39
40
41
42
43
44
45
46
47
48
49
50
51
52
53
54
55
56
57
58
59
60
61
62
63
6.7 清除定时器 clearInterval
<body>
  <button class="begin">开启定时器</button>
  <button class="stop">停止定时器</button>
  <script>
    const begin = document.querySelector('.begin')
    const stop = document.querySelector('.stop')
    let timer
    begin.addEventListener('click', function () {
      timer = setInterval(() => {
        console.log('你好吗')
      }, 1000);
    })
    stop.addEventListener('click', function () {
      clearInterval(timer)
    })
  </script>
</body>
2
3
4
5
6
7
8
9
10
11
12
13
14
15
16
17
6.8 发送短信案例
<!DOCTYPE html>
<html lang="en">

<head>
  <meta charset="UTF-8">
  <meta http-equiv="X-UA-Compatible" content="IE=edge">
  <meta name="viewport" content="width=device-width, initial-scale=1.0">
  <title>Document</title>
</head>

<body>
  <label for="send">
    手机号码:<input type="number" id="send">
  </label>
  <button>发送</button>

  <script>
    const btn = document.querySelector('button')
    let time = 3
    btn.addEventListener('click', function () {
      this.disabled = true
      btn.innerHTML = `还剩下${time}秒`
      let timer = setInterval(() => {
        if (time === 0) {
          // 清除定时器和复原按钮
          clearInterval(timer)
          btn.disabled = false
          btn.innerHTML = '发送'
          time = 3
        } else {
          btn.innerHTML = `还剩下${time-1}秒`
          time--
        }
      }, 1000)
    })
  </script>
</body>

</html>
2
3
4
5
6
7
8
9
10
11
12
13
14
15
16
17
18
19
20
21
22
23
24
25
26
27
28
29
30
31
32
33
34
35
36
37
38
39
6.9 location 对象常见属性
window 对象给我们提供了一个 location 属性用以获取或设置窗体的 URL,并且可以用于解析 URL。因为这个属性返回的是一个对象,所以我们将这个属性称为 location 对象
URL 一般语法格式:
protocol://host[:port]/path/[?query]#fragment
https://www.iamyuan.com/index.html?name=andy&age=18#link
2
| 组成 | 说明 |
|---|---|
| protocol | 通信协议,常用的 http、ftp、maito 等 |
| host | 主机(域名)www.iamyuan.com |
| port | 端口号 可选,省略时使用的方案默认端口,如 http 默认端口为 80 |
| path | 路径由零或多个 '/' 符号隔开的字符串,一般用来表示主机上的一个目录或文件地址 |
| query | 参数,以键值对的形式,通过 ‘&’ 符号分割开来 |
| fragment | 片段 #后面内容 常见于链接锚点 |
location 对象的属性:
| location 对象属性 | 返回值 |
|---|---|
| location.href | 获取或者设置整个 URL |
| location.host | 返回主机(域名)www.iamyuan.com |
| location.port | 返回端口号,如果未写返回空字符串 |
| location.pathname | 返回路径 |
| location.search | 返回参数 |
| location.hash | 返回片段 #后面内容 常见于链接锚点 |
6.10 简单表单提交及获取案例
提交网页 login.html:
<body>
  <form action="./index.html">
    <label for="uname">
      用户名:<input type="text" name="uname" id="uname">
    </label>
    <input type="submit" value="登录">
  </form>
</body>
2
3
4
5
6
7
8
获得 query 的网页 index.html:
<body>
  <div></div>
  <script>
    // console.log(location.search) // ?uname=andy
    // 1.去掉问号 substr('起始位置', 截取几个字符)
    const params = location.search.substr(1) // uname=andy
    const arr = params.split('=') // ['uname', '123']
    // console.log(arr[1]) // andy

    const div = document.querySelector('div')
    div.innerHTML = arr[1]
  </script>
</body>
2
3
4
5
6
7
8
9
10
11
12
13
6.11 location 对象的方法
| location 对象方法 | 返回值 |
|---|---|
| location.assign() | 跟 href 一样,可以跳转页面(也称为重定向页面) |
| location.replace() | 替换当前页面,因为不记录历史,所以不能后退页面 |
| location.reload() | 重新加载页面,相当于刷新按钮或 f5,若参数为 true,强制刷新 ctrl + f5 |
代码举例:
<body>
  <button>点击</button>

  <script>
    const btn = document.querySelector('button')
    btn.addEventListener('click', function () {
      location.href = 'https://www.baidu.com'
      // location.assign('https://www.baidu.com')
      // location.replace('https://www.baidu.com') // 不记录历史,无后退功能
      // location.reload() // 刷新
      // location.reload(true) // 强制刷新,清除了缓存
    })
  </script>
</body>
2
3
4
5
6
7
8
9
10
11
12
13
14
6.12 navigator 对象
只有 navigator.userAgent 有点用
6.13 history 对象
window 对象提供了一个 history 对象,与浏览器历史记录进行交互,该对象包含用户(在浏览器窗口中)
| history 对象方法 | 作用 |
|---|---|
| back() | 可以后退功能 |
| forward() | 前进功能 |
| go(参数) | 前进后退功能。参数如果是 1 前进 1 个页面,如果是 -1 后退 1 个页面 |
7. PC 端网页特效
7.1 offset 系列
offset 即偏移量,使用 offset 系列相关属性可以动态得到该元素的位置(偏移)、大小等
作用:
- 获得元素距离带有定位父元素的位置
- 获得元素自身的大小(宽度高度)
- 注意:返回的数值不带单位
offset 常用属性:
| offset 系列属性 | 作用 |
|---|---|
| element.offsetParent | 返回作为该元素带有定位的父级元素,如果父级元素没有定位则返回body |
| element.offsetTop | 返回元素相对带有定位父元素上方的偏移 |
| element.offsetLeft | 返回元素相对带有定位父元素做边框的偏移 |
| element.offsetWidth | 返回自身包括 padding、边框、内容区的宽度,返回数值不带单位。包含 padding、border、width |
| element.offsetHeight | 返回自身包括 padding、边框、内容区的高度,返回数值不带单位。包含 padding、border、width |
示例代码:
<!DOCTYPE html>
<html lang="en">

<head>
  <meta charset="UTF-8">
  <meta http-equiv="X-UA-Compatible" content="IE=edge">
  <meta name="viewport" content="width=device-width, initial-scale=1.0">
  <title>Document</title>
  <style>
    * {
      margin: 0;
      padding: 0;
    }

    .father {
      position: relative;
      width: 200px;
      height: 200px;
      background-color: pink;
      margin: 100px;
    }

    .son {
      width: 100px;
      height: 100px;
      background-color: purple;
      margin-left: 45px;
    }

    .w {
      width: 100%;
      height: 200px;
      background-color: #bfa;
      padding: 10px;
    }
  </style>
</head>

<body>
  <div class="father">
    <div class="son"></div>
  </div>
  <div class="w"></div>

  <script>
    const father = document.querySelector('.father')
    const son = document.querySelector('.son')
    console.log(father.offsetTop) // 100
    console.log(father.offsetLeft) // 100
    console.log(son.offsetLeft) // 45
    console.log(son.offsetTop) // 0

    const w = document.querySelector('.w')
    // 包含 padding、border、width
    console.log(w.offsetWidth) // 220
    console.log(w.offsetHeight) // 220

    console.log(son.offsetParent) // div.father
  </script>
</body>

</html>
2
3
4
5
6
7
8
9
10
11
12
13
14
15
16
17
18
19
20
21
22
23
24
25
26
27
28
29
30
31
32
33
34
35
36
37
38
39
40
41
42
43
44
45
46
47
48
49
50
51
52
53
54
55
56
57
58
59
60
61
62
7.2 offset 与 style 区别
offset:
- offset 可以得到任意样式表中的样式值
- offset 系列获得的数值没有单位
- offsetWidth 包含 padding、border、width
- offsetWidth 等属性是只读属性,只能获取不能赋值
- 所以,要向获取元素大小位置,用 offset 更合适
style:
- style 只能得到行内样式表中的样式值
- style.width 得到的是带有单位的字符串
- style.width 获得不包含 padding 和 border 的值
- style.width 是可读写属性,可以获取也可以赋值
- 所以,想要给元素更改值,需要用 style 改变
7.3 获取鼠标在盒子内的坐标
- 点击盒子,欲得到鼠标举例盒子左右的距离
- 首先得到鼠标在页面中的坐标(e.pageX、e.pageY)
- 其次得到盒子在页面中的距离(box.offsetLeft、box.offsetTop)
<!DOCTYPE html>
<html lang="en">

<head>
  <meta charset="UTF-8">
  <meta http-equiv="X-UA-Compatible" content="IE=edge">
  <meta name="viewport" content="width=device-width, initial-scale=1.0">
  <title>Document</title>
  <style>
    .box {
      width: 200px;
      height: 200px;
      background-color: pink;
    }
  </style>
</head>

<body>
  <div class="box"></div>

  <script>
    const box = document.querySelector('.box')
    box.addEventListener('mousemove', function (e) {
      const x = e.pageX - this.offsetLeft
      const y = e.pageY - this.offsetTop
      this.innerHTML = `x:${x}  y:${y}`
    })
  </script>
</body>

</html>
2
3
4
5
6
7
8
9
10
11
12
13
14
15
16
17
18
19
20
21
22
23
24
25
26
27
28
29
30
31
7.4 拖动模态框
弹出框,也称为模态框
- 点击弹出层,会弹出模态框,并且显示灰色半透明的遮挡层
- 点击关闭按钮,可以关闭模态框,并且同时关闭灰色半透明zhedangc
- 鼠标放在模态框最上面一行,可以按住鼠标拖拽模态框在页面中移动
- 鼠标松开,可以停止拖动模态框移动
遮盖层样式写法:(<div class="login-bg"></div>)
.login-bg {
    display: block;
    width: 100%;
    height: 100%;
    position: fixed;
    top: 0px;
    left: 0px;
    background: rgba(0, 0, 0, .3);
}
2
3
4
5
6
7
8
9
- 点击弹出层,模态框和遮盖层就会显示出来
- 点击关闭按钮,模态框和遮挡层就会隐藏起来
代码如下:
// 1.获取元素
const login = document.querySelector('.login')
const mask = document.querySelector('.login-bg')
const link = document.querySelector('#link')
const closeBtn = document.querySelector('#closeBtn')
// 2.点击弹出层的 link,让 mask 和 login 显示出来
link.addEventListener('click', function () {
    mask.style.display = 'block'
    login.style.display = 'block'
})
// 3.点击 closeBtn 隐藏 mask 和 login
closeBtn.addEventListener('click', function () {
    mask.style.display = 'none'
    login.style.display = 'none'
})
2
3
4
5
6
7
8
9
10
11
12
13
14
15
- 拖拽效果原理:鼠标按下并且移动,之后松开鼠标
- 触发事件是鼠标按下 mousedown,鼠标移动 mousemove,鼠标松开 mouseup
- 拖拽过程:鼠标移动过程中,获得最新的值赋值给模态框框里的 left 和 top 值,这样模态框就能跟着鼠标走了
- 鼠标按下触发的事件源是最上面一行,就是 id 为 title
- 鼠标的坐标(pageX、pageY)减去鼠标在盒子内的坐标(offsetX、offsetY),才是模态框真正的位置
代码如下:
// 4.开始拖拽
// (1)当鼠标按下,获得鼠标在盒子的坐标
title.addEventListener('mousedown', function (e) {
    let x = e.pageX - login.offsetLeft
    let y = e.pageY - login.offsetTop
    // (2)鼠标移动的时候,把鼠标在页面中的坐标,减去鼠标在盒子内的坐标就是模态框的 left 和 top 值
    document.addEventListener('mousemove', function (e) {
        login.style.left = e.pageX - x + 'px'
        login.style.top = e.pageY - y + 'px'
    })
})
2
3
4
5
6
7
8
9
10
11
问题:松开鼠标仍有跟随,解决如下:
// 4.开始拖拽
// (1)当鼠标按下,获得鼠标在盒子的坐标
title.addEventListener('mousedown', function (e) {
    let x = e.pageX - login.offsetLeft
    let y = e.pageY - login.offsetTop
    // (2)鼠标移动的时候,把鼠标在页面中的坐标,减去鼠标在盒子内的坐标就是模态框的 left 和 top 值
    document.addEventListener('mousemove', move)

    function move (e) {
        login.style.left = e.pageX - x + 'px'
        login.style.top = e.pageY - y + 'px'
    }

    // (3)鼠标弹起,就让谁啊哦移动事件移除
    document.addEventListener('mouseup', function () {
        document.removeEventListener('mousemove', move)
    })
})
2
3
4
5
6
7
8
9
10
11
12
13
14
15
16
17
18
全部代码:
<!DOCTYPE html>
<html lang="en">

<head>
  <meta charset="UTF-8">
  <meta http-equiv="X-UA-Compatible" content="IE=edge">
  <meta name="viewport" content="width=device-width, initial-scale=1.0">
  <title>Document</title>
  <style>
    .login-header {
      width: 100%;
      text-align: center;
      height: 30px;
      font-size: 24px;
      line-height: 30px;
    }

    ul,
    li,
    ol,
    dl,
    dt,
    dd,
    div,
    p,
    span,
    h1,
    h2,
    h3,
    h4,
    h5,
    h6,
    a {
      padding: 0px;
      margin: 0px;
    }

    .login {
      display: none;
      width: 512px;
      height: 280px;
      position: fixed;
      border: #ebebeb solid 1px;
      left: 50%;
      top: 50%;
      background: #ffffff;
      box-shadow: 0px 0px 20px #ddd;
      z-index: 9999;
      transform: translate(-50%, -50%);
    }

    .login-title {
      width: 100%;
      margin: 10px 0px 0px 0px;
      text-align: center;
      line-height: 40px;
      height: 40px;
      font-size: 18px;
      position: relative;
      cursor: move;
    }

    .login-input-content {
      margin-top: 20px;
    }

    .login-button {
      width: 50%;
      margin: 30px auto 0px auto;
      line-height: 40px;
      font-size: 14px;
      border: #ebebeb 1px solid;
      text-align: center;
    }

    .login-bg {
      display: none;
      width: 100%;
      height: 100%;
      position: fixed;
      top: 0px;
      left: 0px;
      background: rgba(0, 0, 0, .3);
    }

    a {
      text-decoration: none;
      color: #000000;
    }

    .login-button a {
      display: block;
    }

    .login-input input.list-input {
      float: left;
      line-height: 35px;
      height: 35px;
      width: 350px;
      border: #ebebeb 1px solid;
      text-indent: 5px;
    }

    .login-input {
      overflow: hidden;
      margin: 0px 0px 20px 0px;
    }

    .login-input label {
      float: left;
      width: 90px;
      padding-right: 10px;
      text-align: right;
      line-height: 35px;
      height: 35px;
      font-size: 14px;
    }

    .login-title span {
      position: absolute;
      font-size: 12px;
      right: -20px;
      top: -30px;
      background: #ffffff;
      border: #ebebeb solid 1px;
      width: 40px;
      height: 40px;
      border-radius: 20px;
    }
  </style>
</head>

<body>
  <div class="login-header"><a id="link" href="javascript:;">点击,弹出登录框</a></div>
  <div id="login" class="login">
    <div id="title" class="login-title">登录会员
      <span><a id="closeBtn" href="javascript:void(0);" class="close-login">关闭</a></span>
    </div>
    <div class="login-input-content">
      <div class="login-input">
        <label>用户名:</label>
        <input type="text" placeholder="请输入用户名" name="info[username]" id="username" class="list-input">
      </div>
      <div class="login-input">
        <label>登录密码:</label>
        <input type="password" placeholder="请输入登录密码" name="info[password]" id="password" class="list-input">
      </div>
    </div>
    <div id="loginBtn" class="login-button"><a href="javascript:void(0);" id="login-button-submit">登录会员</a></div>
  </div>
  <!-- 遮盖层 -->
  <div id="bg" class="login-bg"></div>

  <script>
    // 1.获取元素
    const login = document.querySelector('.login')
    const mask = document.querySelector('.login-bg')
    const link = document.querySelector('#link')
    const closeBtn = document.querySelector('#closeBtn')
    const title = document.querySelector('#title')
    // 2.点击弹出层的 link,让 mask 和 login 显示出来
    link.addEventListener('click', function () {
      mask.style.display = 'block'
      login.style.display = 'block'
    })
    // 3.点击 closeBtn 隐藏 mask 和 login
    closeBtn.addEventListener('click', function () {
      mask.style.display = 'none'
      login.style.display = 'none'
    })
    // 4.开始拖拽
    // (1)当鼠标按下,获得鼠标在盒子的坐标
    title.addEventListener('mousedown', function (e) {
      let x = e.pageX - login.offsetLeft
      let y = e.pageY - login.offsetTop
      // (2)鼠标移动的时候,把鼠标在页面中的坐标,减去鼠标在盒子内的坐标就是模态框的 left 和 top 值
      document.addEventListener('mousemove', move)

      function move(e) {
        login.style.left = e.pageX - x + 'px'
        login.style.top = e.pageY - y + 'px'
      }

      // (3)鼠标弹起,就让谁啊哦移动事件移除
      document.addEventListener('mouseup', function () {
        document.removeEventListener('mousemove', move)
      })
    })
  </script>
</body>

</html>
2
3
4
5
6
7
8
9
10
11
12
13
14
15
16
17
18
19
20
21
22
23
24
25
26
27
28
29
30
31
32
33
34
35
36
37
38
39
40
41
42
43
44
45
46
47
48
49
50
51
52
53
54
55
56
57
58
59
60
61
62
63
64
65
66
67
68
69
70
71
72
73
74
75
76
77
78
79
80
81
82
83
84
85
86
87
88
89
90
91
92
93
94
95
96
97
98
99
100
101
102
103
104
105
106
107
108
109
110
111
112
113
114
115
116
117
118
119
120
121
122
123
124
125
126
127
128
129
130
131
132
133
134
135
136
137
138
139
140
141
142
143
144
145
146
147
148
149
150
151
152
153
154
155
156
157
158
159
160
161
162
163
164
165
166
167
168
169
170
171
172
173
174
175
176
177
178
179
180
181
182
183
184
185
186
187
188
189
190
191
192
7.5 client 系列
client 即客户端,使用 client 系列的相关属性获取元素可视区的相关信息,通过 client 系列的相关属性可以动态得到该元素的边框大小、元素大小等
| client 系列属性 | 作用 |
|---|---|
| element.clientTop | 返回元素上边框的大小 |
| element.clientLeft | 返回元素左边框的大小 |
| element.clientWidth | 返回自身包括 padding、内容区的宽度,不含边框,返回数值不带单位 |
| element.clientHeight | 返回自身包括 padding、内容区的高度,不含边框,返回数值不带单位 |
最大的区别就是 clientWidth / clientHeight 不包括边框。若要得到边框大小,需要使用 clientTop、clientLeft
7.6 load 和 pageshow 区别
下面三种情况都会刷新页面触发 load 事件
- a 标签的超链接
- f5 或者强制刷新
- 前进后退按钮
但是在火狐中,有个特点“往返缓存”,这个缓存不仅保存着页面数据,还保存了 DOM 和 JavaScript 的状态;实际上是将整个页面都保存到了内存里。
此时后退按钮不能刷新页面。
此时可以使用 pageshow 事件来触发。这个事件在页面显示时触发,无论页面是否来自缓存。在重新加载页面中,pageshow 会在 load 事件触发后触发;根据事件对象中的 persisted 来判断是否是缓存中的页面触发的 pageshow 事件,注意这个事件给 window 添加
window.addEventListener('pageshow', function (e) {
    if (e.persisted) {
        setRemUnit()
    }
})
2
3
4
5
7.7 scroll 系列
scroll 就是滚动的,使用 scroll 系列的相关属性可以动态地得到该元素的大小、滚动举例等
| scroll 系列属性 | 作用 |
|---|---|
| element.scrollTop | 返回被卷去的上侧距离,返回数值不带单位 |
| element.scrollLeft | 返回被卷曲的左侧距离,返回数值不带单位 |
| element.scrollWidth | 返回自身实际的宽度,不含边框,返回数值不带单位(含 padding) |
| element.scrollHeight | 返回自身实际高度,不含边框,返回数值不带单位(含 padding) |
页面被卷去头部或左侧:
- window.pageXOffset
- window.pageYOffset
举例代码:
<!DOCTYPE html>
<html lang="en">

<head>
  <meta charset="UTF-8">
  <meta http-equiv="X-UA-Compatible" content="IE=edge">
  <meta name="viewport" content="width=device-width, initial-scale=1.0">
  <title>Document</title>
  <script src="./index.js"></script>
  <style>
    div {
      width: 200px;
      height: 200px;
      background-color: pink;
      border: 1px solid red;
      padding: 10px;
      overflow: auto;
    }
  </style>
</head>

<body>
  <div>
    Lorem ipsum dolor sit, amet consectetur adipisicing elit. Optio aperiam consequuntur cupiditate natus esse fugit
    tempore amet, omnis velit quidem? Ipsum, doloremque ad perspiciatis id vitae aut dicta molestiae
    similique!Loremlorem
    a placeat soluta nemo!Loremloremlorem
  </div>

  <script>
    const div = document.querySelector('div')
    console.log(div.scrollHeight) // 290,实际的内容高度
    console.log(div.offsetHeight) // 222
    div.addEventListener('scroll', function () {
      console.log(div.scrollTop)
    })
  </script>
</body>

</html>
2
3
4
5
6
7
8
9
10
11
12
13
14
15
16
17
18
19
20
21
22
23
24
25
26
27
28
29
30
31
32
33
34
35
36
37
38
39
40
7.8 仿淘宝固定侧边栏
页面被卷去头部或左侧:
- window.pageXOffset
- window.pageYOffset
<!DOCTYPE html>
<html lang="en">

<head>
  <meta charset="UTF-8">
  <meta name="viewport" content="width=device-width, initial-scale=1.0">
  <meta http-equiv="X-UA-Compatible" content="ie=edge">
  <title>Document</title>
  <style>
    .slider-bar {
      position: absolute;
      left: 50%;
      top: 300px;
      margin-left: 600px;
      width: 45px;
      height: 130px;
      background-color: pink;
    }

    .w {
      width: 1200px;
      margin: 10px auto;
    }

    .header {
      height: 150px;
      background-color: purple;
    }

    .banner {
      height: 250px;
      background-color: skyblue;
    }

    .main {
      height: 1000px;
      background-color: yellowgreen;
    }

    span {
      display: none;
      position: absolute;
      bottom: 0;
    }
  </style>
</head>

<body>
  <div class="slider-bar">
    <span class="goBack">返回顶部</span>
  </div>
  <div class="header w">头部区域</div>
  <div class="banner w">banner区域</div>
  <div class="main w">主体部分</div>
  <script>
    //1. 获取元素
    const sliderbar = document.querySelector('.slider-bar');
    const banner = document.querySelector('.banner');
    // banner.offestTop 就是被卷去头部的大小 一定要写到滚动的外面
    const bannerTop = banner.offsetTop
    // 当我们侧边栏固定定位之后应该变化的数值
    const sliderbarTop = sliderbar.offsetTop - bannerTop;
    const main = document.querySelector('.main')
    const goBack = document.querySelector('.goBack')
    const mainTop = main.offsetTop
    // 2. 页面滚动事件 scroll
    document.addEventListener('scroll', function () {
      // 3 .当我们页面被卷去的头部大于等于了 172 此时 侧边栏就要改为固定定位
      if (window.pageYOffset >= bannerTop) {
        sliderbar.style.position = 'fixed';
        sliderbar.style.top = sliderbarTop + 'px';
      } else {
        sliderbar.style.position = 'absolute';
        sliderbar.style.top = '300px'
      }
      if (window.pageYOffset >= mainTop) {
        goBack.style.display = 'block'
      } else {
        goBack.style.display = 'none';
      }
    })
  </script>
</body>

</html>
2
3
4
5
6
7
8
9
10
11
12
13
14
15
16
17
18
19
20
21
22
23
24
25
26
27
28
29
30
31
32
33
34
35
36
37
38
39
40
41
42
43
44
45
46
47
48
49
50
51
52
53
54
55
56
57
58
59
60
61
62
63
64
65
66
67
68
69
70
71
72
73
74
75
76
77
78
79
80
81
82
83
84
85
7.9 三大系列总结
| 三大系列大小对比 | 作用 |
|---|---|
| element.offsetWidth | 返回自身包括 padding、边框、内容区的宽度,返回数值不带单位 |
| element.clientWidth | 返回自身包括 padding、内容区的宽度,不含边框,返回数值不带单位 |
| element.scrollWidth | 返回自身实际宽度,不含边框,返回数值不带单位 |
主要用法:
- offset 系列经常用于获得元素位置 offsetLeft、offsetTop
- client 系列经常用于获取元素大小 clientWidth、clientHeight
- scroll 系列经常用于获取滚动举例 scrollTop、scrollLeft
- 页面滚动距离通过 window.pageXOffset、window.pageYOffset 获得
7.10 mouseenter 和 mouseover 的区别
- mouseover 鼠标经过自身盒子会触发,经过子盒子还会触发。mouseenter 只会经过自身盒子触发
- mouseenter 不会冒泡
- mouseenter 与 mouseleave 进行搭配,同样不会冒泡
<!DOCTYPE html>
<html lang="en">

<head>
  <meta charset="UTF-8">
  <meta http-equiv="X-UA-Compatible" content="IE=edge">
  <meta name="viewport" content="width=device-width, initial-scale=1.0">
  <title>Document</title>
  <style>
    .father {
      width: 200px;
      height: 200px;
      background-color: pink;
    }

    .son {
      width: 100px;
      height: 100px;
      background-color: #bfa;
    }
  </style>
</head>

<body>
  <div class="father">
    <div class="son"></div>
  </div>

  <script>
    const father = document.querySelector('.father')
    const son = father.firstElementChild
    father.addEventListener('mouseover', function () {
      console.log(11)
    })
  </script>
</body>

</html>
2
3
4
5
6
7
8
9
10
11
12
13
14
15
16
17
18
19
20
21
22
23
24
25
26
27
28
29
30
31
32
33
34
35
36
37
38
7.11 简单动画
基本代码:
<!DOCTYPE html>
<html lang="en">

<head>
  <meta charset="UTF-8">
  <meta http-equiv="X-UA-Compatible" content="IE=edge">
  <meta name="viewport" content="width=device-width, initial-scale=1.0">
  <title>Document</title>
  <style>
    div {
      position: absolute;
      left: 0;
      width: 100px;
      height: 100px;
      background-color: pink;
    }
  </style>
</head>

<body>
  <div></div>

  <script>
    const div = document.querySelector('div')
    const timer = setInterval(() => {
      if (div.offsetLeft >= 400) {
        clearInterval(timer)
      }
      div.style.left = div.offsetLeft + 3 + 'px'
    }, 30);
  </script>
</body>

</html>
2
3
4
5
6
7
8
9
10
11
12
13
14
15
16
17
18
19
20
21
22
23
24
25
26
27
28
29
30
31
32
33
34
7.12 动画函数封装
上面的动画可以封装为函数,需要传递两个参数,动画对象和移动到的距离
性能优化:不同元素记录不同定时器
function animate(obj, target) {
    // 给不同元素指定不同的定时器
    obj.timer = setInterval(() => {
        if (obj.offsetLeft >= target) {
            clearInterval(obj.timer)
        } else {
            obj.style.left = obj.offsetLeft + 3 + 'px'
        }
    }, 30);
}
2
3
4
5
6
7
8
9
10
连续点击按钮,元素越来越快,解决方案:
// 先清除以前的定时器,只保留当前的一个定时器执行
function animate(obj, target) {
    clearInterval(obj.timer)
    // 给不同元素指定不同的定时器
    obj.timer = setInterval(() => {
        if (obj.offsetLeft >= target) {
            clearInterval(obj.timer)
        } else {
            obj.style.left = obj.offsetLeft + 3 + 'px'
        }
    }, 30);
}
2
3
4
5
6
7
8
9
10
11
12
x 方向完整代码:
function animateMove (obj, target) {
  return new Promise((resolve, reject) => {
    clearInterval(obj.timer)
    // 给不同元素指定不同的定时器
    obj.timer = setInterval(() => {
      // 步长值
      // 把步长值改成正数,不要出现小数的问题
      // const step = Math.ceil((target - obj.offsetLeft) / 10)
      let step = (target - obj.offsetLeft) / 10
      step = step > 0 ? Math.ceil(step) : Math.floor(step)
      if (obj.offsetLeft === target) {
        clearInterval(obj.timer)
        resolve()
      } else {
        // 把每次加 1 这个步长值改成一个慢慢变小的值
        // 步长公式:(目标值 - 现在的位置) / 10
        obj.style.left = obj.offsetLeft + step + 'px'
      }
    }, 15)
  })
}
2
3
4
5
6
7
8
9
10
11
12
13
14
15
16
17
18
19
20
21
y 方向完整代码:
// 动画函数
function animate(obj, target, callback) {
  // console.log(callback);  callback = function() {}  调用的时候 callback()
  // 先清除以前的定时器,只保留当前的一个定时器执行
  clearInterval(obj.timer);
  obj.timer = setInterval(function () {
    // 步长值写到定时器的里面
    // 把我们步长值改为整数 不要出现小数的问题
    // var step = Math.ceil((target - obj.offsetLeft) / 10);
    var step = (target - window.pageYOffset) / 10;
    step = step > 0 ? Math.ceil(step) : Math.floor(step);
    if (window.pageYOffset == target) {
      // 停止动画 本质是停止定时器
      clearInterval(obj.timer);
      // 回调函数写到定时器结束里面
      // if (callback) {
      //     // 调用函数
      //     callback();
      // }
      callback && callback();
    }
    // 把每次加1 这个步长值改为一个慢慢变小的值  步长公式:(目标值 - 现在的位置) / 10
    // obj.style.left = window.pageYOffset + step + 'px';
    window.scroll(0, window.pageYOffset + step);
  }, 15);
}
2
3
4
5
6
7
8
9
10
11
12
13
14
15
16
17
18
19
20
21
22
23
24
25
26
8. PC - 动画
8.1 缓动动画原理
缓动动画就是让元素运动速度有所变化,最常见的是让速度慢慢停下来
- 让盒子每次移动的距离慢慢变小,速度就会慢慢落下来
- 核心算法:(目标值 - 现在的位置) / 10 作为每次移动的距离步长
- 停止的条件:当前盒子位置等于目标位置就停止定时器
<!DOCTYPE html>
<html lang="en">

<head>
  <meta charset="UTF-8">
  <meta http-equiv="X-UA-Compatible" content="IE=edge">
  <meta name="viewport" content="width=device-width, initial-scale=1.0">
  <title>Document</title>
  <style>
    span {
      position: absolute;
      left: 0;
      top: 200px;
      display: block;
      width: 150px;
      height: 150px;
      background-color: #bfa;
    }
  </style>
</head>

<body>
  <button class="btn500">点击到 500</button>
  <button class="btn800">点击到 800</button>
  <span></span>

  <script>
    // 目标对象 和 目标位置
    function animate(obj, target) {
      clearInterval(obj.timer)
      // 给不同元素指定不同的定时器
      obj.timer = setInterval(() => {
        // 步长值
        // 把步长值改成正数,不要出现小数的问题
        // const step = Math.ceil((target - obj.offsetLeft) / 10)
        let step = (target - obj.offsetLeft) / 10
        step = step > 0 ? Math.ceil(step) : Math.floor(step)
        if (obj.offsetLeft === target) {
          clearInterval(obj.timer)
        } else {
          // 把每次加 1 这个步长值改成一个慢慢变小的值
          // 步长公式:(目标值 - 现在的位置) / 10
          obj.style.left = obj.offsetLeft + step + 'px'
        }
      }, 15);
    }
    const span = document.querySelector('span')
    const btn500 = document.querySelector('.btn500')
    const btn800 = document.querySelector('.btn800')
    btn500.addEventListener('click', function () {
      animate(span, 500)
    })
    btn800.addEventListener('click', function () {
      animate(span, 800)
    })
  </script>
</body>

</html>
2
3
4
5
6
7
8
9
10
11
12
13
14
15
16
17
18
19
20
21
22
23
24
25
26
27
28
29
30
31
32
33
34
35
36
37
38
39
40
41
42
43
44
45
46
47
48
49
50
51
52
53
54
55
56
57
58
59
8.2 缓动动画添加回调函数
es5 方式:
<!DOCTYPE html>
<html lang="en">

<head>
  <meta charset="UTF-8">
  <meta http-equiv="X-UA-Compatible" content="IE=edge">
  <meta name="viewport" content="width=device-width, initial-scale=1.0">
  <title>Document</title>
  <style>
    span {
      position: absolute;
      left: 0;
      top: 200px;
      display: block;
      width: 150px;
      height: 150px;
      background-color: #bfa;
    }
  </style>
</head>

<body>
  <button class="btn500">点击到 500</button>
  <button class="btn800">点击到 800</button>
  <span></span>

  <script>
    // 目标对象 和 目标位置
    function animate(obj, target, callback) { // 调用的时候 callback()
      clearInterval(obj.timer)
      // 给不同元素指定不同的定时器
      obj.timer = setInterval(() => {
        // 步长值
        // 把步长值改成正数,不要出现小数的问题
        // const step = Math.ceil((target - obj.offsetLeft) / 10)
        let step = (target - obj.offsetLeft) / 10
        step = step > 0 ? Math.ceil(step) : Math.floor(step)
        if (obj.offsetLeft === target) {
          clearInterval(obj.timer)
          // 回调函数写在定时器结束里面
          if (callback) {
            callback()
          }
        } else {
          // 把每次加 1 这个步长值改成一个慢慢变小的值
          // 步长公式:(目标值 - 现在的位置) / 10
          obj.style.left = obj.offsetLeft + step + 'px'
        }
      }, 15);
    }
    const span = document.querySelector('span')
    const btn500 = document.querySelector('.btn500')
    const btn800 = document.querySelector('.btn800')
    btn500.addEventListener('click', function () {
      animate(span, 500, function () {
        // alert(this) // window
      })
    })
    btn800.addEventListener('click', function () {
      animate(span, 800, () => {
        // alert(this) // btn800
        span.style.backgroundColor = 'red'
      })
    })
  </script>
</body>

</html>
2
3
4
5
6
7
8
9
10
11
12
13
14
15
16
17
18
19
20
21
22
23
24
25
26
27
28
29
30
31
32
33
34
35
36
37
38
39
40
41
42
43
44
45
46
47
48
49
50
51
52
53
54
55
56
57
58
59
60
61
62
63
64
65
66
67
68
Promise 形式:
<!DOCTYPE html>
<html lang="en">

<head>
  <meta charset="UTF-8">
  <meta http-equiv="X-UA-Compatible" content="IE=edge">
  <meta name="viewport" content="width=device-width, initial-scale=1.0">
  <title>Document</title>
  <style>
    span {
      position: absolute;
      left: 0;
      top: 200px;
      display: block;
      width: 150px;
      height: 150px;
      background-color: #bfa;
    }
  </style>
</head>

<body>
  <button class="btn500">点击到 500</button>
  <button class="btn800">点击到 800</button>
  <span></span>

  <script>
    function animateMove(obj, target) {
      return new Promise((resolve, reject) => {
        clearInterval(obj.timer)
        // 给不同元素指定不同的定时器
        obj.timer = setInterval(() => {
          // 步长值
          // 把步长值改成正数,不要出现小数的问题
          // const step = Math.ceil((target - obj.offsetLeft) / 10)
          let step = (target - obj.offsetLeft) / 10
          step = step > 0 ? Math.ceil(step) : Math.floor(step)
          if (obj.offsetLeft === target) {
            clearInterval(obj.timer)
            resolve()
          } else {
            // 把每次加 1 这个步长值改成一个慢慢变小的值
            // 步长公式:(目标值 - 现在的位置) / 10
            obj.style.left = obj.offsetLeft + step + 'px'
          }
        }, 15);
      })
    }
    const span = document.querySelector('span')
    const btn500 = document.querySelector('.btn500')
    const btn800 = document.querySelector('.btn800')
    btn500.addEventListener('click', function () {
      animateMove(span, 500).then(() => {
        alert('finished')
      })
    })
    btn800.addEventListener('click', function () {
      animateMove(span, 800).then(() => {
        alert('good')
      })
    })
  </script>
</body>

</html>
2
3
4
5
6
7
8
9
10
11
12
13
14
15
16
17
18
19
20
21
22
23
24
25
26
27
28
29
30
31
32
33
34
35
36
37
38
39
40
41
42
43
44
45
46
47
48
49
50
51
52
53
54
55
56
57
58
59
60
61
62
63
64
65
async await 形式:
<!DOCTYPE html>
<html lang="en">

<head>
  <meta charset="UTF-8">
  <meta http-equiv="X-UA-Compatible" content="IE=edge">
  <meta name="viewport" content="width=device-width, initial-scale=1.0">
  <title>Document</title>
  <style>
    span {
      position: absolute;
      left: 0;
      top: 200px;
      display: block;
      width: 150px;
      height: 150px;
      background-color: #bfa;
    }
  </style>
</head>

<body>
  <button class="btn500">点击到 500</button>
  <button class="btn800">点击到 800</button>
  <span></span>

  <script>
    function animateMove(obj, target) {
      return new Promise((resolve, reject) => {
        clearInterval(obj.timer)
        // 给不同元素指定不同的定时器
        obj.timer = setInterval(() => {
          // 步长值
          // 把步长值改成正数,不要出现小数的问题
          // const step = Math.ceil((target - obj.offsetLeft) / 10)
          let step = (target - obj.offsetLeft) / 10
          step = step > 0 ? Math.ceil(step) : Math.floor(step)
          if (obj.offsetLeft === target) {
            clearInterval(obj.timer)
            resolve()
          } else {
            // 把每次加 1 这个步长值改成一个慢慢变小的值
            // 步长公式:(目标值 - 现在的位置) / 10
            obj.style.left = obj.offsetLeft + step + 'px'
          }
        }, 15);
      })
    }
    const span = document.querySelector('span')
    const btn500 = document.querySelector('.btn500')
    const btn800 = document.querySelector('.btn800')
    btn500.addEventListener('click', async function () {
      await animateMove(span, 500)
      alert('nihao')
    })
    btn800.addEventListener('click', async function () {
      await animateMove(span, 800)
      alert('ok')
    })
  </script>
</body>

</html>
2
3
4
5
6
7
8
9
10
11
12
13
14
15
16
17
18
19
20
21
22
23
24
25
26
27
28
29
30
31
32
33
34
35
36
37
38
39
40
41
42
43
44
45
46
47
48
49
50
51
52
53
54
55
56
57
58
59
60
61
62
63
8.3 侧边箭头(重要)
animate.js:
function animate (obj, target, callback) { // 调用的时候 callback()
  clearInterval(obj.timer)
  // 给不同元素指定不同的定时器
  obj.timer = setInterval(() => {
    // 步长值
    // 把步长值改成正数,不要出现小数的问题
    // const step = Math.ceil((target - obj.offsetLeft) / 10)
    let step = (target - obj.offsetLeft) / 10
    step = step > 0 ? Math.ceil(step) : Math.floor(step)
    if (obj.offsetLeft === target) {
      clearInterval(obj.timer)
      // 回调函数写在定时器结束里面
      if (callback) {
        callback()
      }
    } else {
      // 把每次加 1 这个步长值改成一个慢慢变小的值
      // 步长公式:(目标值 - 现在的位置) / 10
      obj.style.left = obj.offsetLeft + step + 'px'
    }
  }, 15)
}
2
3
4
5
6
7
8
9
10
11
12
13
14
15
16
17
18
19
20
21
22
index.html:
<!DOCTYPE html>
<html lang="en">

<head>
  <meta charset="UTF-8">
  <meta http-equiv="X-UA-Compatible" content="IE=edge">
  <meta name="viewport" content="width=device-width, initial-scale=1.0">
  <title>Document</title>
  <style>
    .sliderbar {
      position: fixed;
      right: 0;
      bottom: 100px;
      width: 40px;
      height: 40px;
      text-align: center;
      line-height: 40px;
      cursor: pointer;
      color: #fff;
    }

    .con {
      position: absolute;
      left: 0;
      top: 0;
      width: 200px;
      height: 40px;
      background-color: purple;
      z-index: -1;
    }
  </style>
  <script src="./animate.js"></script>
</head>

<body>
  <div class="sliderbar">
    <span>←</span>
    <div class="con">问题反馈</div>
  </div>

  <script>
    // 1.获取元素
    const sliderbar = document.querySelector('.sliderbar')
    const con = document.querySelector('.con')
    // 鼠标经过 sliderbar 就会让 con 这个盒子滑动到左侧
    // 鼠标经过 sliderbar 就会让 con 这个盒子滑动到右侧
    sliderbar.addEventListener('mouseenter', function () {
      // animate(obj, target, callback)
      animate(con, -160, function () {
        // 当动画执行完毕,就把左箭头 ← 改成右箭头 →
        sliderbar.children[0].innerHTML = '→'
      })
    })
    sliderbar.addEventListener('mouseleave', function () {
      // animate(obj, target, callback)
      animate(con, 0, function () {
        sliderbar.children[0].innerHTML = '←'
      })
    })
  </script>
</body>

</html>
2
3
4
5
6
7
8
9
10
11
12
13
14
15
16
17
18
19
20
21
22
23
24
25
26
27
28
29
30
31
32
33
34
35
36
37
38
39
40
41
42
43
44
45
46
47
48
49
50
51
52
53
54
55
56
57
58
59
60
61
62
63
8.4 网页轮播图 - 结构搭建
功能需求:
- 鼠标经过轮播图模块,左右按钮显示,离开隐藏左右按钮
- 点击右侧按钮一次,图片向左播放一张,以此类推,左侧按钮同理
- 图片播放的同时,下面小圆圈块跟随一起变化
- 点击小圆圈,可以播放响应图片
- 鼠标不经故宫轮播图,轮播图也会自动播放图片
- 鼠标经过轮播图模块,自动播放停止
初始 html + css:
<!DOCTYPE html>
<html lang="en">
<head>
<meta charset="UTF-8">
<meta http-equiv="X-UA-Compatible" content="IE=edge">
<meta name="viewport" content="width=device-width, initial-scale=1.0">
<title>Document</title>
<style>
* {
margin: 0;
padding: 0;
}
a {
text-decoration: none;
}
.focus {
position: relative;
width: 721px;
height: 455px;
background-color: purple;
overflow: hidden;
}
.focus ul {
position: absolute;
top: 0;
left: 0;
width: 600%;
}
.focus ul li {
float: left;
}
.arrow-l,
.arrow-r {
display: none;
position: absolute;
top: 50%;
margin-top: -20px;
width: 24px;
height: 40px;
background: rgba(0, 0, 0, .3);
text-align: center;
line-height: 40px;
color: #fff;
font-family: 'icomoon';
font-size: 18px;
z-index: 2;
}
.arrow-r {
right: 0;
}
.circle {
position: absolute;
bottom: 10px;
left: 50px;
}
.circle li {
float: left;
width: 8px;
height: 8px;
/*background-color: #fff;*/
border: 2px solid rgba(255, 255, 255, 0.5);
margin: 0 3px;
border-radius: 50%;
/*鼠标经过显示小手*/
cursor: pointer;
}
.current {
background-color: #fff;
}
</style>
<script src="animate.js"></script>
<script src="js/index.js"></script>
</head>
<body>
<div class="focus fl">
<!-- 左侧按钮 -->
<a href="javascript:;" class="arrow-l">
<
</a>
<!-- 右侧按钮 -->
<a href="javascript:;" class="arrow-r">
>
</a>
<!-- 核心的滚动区域 -->
<ul>
<li>
<a href="#"><img src="upload/focus.jpg" alt="1"></a>
</li>
<li>
<a href="#"><img src="upload/focus1.jpg" alt="2"></a>
</li>
<li>
<a href="#"><img src="upload/focus2.jpg" alt="3"></a>
</li>
<li>
<a href="#"><img src="upload/focus3.jpg" alt="4"></a>
</li>
</ul>
<!-- 小圆圈 -->
<ol class="circle">
</ol>
</div>
</body>
</html>
2
3
4
5
6
7
8
9
10
11
12
13
14
15
16
17
18
19
20
21
22
23
24
25
26
27
28
29
30
31
32
33
34
35
36
37
38
39
40
41
42
43
44
45
46
47
48
49
50
51
52
53
54
55
56
57
58
59
60
61
62
63
64
65
66
67
68
69
70
71
72
73
74
75
76
77
78
79
80
81
82
83
84
85
86
87
88
89
90
91
92
93
94
95
96
97
98
99
100
101
102
103
104
105
106
107
108
109
110
111
112
113
114
115
116
117
8.5 网页轮播图 - 动态生成小圈圈
需求:
动态生成小圆圈,有几张图片就生成几个小圆圈
案例分析:
- 首先得到 ul 里面图片的张数(图片放入 li 里面,所以就是 li 的个数)
- 利用循环动态生成小圆圈(这个小圆圈要放入 ol 里面)
- 创建节点 createElement('li')
- 插入节点 ol.appendChild(li)
index.js(部分代码):
// 3.动态生成小圆圈,有几张图片生成几个小圆圈
const ul = focus.querySelector('ul')
const ol = focus.querySelector('.circle')
for (let i = 0; i < ul.children.length; i++) {
    // 创建 li
    const li = this.document.createElement('li')
    // 把 li 插入到 ol 里面
    ol.appendChild(li)
}
// 把 ol 里面第一个 li 设置类名为 current
ol.children[0].className = 'current'
2
3
4
5
6
7
8
9
10
11
8.6 网页轮播图 - 小圆圈排他思想
思路:
点击当前小圆圈,就添加 current 类,其余小圆圈就移除 current 类
index.js:
window.addEventListener('load', function () {
  // 1.获取元素
  const arrowL = this.document.querySelector('.arrow-l')
  const arrowR = this.document.querySelector('.arrow-r')
  const focus = this.document.querySelector('.focus')
  // 2.鼠标经过 focus 就显示隐藏左右按钮
  focus.addEventListener('mouseover', function () {
    arrowL.style.display = 'block'
    arrowR.style.display = 'block'
  })
  focus.addEventListener('mouseout', function () {
    arrowL.style.display = 'none'
    arrowR.style.display = 'none'
  })
  // 3.动态生成小圆圈,有几张图片生成几个小圆圈
  const ul = focus.querySelector('ul')
  const ol = focus.querySelector('.circle')
  for (let i = 0; i < ul.children.length; i++) {
    // 创建 li
    const li = this.document.createElement('li')
    // 把 li 插入到 ol 里面
    ol.appendChild(li)
    // 4.小圆圈的排他思想 可以直接在生成小圆圈的同时直接绑定点击事件
    li.addEventListener('click', function () {
      // 清除所有 li 的 current 类名
      for (let i = 0; i < ol.children.length; i++) {
        ol.children[i].className = ''
      }
      // 当前的 li 设置 current 类名
      this.className = 'current'
    })
  }
  // 把 ol 里面第一个 li 设置类名为 current
  ol.children[0].className = 'current'
})
2
3
4
5
6
7
8
9
10
11
12
13
14
15
16
17
18
19
20
21
22
23
24
25
26
27
28
29
30
31
32
33
34
35
36
8.7 网页轮播图 - 点击小圆圈滚动图片
案例分析:
- 引入 animate.js 动画函数
- 为 ul 加入定位,这样才能使用动画函数
- 移动 ul,而不是移动 li
- 核心算法:点击某个小圆圈,就让图片滚动,小圆圈的索引号乘以图片的宽度作为 ul 的移动距离
- 需要知道小圆圈的索引号,则可以在生成小圆圈的时候,给它设置一个自定义属性,点击的时候获取这个自定义属性即可
index.js:
window.addEventListener('load', function () {
  // 1.获取元素
  const arrowL = this.document.querySelector('.arrow-l')
  const arrowR = this.document.querySelector('.arrow-r')
  const focus = this.document.querySelector('.focus')
  // 2.鼠标经过 focus 就显示隐藏左右按钮
  focus.addEventListener('mouseover', function () {
    arrowL.style.display = 'block'
    arrowR.style.display = 'block'
  })
  focus.addEventListener('mouseout', function () {
    arrowL.style.display = 'none'
    arrowR.style.display = 'none'
  })
  // 3.动态生成小圆圈,有几张图片生成几个小圆圈
  const ul = focus.querySelector('ul')
  const ol = focus.querySelector('.circle')
  for (let i = 0; i < ul.children.length; i++) {
    // 创建 li
    const li = this.document.createElement('li')
    // 记录当前小圆圈的索引号,通过自定义属性来做
    li.setAttribute('index', i)
    // 把 li 插入到 ol 里面
    ol.appendChild(li)
    // 4.小圆圈的排他思想 可以直接在生成小圆圈的同时直接绑定点击事件
    li.addEventListener('click', function () {
      // 清除所有 li 的 current 类名
      for (let i = 0; i < ol.children.length; i++) {
        ol.children[i].className = ''
      }
      // 当前的 li 设置 current 类名
      this.className = 'current'
      // 5.点击小圆圈,移动图片,移动 ul
      // ul 的移动距离 = 小圆圈的索引号 * 图片的宽度 * (-1)
      // 当点击了某个 li 就拿到当前 li 的索引号
      const index = this.getAttribute('index')
      const focusWidth = focus.offsetWidth
      console.log(focusWidth)
      console.log(index)
      // eslint-disable-next-line no-undef
      animate(ul, -index * focusWidth)
    })
  }
  // 把 ol 里面第一个 li 设置类名为 current
  ol.children[0].className = 'current'
})
2
3
4
5
6
7
8
9
10
11
12
13
14
15
16
17
18
19
20
21
22
23
24
25
26
27
28
29
30
31
32
33
34
35
36
37
38
39
40
41
42
43
44
45
46
8.8 网页轮播图 - 右侧按钮无缝滚动
要求:
- 点击按钮一次,就让图片滚动一张
- 利用无缝滚动原理,实现无缝滚动
思路:
- 声明一个变量 num,点击一次,自增 1,让此变量乘以图片宽度,就是 ul 的滚动距离
- 把 ul 的第一个 li 复制一份,放到 ul 的最后面
- 当图片滚动到克隆的最后一张图片时,让 ul 快速地、不做动画地跳到最左侧:left 为 0
- 同时 num 赋值为 0,可以重新开始滚动图片了
index.js:
window.addEventListener('load', function () {
  // 1.获取元素
  const arrowL = this.document.querySelector('.arrow-l')
  const arrowR = this.document.querySelector('.arrow-r')
  const focus = this.document.querySelector('.focus')
  const focusWidth = focus.offsetWidth
  // 2.鼠标经过 focus 就显示隐藏左右按钮
  focus.addEventListener('mouseover', function () {
    arrowL.style.display = 'block'
    arrowR.style.display = 'block'
  })
  focus.addEventListener('mouseout', function () {
    arrowL.style.display = 'none'
    arrowR.style.display = 'none'
  })
  // 3.动态生成小圆圈,有几张图片生成几个小圆圈
  const ul = focus.querySelector('ul')
  const ol = focus.querySelector('.circle')
  for (let i = 0; i < ul.children.length; i++) {
    // 创建 li
    const li = this.document.createElement('li')
    // 记录当前小圆圈的索引号,通过自定义属性来做
    li.setAttribute('index', i)
    // 把 li 插入到 ol 里面
    ol.appendChild(li)
    // 4.小圆圈的排他思想 可以直接在生成小圆圈的同时直接绑定点击事件
    li.addEventListener('click', function () {
      // 清除所有 li 的 current 类名
      for (let i = 0; i < ol.children.length; i++) {
        ol.children[i].className = ''
      }
      // 当前的 li 设置 current 类名
      this.className = 'current'
      // 5.点击小圆圈,移动图片,移动 ul
      // ul 的移动距离 = 小圆圈的索引号 * 图片的宽度 * (-1)
      // 当点击了某个 li 就拿到当前 li 的索引号
      const index = this.getAttribute('index')
      console.log(focusWidth)
      console.log(index)
      // eslint-disable-next-line no-undef
      animate(ul, -index * focusWidth)
    })
  }
  // 把 ol 里面第一个 li 设置类名为 current
  ol.children[0].className = 'current'
  // 6.点击右侧按钮,图片滚动一张
  let num = 0
  arrowR.addEventListener('click', function () {
    // 如果走到了最后复制的一张图片,此时 ul 要快速复原 left 为 0
    if (num === ul.children.length - 1) {
      ul.style.left = 0
      num = 0
    }
    num++
    // eslint-disable-next-line no-undef
    animate(ul, -num * focusWidth)
  })
})
2
3
4
5
6
7
8
9
10
11
12
13
14
15
16
17
18
19
20
21
22
23
24
25
26
27
28
29
30
31
32
33
34
35
36
37
38
39
40
41
42
43
44
45
46
47
48
49
50
51
52
53
54
55
56
57
58
8.9 网络轮播图 - 克隆第一张图片
思路:
- 克隆 ul 第一个 li(cloneNode())加 true 深克隆,复制里面的子节点,false 浅克隆
- 添加到 ul 最后面 appendChild
- 克隆写在了生成小圆圈的下面,所以不会多一个小圆圈
index.js:
window.addEventListener('load', function () {
  // 1.获取元素
  const arrowL = this.document.querySelector('.arrow-l')
  const arrowR = this.document.querySelector('.arrow-r')
  const focus = this.document.querySelector('.focus')
  const focusWidth = focus.offsetWidth
  // 2.鼠标经过 focus 就显示隐藏左右按钮
  focus.addEventListener('mouseover', function () {
    arrowL.style.display = 'block'
    arrowR.style.display = 'block'
  })
  focus.addEventListener('mouseout', function () {
    arrowL.style.display = 'none'
    arrowR.style.display = 'none'
  })
  // 3.动态生成小圆圈,有几张图片生成几个小圆圈
  const ul = focus.querySelector('ul')
  const ol = focus.querySelector('.circle')
  for (let i = 0; i < ul.children.length; i++) {
    // 创建 li
    const li = this.document.createElement('li')
    // 记录当前小圆圈的索引号,通过自定义属性来做
    li.setAttribute('index', i)
    // 把 li 插入到 ol 里面
    ol.appendChild(li)
    // 4.小圆圈的排他思想 可以直接在生成小圆圈的同时直接绑定点击事件
    li.addEventListener('click', function () {
      // 清除所有 li 的 current 类名
      for (let i = 0; i < ol.children.length; i++) {
        ol.children[i].className = ''
      }
      // 当前的 li 设置 current 类名
      this.className = 'current'
      // 5.点击小圆圈,移动图片,移动 ul
      // ul 的移动距离 = 小圆圈的索引号 * 图片的宽度 * (-1)
      // 当点击了某个 li 就拿到当前 li 的索引号
      const index = this.getAttribute('index')
      console.log(focusWidth)
      console.log(index)
      // eslint-disable-next-line no-undef
      animate(ul, -index * focusWidth)
    })
  }
  // 把 ol 里面第一个 li 设置类名为 current
  ol.children[0].className = 'current'
  // 6.克隆第一张图片 li,放在 ul 最后面
  const first = ul.children[0].cloneNode(true)
  ul.appendChild(first)
  // 7.点击右侧按钮,图片滚动一张
  let num = 0
  arrowR.addEventListener('click', function () {
    // 如果走到了最后复制的一张图片,此时 ul 要快速复原 left 为 0
    if (num === ul.children.length - 1) {
      ul.style.left = 0
      num = 0
    }
    num++
    // eslint-disable-next-line no-undef
    animate(ul, -num * focusWidth)
  })
})
2
3
4
5
6
7
8
9
10
11
12
13
14
15
16
17
18
19
20
21
22
23
24
25
26
27
28
29
30
31
32
33
34
35
36
37
38
39
40
41
42
43
44
45
46
47
48
49
50
51
52
53
54
55
56
57
58
59
60
61
8.10 网页轮播图 - 小圆圈跟随右侧按钮一起变化
思路:
- 声明一个变量 circle,每次点击自增 1
- 图片有 5 张,但是小圆圈只有 4 个,必须加一个判断条件:如果 circle === 4 就重新复原为 0
index.js:
window.addEventListener('load', function () {
  // 1.获取元素
  const arrowL = this.document.querySelector('.arrow-l')
  const arrowR = this.document.querySelector('.arrow-r')
  const focus = this.document.querySelector('.focus')
  const focusWidth = focus.offsetWidth
  // 2.鼠标经过 focus 就显示隐藏左右按钮
  focus.addEventListener('mouseover', function () {
    arrowL.style.display = 'block'
    arrowR.style.display = 'block'
  })
  focus.addEventListener('mouseout', function () {
    arrowL.style.display = 'none'
    arrowR.style.display = 'none'
  })
  // 3.动态生成小圆圈,有几张图片生成几个小圆圈
  const ul = focus.querySelector('ul')
  const ol = focus.querySelector('.circle')
  for (let i = 0; i < ul.children.length; i++) {
    // 创建 li
    const li = this.document.createElement('li')
    // 记录当前小圆圈的索引号,通过自定义属性来做
    li.setAttribute('index', i)
    // 把 li 插入到 ol 里面
    ol.appendChild(li)
    // 4.小圆圈的排他思想 可以直接在生成小圆圈的同时直接绑定点击事件
    li.addEventListener('click', function () {
      // 清除所有 li 的 current 类名
      for (let i = 0; i < ol.children.length; i++) {
        ol.children[i].className = ''
      }
      // 当前的 li 设置 current 类名
      this.className = 'current'
      // 5.点击小圆圈,移动图片,移动 ul
      // ul 的移动距离 = 小圆圈的索引号 * 图片的宽度 * (-1)
      // 当点击了某个 li 就拿到当前 li 的索引号
      const index = this.getAttribute('index')
      console.log(focusWidth)
      console.log(index)
      // eslint-disable-next-line no-undef
      animate(ul, -index * focusWidth)
    })
  }
  // 把 ol 里面第一个 li 设置类名为 current
  ol.children[0].className = 'current'
  // 6.克隆第一张图片 li,放在 ul 最后面
  const first = ul.children[0].cloneNode(true)
  ul.appendChild(first)
  // 7.点击右侧按钮,图片滚动一张
  let num = 0
  // circle:控制小圆圈的变化
  let circle = 0
  arrowR.addEventListener('click', function () {
    // 如果走到了最后复制的一张图片,此时 ul 要快速复原 left 为 0
    if (num === ul.children.length - 1) {
      ul.style.left = 0
      num = 0
    }
    num++
    // eslint-disable-next-line no-undef
    animate(ul, -num * focusWidth)
    circle++
    // 如果 circle === 4 说明走到最后克隆的图片了
    if (circle === ol.children.length) {
      circle = 0
    }
    // 先清除其余小圆圈的 current 类名
    for (let i = 0; i < ol.children.length; i++) {
      ol.children[i].className = ''
    }
    // 保留当前小圆圈的 current 类名
    ol.children[circle].className = 'current'
  })
})
2
3
4
5
6
7
8
9
10
11
12
13
14
15
16
17
18
19
20
21
22
23
24
25
26
27
28
29
30
31
32
33
34
35
36
37
38
39
40
41
42
43
44
45
46
47
48
49
50
51
52
53
54
55
56
57
58
59
60
61
62
63
64
65
66
67
68
69
70
71
72
73
74
8.11 网页轮播图 - 两个 bug 解决方案
bug1:点击第三个小圆圈,再点右侧箭头会返回到上一张图片
bug2:点击第四个小圆圈(最后一个),再点右侧箭头会直接使小圆圈指向第二个小圆圈
解决代码:
window.addEventListener('load', function () {
  // 1.获取元素
  const arrowL = this.document.querySelector('.arrow-l')
  const arrowR = this.document.querySelector('.arrow-r')
  const focus = this.document.querySelector('.focus')
  const focusWidth = focus.offsetWidth
  // 2.鼠标经过 focus 就显示隐藏左右按钮
  focus.addEventListener('mouseover', function () {
    arrowL.style.display = 'block'
    arrowR.style.display = 'block'
  })
  focus.addEventListener('mouseout', function () {
    arrowL.style.display = 'none'
    arrowR.style.display = 'none'
  })
  // 3.动态生成小圆圈,有几张图片生成几个小圆圈
  const ul = focus.querySelector('ul')
  const ol = focus.querySelector('.circle')
  for (let i = 0; i < ul.children.length; i++) {
    // 创建 li
    const li = this.document.createElement('li')
    // 记录当前小圆圈的索引号,通过自定义属性来做
    li.setAttribute('index', i)
    // 把 li 插入到 ol 里面
    ol.appendChild(li)
    // 4.小圆圈的排他思想 可以直接在生成小圆圈的同时直接绑定点击事件
    li.addEventListener('click', function () {
      // 清除所有 li 的 current 类名
      for (let i = 0; i < ol.children.length; i++) {
        ol.children[i].className = ''
      }
      // 当前的 li 设置 current 类名
      this.className = 'current'
      // 5.点击小圆圈,移动图片,移动 ul
      // ul 的移动距离 = 小圆圈的索引号 * 图片的宽度 * (-1)
      // 当点击了某个 li 就拿到当前 li 的索引号
      const index = this.getAttribute('index')
      // 当点击了某个 li,就要把 li 的索引号给 num
      num = index
      // 当点击了某个 li,就要把 li 的索引号给 num
      circle = index
      console.log(focusWidth)
      console.log(index)
      // eslint-disable-next-line no-undef
      animate(ul, -index * focusWidth)
    })
  }
  // 把 ol 里面第一个 li 设置类名为 current
  ol.children[0].className = 'current'
  // 6.克隆第一张图片 li,放在 ul 最后面
  const first = ul.children[0].cloneNode(true)
  ul.appendChild(first)
  // 7.点击右侧按钮,图片滚动一张
  let num = 0
  // circle:控制小圆圈的变化
  let circle = 0
  arrowR.addEventListener('click', function () {
    // 如果走到了最后复制的一张图片,此时 ul 要快速复原 left 为 0
    if (num === ul.children.length - 1) {
      ul.style.left = 0
      num = 0
    }
    num++
    // eslint-disable-next-line no-undef
    animate(ul, -num * focusWidth)
    circle++
    // 如果 circle === 4 说明走到最后克隆的图片了
    if (circle === ol.children.length) {
      circle = 0
    }
    // 先清除其余小圆圈的 current 类名
    for (let i = 0; i < ol.children.length; i++) {
      ol.children[i].className = ''
    }
    // 保留当前小圆圈的 current 类名
    ol.children[circle].className = 'current'
  })
})
2
3
4
5
6
7
8
9
10
11
12
13
14
15
16
17
18
19
20
21
22
23
24
25
26
27
28
29
30
31
32
33
34
35
36
37
38
39
40
41
42
43
44
45
46
47
48
49
50
51
52
53
54
55
56
57
58
59
60
61
62
63
64
65
66
67
68
69
70
71
72
73
74
75
76
77
78
8.12 网页轮播图 - 左侧按钮功能
window.addEventListener('load', function () {
  // 1.获取元素
  const arrowL = this.document.querySelector('.arrow-l')
  const arrowR = this.document.querySelector('.arrow-r')
  const focus = this.document.querySelector('.focus')
  const focusWidth = focus.offsetWidth
  // 2.鼠标经过 focus 就显示隐藏左右按钮
  focus.addEventListener('mouseover', function () {
    arrowL.style.display = 'block'
    arrowR.style.display = 'block'
  })
  focus.addEventListener('mouseout', function () {
    arrowL.style.display = 'none'
    arrowR.style.display = 'none'
  })
  // 3.动态生成小圆圈,有几张图片生成几个小圆圈
  const ul = focus.querySelector('ul')
  const ol = focus.querySelector('.circle')
  for (let i = 0; i < ul.children.length; i++) {
    // 创建 li
    const li = this.document.createElement('li')
    // 记录当前小圆圈的索引号,通过自定义属性来做
    li.setAttribute('index', i)
    // 把 li 插入到 ol 里面
    ol.appendChild(li)
    // 4.小圆圈的排他思想 可以直接在生成小圆圈的同时直接绑定点击事件
    li.addEventListener('click', function () {
      // 清除所有 li 的 current 类名
      for (let i = 0; i < ol.children.length; i++) {
        ol.children[i].className = ''
      }
      // 当前的 li 设置 current 类名
      this.className = 'current'
      // 5.点击小圆圈,移动图片,移动 ul
      // ul 的移动距离 = 小圆圈的索引号 * 图片的宽度 * (-1)
      // 当点击了某个 li 就拿到当前 li 的索引号
      const index = this.getAttribute('index')
      // 当点击了某个 li,就要把 li 的索引号给 num
      num = index
      // 当点击了某个 li,就要把 li 的索引号给 num
      circle = index
      console.log(focusWidth)
      console.log(index)
      // eslint-disable-next-line no-undef
      animate(ul, -index * focusWidth)
    })
  }
  // 把 ol 里面第一个 li 设置类名为 current
  ol.children[0].className = 'current'
  // 6.克隆第一张图片 li,放在 ul 最后面
  const first = ul.children[0].cloneNode(true)
  ul.appendChild(first)
  // 7.点击右侧按钮,图片滚动一张
  let num = 0
  // circle:控制小圆圈的变化
  let circle = 0
  arrowR.addEventListener('click', function () {
    // 如果走到了最后复制的一张图片,此时 ul 要快速复原 left 为 0
    if (num === ul.children.length - 1) {
      ul.style.left = 0
      num = 0
    }
    num++
    // eslint-disable-next-line no-undef
    animate(ul, -num * focusWidth)
    // 8.点击右侧按钮,小圆圈跟随一起变化,可以再声明一个变量控制小圆圈的播放
    circle++
    // 如果 circle === 4 说明走到最后克隆的图片了
    // if (circle === ol.children.length) {
    //   circle = 0
    // }
    circle = circle === ol.children.length ? circle = 0 : circle
    circleChange()
  })

  // 9.左侧按钮做法
  arrowL.addEventListener('click', function () {
    // 如果走到了第一章图片,此时 ul 要快速复原 left 为 -(ul.children.length) * focusWidth
    if (num === 0) {
      num = ul.children.length - 1
      ul.style.left = -num * focusWidth + 'px'
    }
    num--
    // eslint-disable-next-line no-undef
    animate(ul, -num * focusWidth)
    circle--
    // 如果 circle < 0 说明第一张图片,则小圆圈要改成第四个小圆圈
    // if (circle < 0) {
    //   circle = ol.children.length - 1
    // }
    circle = circle < 0 ? ol.children.length - 1 : circle
    circleChange()
  })

  function circleChange () {
    // 先清除其余小圆圈的 current 类名
    for (let i = 0; i < ol.children.length; i++) {
      ol.children[i].className = ''
    }
    // 保留当前小圆圈的 current 类名
    ol.children[circle].className = 'current'
  }
})
2
3
4
5
6
7
8
9
10
11
12
13
14
15
16
17
18
19
20
21
22
23
24
25
26
27
28
29
30
31
32
33
34
35
36
37
38
39
40
41
42
43
44
45
46
47
48
49
50
51
52
53
54
55
56
57
58
59
60
61
62
63
64
65
66
67
68
69
70
71
72
73
74
75
76
77
78
79
80
81
82
83
84
85
86
87
88
89
90
91
92
93
94
95
96
97
98
99
100
101
102
103
8.13 网页轮播图 - 自动播放功能
思路:
- 添加一个定时器
- 自动播放轮播图,实际类似于点击了右侧按钮
- 此时使用 手动调用 右侧按钮点击事件 arrowL.click()
- 鼠标经过 focus 停止定时器
- 鼠标离开 focus 开启定时器
index.js:
window.addEventListener('load', function () {
  // 1.获取元素
  const arrowL = this.document.querySelector('.arrow-l')
  const arrowR = this.document.querySelector('.arrow-r')
  const focus = this.document.querySelector('.focus')
  const focusWidth = focus.offsetWidth
  // 2.鼠标经过 focus 就显示隐藏左右按钮
  focus.addEventListener('mouseover', function () {
    arrowL.style.display = 'block'
    arrowR.style.display = 'block'
    clearInterval(timer)
    timer = null // 清除定时器变量
  })
  focus.addEventListener('mouseout', function () {
    arrowL.style.display = 'none'
    arrowR.style.display = 'none'
    timer = setInterval(() => {
      arrowR.click()
    }, 2000)
  })
  // 3.动态生成小圆圈,有几张图片生成几个小圆圈
  const ul = focus.querySelector('ul')
  const ol = focus.querySelector('.circle')
  for (let i = 0; i < ul.children.length; i++) {
    // 创建 li
    const li = this.document.createElement('li')
    // 记录当前小圆圈的索引号,通过自定义属性来做
    li.setAttribute('index', i)
    // 把 li 插入到 ol 里面
    ol.appendChild(li)
    // 4.小圆圈的排他思想 可以直接在生成小圆圈的同时直接绑定点击事件
    li.addEventListener('click', function () {
      // 清除所有 li 的 current 类名
      for (let i = 0; i < ol.children.length; i++) {
        ol.children[i].className = ''
      }
      // 当前的 li 设置 current 类名
      this.className = 'current'
      // 5.点击小圆圈,移动图片,移动 ul
      // ul 的移动距离 = 小圆圈的索引号 * 图片的宽度 * (-1)
      // 当点击了某个 li 就拿到当前 li 的索引号
      const index = this.getAttribute('index')
      // 当点击了某个 li,就要把 li 的索引号给 num
      num = index
      // 当点击了某个 li,就要把 li 的索引号给 num
      circle = index
      console.log(focusWidth)
      console.log(index)
      // eslint-disable-next-line no-undef
      animate(ul, -index * focusWidth)
    })
  }
  // 把 ol 里面第一个 li 设置类名为 current
  ol.children[0].className = 'current'
  // 6.克隆第一张图片 li,放在 ul 最后面
  const first = ul.children[0].cloneNode(true)
  ul.appendChild(first)
  // 7.点击右侧按钮,图片滚动一张
  let num = 0
  // circle:控制小圆圈的变化
  let circle = 0
  arrowR.addEventListener('click', function () {
    // 如果走到了最后复制的一张图片,此时 ul 要快速复原 left 为 0
    if (num === ul.children.length - 1) {
      ul.style.left = 0
      num = 0
    }
    num++
    // eslint-disable-next-line no-undef
    animate(ul, -num * focusWidth)
    // 8.点击右侧按钮,小圆圈跟随一起变化,可以再声明一个变量控制小圆圈的播放
    circle++
    // 如果 circle === 4 说明走到最后克隆的图片了
    // if (circle === ol.children.length) {
    //   circle = 0
    // }
    circle = circle === ol.children.length ? circle = 0 : circle
    circleChange()
  })

  // 9.左侧按钮做法
  arrowL.addEventListener('click', function () {
    // 如果走到了第一章图片,此时 ul 要快速复原 left 为 -(ul.children.length) * focusWidth
    if (num === 0) {
      num = ul.children.length - 1
      ul.style.left = -num * focusWidth + 'px'
    }
    num--
    // eslint-disable-next-line no-undef
    animate(ul, -num * focusWidth)
    circle--
    // 如果 circle < 0 说明第一张图片,则小圆圈要改成第四个小圆圈
    // if (circle < 0) {
    //   circle = ol.children.length - 1
    // }
    circle = circle < 0 ? ol.children.length - 1 : circle
    circleChange()
  })

  function circleChange () {
    // 先清除其余小圆圈的 current 类名
    for (let i = 0; i < ol.children.length; i++) {
      ol.children[i].className = ''
    }
    // 保留当前小圆圈的 current 类名
    ol.children[circle].className = 'current'
  }

  // 10.自动播放轮播图
  let timer = setInterval(() => {
    // 手动调用点击事件
    arrowR.click()
  }, 2000)
})
2
3
4
5
6
7
8
9
10
11
12
13
14
15
16
17
18
19
20
21
22
23
24
25
26
27
28
29
30
31
32
33
34
35
36
37
38
39
40
41
42
43
44
45
46
47
48
49
50
51
52
53
54
55
56
57
58
59
60
61
62
63
64
65
66
67
68
69
70
71
72
73
74
75
76
77
78
79
80
81
82
83
84
85
86
87
88
89
90
91
92
93
94
95
96
97
98
99
100
101
102
103
104
105
106
107
108
109
110
111
112
113
114
8.14 网页轮播图 - 节流阀
作用:
防止轮播图按钮连续点击造成播放过快
目的:
当上一个函数动画内容执行完毕,再去执行下一个函数动画,让事件无法连续触发
思路:
- 利用回调函数,添加一个变量控制,锁住函数和解锁函数
- 声明一个变量
let flag = true,if (flag) {flag = false; do something}关闭水龙头;利用回调函数,动画执行完毕,flag = true,打开水龙头
index.js 完整代码:
window.addEventListener('load', function () {
  // 1.获取元素
  const arrowL = this.document.querySelector('.arrow-l')
  const arrowR = this.document.querySelector('.arrow-r')
  const focus = this.document.querySelector('.focus')
  const focusWidth = focus.offsetWidth
  // 2.鼠标经过 focus 就显示隐藏左右按钮
  focus.addEventListener('mouseover', function () {
    arrowL.style.display = 'block'
    arrowR.style.display = 'block'
    clearInterval(timer)
    timer = null // 清除定时器变量
  })
  focus.addEventListener('mouseout', function () {
    arrowL.style.display = 'none'
    arrowR.style.display = 'none'
    timer = setInterval(() => {
      arrowR.click()
    }, 2000)
  })
  // 3.动态生成小圆圈,有几张图片生成几个小圆圈
  const ul = focus.querySelector('ul')
  const ol = focus.querySelector('.circle')
  for (let i = 0; i < ul.children.length; i++) {
    // 创建 li
    const li = this.document.createElement('li')
    // 记录当前小圆圈的索引号,通过自定义属性来做
    li.setAttribute('index', i)
    // 把 li 插入到 ol 里面
    ol.appendChild(li)
    // 4.小圆圈的排他思想 可以直接在生成小圆圈的同时直接绑定点击事件
    li.addEventListener('click', function () {
      // 清除所有 li 的 current 类名
      for (let i = 0; i < ol.children.length; i++) {
        ol.children[i].className = ''
      }
      // 当前的 li 设置 current 类名
      this.className = 'current'
      // 5.点击小圆圈,移动图片,移动 ul
      // ul 的移动距离 = 小圆圈的索引号 * 图片的宽度 * (-1)
      // 当点击了某个 li 就拿到当前 li 的索引号
      const index = this.getAttribute('index')
      // 当点击了某个 li,就要把 li 的索引号给 num
      num = index
      // 当点击了某个 li,就要把 li 的索引号给 num
      circle = index
      console.log(focusWidth)
      console.log(index)
      // eslint-disable-next-line no-undef
      animate(ul, -index * focusWidth)
    })
  }
  // 把 ol 里面第一个 li 设置类名为 current
  ol.children[0].className = 'current'
  // 6.克隆第一张图片 li,放在 ul 最后面
  const first = ul.children[0].cloneNode(true)
  ul.appendChild(first)
  // 7.点击右侧按钮,图片滚动一张
  let num = 0
  // circle:控制小圆圈的变化
  let circle = 0
  // 节流阀
  let flag = true
  arrowR.addEventListener('click', function () {
    if (flag) {
      flag = false
      // 如果走到了最后复制的一张图片,此时 ul 要快速复原 left 为 0
      if (num === ul.children.length - 1) {
        ul.style.left = 0
        num = 0
      }
      num++
      // eslint-disable-next-line no-undef
      animate(ul, -num * focusWidth, function () {
        flag = true
      })
      // 8.点击右侧按钮,小圆圈跟随一起变化,可以再声明一个变量控制小圆圈的播放
      circle++
      // 如果 circle === 4 说明走到最后克隆的图片了
      // if (circle === ol.children.length) {
      //   circle = 0
      // }
      circle = circle === ol.children.length ? circle = 0 : circle
      circleChange()
    }
  })

  // 9.左侧按钮做法
  arrowL.addEventListener('click', function () {
    if (flag) {
      flag = false
      // 如果走到了第一章图片,此时 ul 要快速复原 left 为 -(ul.children.length) * focusWidth
      if (num === 0) {
        num = ul.children.length - 1
        ul.style.left = -num * focusWidth + 'px'
      }
      num--
      // eslint-disable-next-line no-undef
      animate(ul, -num * focusWidth, function () {
        flag = true
      })
      circle--
      // 如果 circle < 0 说明第一张图片,则小圆圈要改成第四个小圆圈
      // if (circle < 0) {
      //   circle = ol.children.length - 1
      // }
      circle = circle < 0 ? ol.children.length - 1 : circle
      circleChange()
    }
  })

  function circleChange () {
    // 先清除其余小圆圈的 current 类名
    for (let i = 0; i < ol.children.length; i++) {
      ol.children[i].className = ''
    }
    // 保留当前小圆圈的 current 类名
    ol.children[circle].className = 'current'
  }

  // 10.自动播放轮播图
  let timer = setInterval(() => {
    // 手动调用点击事件
    arrowR.click()
  }, 2000)
})
2
3
4
5
6
7
8
9
10
11
12
13
14
15
16
17
18
19
20
21
22
23
24
25
26
27
28
29
30
31
32
33
34
35
36
37
38
39
40
41
42
43
44
45
46
47
48
49
50
51
52
53
54
55
56
57
58
59
60
61
62
63
64
65
66
67
68
69
70
71
72
73
74
75
76
77
78
79
80
81
82
83
84
85
86
87
88
89
90
91
92
93
94
95
96
97
98
99
100
101
102
103
104
105
106
107
108
109
110
111
112
113
114
115
116
117
118
119
120
121
122
123
124
125
126
8.15 带有动画的返回顶部
滚动窗口到文档中的特定位置:
window.scroll(x, y)(已弃用)或 window.scrollTo(x, y)
传统方法:
goBack.addEventListener('click', function () {
    window.scroll(0, 0)
})
2
3
优雅方法:
// 3. 当我们点击了返回顶部模块,就让窗口滚动的页面的最上方
goBack.addEventListener('click', function () {
    // 里面的x和y 不跟单位的 直接写数字即可
    // window.scroll(0, 0);
    // 因为是窗口滚动 所以对象是window
    animate(window, 0);
});
// 动画函数
function animate(obj, target, callback) {
    // console.log(callback);  callback = function() {}  调用的时候 callback()

    // 先清除以前的定时器,只保留当前的一个定时器执行
    clearInterval(obj.timer);
    obj.timer = setInterval(function () {
        // 步长值写到定时器的里面
        // 把我们步长值改为整数 不要出现小数的问题
        // var step = Math.ceil((target - obj.offsetLeft) / 10);
        var step = (target - window.pageYOffset) / 10;
        step = step > 0 ? Math.ceil(step) : Math.floor(step);
        if (window.pageYOffset == target) {
            // 停止动画 本质是停止定时器
            clearInterval(obj.timer);
            // 回调函数写到定时器结束里面
            // if (callback) {
            //     // 调用函数
            //     callback();
            // }
            callback && callback();
        }
        // 把每次加1 这个步长值改为一个慢慢变小的值  步长公式:(目标值 - 现在的位置) / 10
        // obj.style.left = window.pageYOffset + step + 'px';
        window.scrollTo(0, window.pageYOffset + step);
    }, 15);
}
2
3
4
5
6
7
8
9
10
11
12
13
14
15
16
17
18
19
20
21
22
23
24
25
26
27
28
29
30
31
32
33
34
8.16 筋斗云案例
要求:
- 鼠标经过某个 li,筋斗云跟到当前 li 的位置
- 鼠标离开这个 li,筋斗云复原为原来的位置
- 鼠标点击某个 li,筋斗云就会留在点击的 li 的位置
思路:
- 原先筋斗云起始位置为 0
- 鼠标经过某个 li,把当前 li 的 offsetLeft 位置作为目标值
- 鼠标离开某个 li,就把目标值设为 0
- 如果点击某个 li,就把 li 当前的位置存储起来,作为筋斗云起始位置
代码:
<!DOCTYPE html>
<html>

<head lang="en">
  <meta charset="UTF-8">
  <title></title>
  <style>
    * {
      margin: 0;
      padding: 0
    }

    ul {
      list-style: none;
    }

    body {
      background-color: black;
    }

    .c-nav {
      width: 900px;
      height: 42px;
      background: #fff url(images/rss.png) no-repeat right center;
      margin: 100px auto;
      border-radius: 5px;
      position: relative;
    }

    .c-nav ul {
      position: absolute;
    }

    .c-nav li {
      float: left;
      width: 83px;
      text-align: center;
      line-height: 42px;
    }

    .c-nav li a {
      color: #333;
      text-decoration: none;
      display: inline-block;
      height: 42px;
    }

    .c-nav li a:hover {
      color: white;
    }

    .c-nav li.current a {
      color: #0dff1d;
    }

    .cloud {
      position: absolute;
      left: 0;
      top: 0;
      width: 83px;
      height: 42px;
      background: url(images/cloud.gif) no-repeat;
    }
  </style>
  <script src="/animate.js"></script>
  <script>
    window.addEventListener('load', function () {
      // 1.获取元素
      const cloud = document.querySelector('.cloud')
      const c_nav = document.querySelector('.c-nav')
      const lis = document.querySelectorAll('li')
      // 2.给所有 li 绑定事件
      // 这个 current 作为筋斗云起始位置
      let current = 0
      for (let i = 0; i < lis.length; i++) {
        lis[i].addEventListener('mouseenter', function () {
          animate(cloud, this.offsetLeft)
        })
        // 鼠标离开就回到起始位置
        lis[i].addEventListener('mouseleave', function () {
          animate(cloud, current)
        })
        // 3.当鼠标点击,就把当前位置作为目标值
        lis[i].addEventListener('click', function () {
          current = this.offsetLeft
        })
      }
    })
  </script>
</head>

<body>
  <div id="c_nav" class="c-nav">
    <span class="cloud"></span>
    <ul>
      <li class="current"><a href="#">首页新闻</a></li>
      <li><a href="#">师资力量</a></li>
      <li><a href="#">活动策划</a></li>
      <li><a href="#">企业文化</a></li>
      <li><a href="#">招聘信息</a></li>
      <li><a href="#">公司简介</a></li>
      <li><a href="#">我是佩奇</a></li>
      <li><a href="#">啥是佩奇</a></li>
    </ul>
  </div>
</body>

</html>
2
3
4
5
6
7
8
9
10
11
12
13
14
15
16
17
18
19
20
21
22
23
24
25
26
27
28
29
30
31
32
33
34
35
36
37
38
39
40
41
42
43
44
45
46
47
48
49
50
51
52
53
54
55
56
57
58
59
60
61
62
63
64
65
66
67
68
69
70
71
72
73
74
75
76
77
78
79
80
81
82
83
84
85
86
87
88
89
90
91
92
93
94
95
96
97
98
99
100
101
102
103
104
105
106
107
108
9. 移动端 - 动画
9.1 常见触摸事件
常见触屏事件:
| 触屏 touch 事件 | 说明 |
|---|---|
| touchstart | 手指触摸到一个 DOM 元素时触发 |
| touchmove | 手指在一个 DOM 元素上滑动时触发 |
| touchend | 手指在一个 DOM 元素上移开时触发 |
举例:
<!DOCTYPE html>
<html lang="en">

<head>
  <meta charset="UTF-8">
  <meta http-equiv="X-UA-Compatible" content="IE=edge">
  <meta name="viewport" content="width=device-width, initial-scale=1.0">
  <title>Document</title>
  <style>
    div {
      width: 100px;
      height: 100px;
      background-color: pink;
    }
  </style>
</head>

<body>
  <div></div>

  <script>
    // 1.获取元素
    const div = document.querySelector('div')
    // 2.手指触摸 DOM 元素事件
    div.addEventListener('touchstart', function () {
      console.log('我摸了你')
    })
    // 3.手指在 DOM 元素上移动事件
    div.addEventListener('touchmove', function () {
      console.log('我继续摸')
    })
    // 4.手指离开 DOM 元素事件
    div.addEventListener('touchend', function () {
      console.log('我走了哈')
    })
  </script>
</body>

</html>
2
3
4
5
6
7
8
9
10
11
12
13
14
15
16
17
18
19
20
21
22
23
24
25
26
27
28
29
30
31
32
33
34
35
36
37
38
39
9.2 触摸事件对象
touchstart、touchmove、touchend 三个事件都有各自的事件对象
- 如果侦听的是一个 DOM 元素,他们两个的 touches / targetTouched 是一样的
- 当手指离开屏幕时候,就没有了 touches 和 targetTouches 列表,但是会有 changedTouches
- 最经常使用的是 targetTouches
常见触摸事件对象:
| 触摸列表 | 说明 |
|---|---|
| touches | 正在触摸屏幕的所有手指的一个列表 |
| targetTouches | 正在触摸当前 DOM 元素上的手指的一个列表 |
| changedTouches | 手指状态发生了改变的列表,从无到有,从有到无变化 |
9.3 移动端拖动元素
- 触摸元素 touchstart:获取手指初始坐标,同时获得盒子原来的位置
- 移动手指 touchmove:计算手指的滑动距离,并且移动盒子
- 离开手指 touchend
注意:手指移动也会触发滚动屏幕,所以这里要组织默认的屏幕滚动 e.preventDefault()
代码:
<!DOCTYPE html>
<html lang="en">

<head>
  <meta charset="UTF-8">
  <meta http-equiv="X-UA-Compatible" content="IE=edge">
  <meta name="viewport" content="width=device-width, initial-scale=1.0">
  <title>Document</title>
  <style>
    div {
      width: 100px;
      height: 100px;
      background-color: pink;
      position: absolute;
    }
  </style>
</head>

<body>
  <div></div>

  <script>
    const div = document.querySelector('div')
    // 手指初始坐标
    let startX = 0
    let startY = 0
    // 盒子原来位置
    let x = 0
    let y = 0
    div.addEventListener('touchstart', function (e) {
      startX = e.targetTouches[0].pageX
      startY = e.targetTouches[0].pageY
      x = this.offsetLeft
      y = this.offsetTop
    })
    div.addEventListener('touchmove', function (e) {
      // 计算手指的移动距离,手指移动之后的坐标减去手指初始的坐标
      let moveX = e.targetTouches[0].pageX - startX
      let moveY = e.targetTouches[0].pageY - startY
      // 移动盒子:盒子原来的位置 + 手指移动的距离
      this.style.left = x + moveX + 'px'
      this.style.top = x + moveY + 'px'
      e.preventDefault() // 阻止屏幕滚动的默认行为
    })
  </script>
</body>

</html>
2
3
4
5
6
7
8
9
10
11
12
13
14
15
16
17
18
19
20
21
22
23
24
25
26
27
28
29
30
31
32
33
34
35
36
37
38
39
40
41
42
43
44
45
46
47
48
9.4 移动端 - 轮播图
要求:
- 功能与 PC 端保持一直
- 可以自动播放图片
- 手指可以拖动播放轮播图
基础结构:
<!DOCTYPE html>
<html lang="en">

<head>
  <meta charset="UTF-8">
  <meta http-equiv="X-UA-Compatible" content="IE=edge">
  <meta name="viewport" content="width=device-width, initial-scale=1.0">
  <title>Document</title>
  <style>
    * {
      margin: 0;
      padding: 0;
    }

    ul {
      list-style: none;
      margin: 0;
      padding: 0;
    }

    div {
      box-sizing: border-box;
    }

    /* focus */

    .focus {
      position: relative;
      padding-top: 44px;
      overflow: hidden;
    }

    .focus img {
      width: 100%;
    }

    .focus ul {
      /* 防止塌陷 */
      overflow: hidden;
      width: 500%;
      margin-left: -100%;
    }

    .focus ul li {
      float: left;
      width: 20%;
    }

    .focus ol {
      position: absolute;
      bottom: 5px;
      right: 5px;
      margin: 0;
    }

    .focus ol li {
      display: inline-block;
      width: 5px;
      height: 5px;
      background-color: #fff;
      list-style: none;
      border-radius: 2px;
      transition: all .3s;
    }

    .focus ol li.current {
      width: 15px;
    }
  </style>
</head>

<body>
  <!-- 焦点图模块 -->
  <div class="focus">
    <ul>
      <li><img src="../static/upload/focus3.jpg" alt=""></li>
      <li><img src="../static/upload/focus1.jpg" alt=""></li>
      <li><img src="../static/upload/focus2.jpg" alt=""></li>
      <li><img src="../static/upload/focus3.jpg" alt=""></li>
      <li><img src="../static/upload/focus1.jpg" alt=""></li>
    </ul>
    <!-- 小圆点 -->
    <ol>
      <li class="current"></li>
      <li></li>
      <li></li>
    </ol>
  </div>
</body>

</html>
2
3
4
5
6
7
8
9
10
11
12
13
14
15
16
17
18
19
20
21
22
23
24
25
26
27
28
29
30
31
32
33
34
35
36
37
38
39
40
41
42
43
44
45
46
47
48
49
50
51
52
53
54
55
56
57
58
59
60
61
62
63
64
65
66
67
68
69
70
71
72
73
74
75
76
77
78
79
80
81
82
83
84
85
86
87
88
89
90
91
9.5 轮播图 - 滚动图片
案例分析:
- 开启定时器
- 移动端移动,可以使用 translate 移动
- 想要图片优雅地移动,添加过渡效果
代码:
<!DOCTYPE html>
<html lang="en">

<head>
  <meta charset="UTF-8">
  <meta http-equiv="X-UA-Compatible" content="IE=edge">
  <meta name="viewport" content="width=device-width, initial-scale=1.0">
  <title>Document</title>
  <style>
    * {
      margin: 0;
      padding: 0;
    }

    ul {
      list-style: none;
      margin: 0;
      padding: 0;
    }

    div {
      box-sizing: border-box;
    }

    /* focus */

    .focus {
      position: relative;
      padding-top: 44px;
      overflow: hidden;
    }

    .focus img {
      width: 100%;
    }

    .focus ul {
      /* 防止塌陷 */
      overflow: hidden;
      width: 500%;
      margin-left: -100%;
    }

    .focus ul li {
      float: left;
      width: 20%;
    }

    .focus ol {
      position: absolute;
      bottom: 5px;
      right: 5px;
      margin: 0;
    }

    .focus ol li {
      display: inline-block;
      width: 5px;
      height: 5px;
      background-color: #fff;
      list-style: none;
      border-radius: 2px;
      transition: all .3s;
    }

    .focus ol li.current {
      width: 15px;
    }
  </style>
</head>

<body>
  <!-- 焦点图模块 -->
  <div class="focus">
    <ul>
      <li><img src="../static/upload/focus3.jpg" alt=""></li>
      <li><img src="../static/upload/focus1.jpg" alt=""></li>
      <li><img src="../static/upload/focus2.jpg" alt=""></li>
      <li><img src="../static/upload/focus3.jpg" alt=""></li>
      <li><img src="../static/upload/focus1.jpg" alt=""></li>
    </ul>
    <!-- 小圆点 -->
    <ol>
      <li class="current"></li>
      <li></li>
      <li></li>
    </ol>
  </div>

  <script>
    // 1.获取元素
    const focus = document.querySelector('.focus')
    const ul = focus.children[0]
    // 获得 focus 的宽度
    let w = focus.offsetWidth
    // 2.利用定时器自动轮播图图片
    let index = 0
    let timer = setInterval(() => {
      index++
      let translatex = -index * w
      ul.style.transition = 'all .3s'
      ul.style.transform = `translateX(${translatex}px)`
    }, 2000);
  </script>
</body>

</html>
2
3
4
5
6
7
8
9
10
11
12
13
14
15
16
17
18
19
20
21
22
23
24
25
26
27
28
29
30
31
32
33
34
35
36
37
38
39
40
41
42
43
44
45
46
47
48
49
50
51
52
53
54
55
56
57
58
59
60
61
62
63
64
65
66
67
68
69
70
71
72
73
74
75
76
77
78
79
80
81
82
83
84
85
86
87
88
89
90
91
92
93
94
95
96
97
98
99
100
101
102
103
104
105
106
107
9.6 轮播图 - 无缝滚动
- 判断条件要等到图片滚动完毕再去判断,就是过渡完成后判断
- 检测过渡完成时间 transitionend
- 判断条件:如果索引号等于 3 说明走到最后一张图片,此时索引号要复原为 0
- 此时图片去掉过渡效果,然后移动
- 如果索引号小于 0,说明是倒着走,索引号等于 2
js 部分:
// 1.获取元素
const focus = document.querySelector('.focus')
const ul = focus.children[0]
// 获得 focus 的宽度
let w = focus.offsetWidth
// 2.利用定时器自动轮播图图片
let index = 0
let timer = setInterval(() => {
    index++
    let translatex = -index * w
    ul.style.transition = 'all .3s'
    ul.style.transform = `translateX(${translatex}px)`
}, 2000);
// 等着过渡完成之后,再去判断。监听过渡完成的事件 transitionend
ul.addEventListener('transitionend', function () {
    // 无缝滚动
    if (index === 3) {
        index = 0
        ul.style.transition = 'none'
        // 利用最新的索引乘以宽度去滚动图片(回到第一张图片)
        let translatex = -index * w
        ul.style.transform = `translateX(${translatex}px)`
    } else if (index < 0) {
        index = 2
        ul.style.transition = 'none'
        let translatex = -index * w
        ul.style.transform = `translateX(${translatex}px)`
    }
})
2
3
4
5
6
7
8
9
10
11
12
13
14
15
16
17
18
19
20
21
22
23
24
25
26
27
28
29
9.7 classList 类名操作
classList 属性是 HTML5 新增的一个属性,返回元素的类名,但是 ie10 以上版本支持
添加类:(是在后面追加类名,而不会像 className 那样覆盖以前的类名)
element.classList.add('类名')
移除类:
element.classList.remove('类名')
**切换类:**没有则添加,有则删掉
element.classList.toggle('类名')
示例代码:
<!DOCTYPE html>
<html lang="en">

<head>
  <meta charset="UTF-8">
  <meta http-equiv="X-UA-Compatible" content="IE=edge">
  <meta name="viewport" content="width=device-width, initial-scale=1.0">
  <title>Document</title>
  <style>
    .bg {
      background-color: black;
    }
  </style>
</head>

<body>
  <div class="one two"></div>
  <button>开关灯</button>
  <script>
    // classList 返回元素的类名
    const div = document.querySelector('div')
    // console.log(div.classList[1])
    div.classList.add('three')
    div.classList.remove('one')
    // 切换类
    const btn = document.querySelector('button')
    btn.addEventListener('click', function () {
      document.body.classList.toggle('bg')
    })
  </script>
</body>

</html>
2
3
4
5
6
7
8
9
10
11
12
13
14
15
16
17
18
19
20
21
22
23
24
25
26
27
28
29
30
31
32
33
9.8 轮播图 - 小圆点跟随变化
分析:
- 把 ol 里面 li 带有 current 类名的选出来去掉类名(remove)
- 让当前索引号的 li 加上 current(add)
- 但是,要等到过渡结束之后变化,所以写到 transitionend 事件里面
js 部分:
// 1.获取元素
const focus = document.querySelector('.focus')
const ul = focus.children[0]
// 获得 focus 的宽度
let w = focus.offsetWidth
const ol = focus.children[1]
// 2.利用定时器自动轮播图图片
let index = 0
let timer = setInterval(() => {
    index++
    let translatex = -index * w
    ul.style.transition = 'all .3s'
    ul.style.transform = `translateX(${translatex}px)`
}, 2000);
// 等着过渡完成之后,再去判断。监听过渡完成的事件 transitionend
ul.addEventListener('transitionend', function () {
    // 无缝滚动
    if (index >= 3) {
        index = 0
        ul.style.transition = 'none'
        // 利用最新的索引乘以宽度去滚动图片(回到第一张图片)
        let translatex = -index * w
        ul.style.transform = `translateX(${translatex}px)`
    } else if (index < 0) {
        index = 2
        ul.style.transition = 'none'
        let translatex = -index * w
        ul.style.transform = `translateX(${translatex}px)`
    }
    // 3.小圆点跟随变化
    // remove .current
    ol.querySelector('li.current').classList.remove('current')
    // add .current
    ol.children[index].classList.add('current')
})
2
3
4
5
6
7
8
9
10
11
12
13
14
15
16
17
18
19
20
21
22
23
24
25
26
27
28
29
30
31
32
33
34
35
9.9 轮播图 - 手指拖动
分析:
- 本质就是 ul 跟随手指移动
- 触摸元素 touchstart:获取手指初始坐标
- 移动手指 touchmove,计算手指滑动距离,并且移动盒子
js 部分:
// 1.获取元素
const focus = document.querySelector('.focus')
const ul = focus.children[0]
// 获得 focus 的宽度
let w = focus.offsetWidth
const ol = focus.children[1]
// 2.利用定时器自动轮播图图片
let index = 0
let timer = setInterval(() => {
    index++
    let translatex = -index * w
    ul.style.transition = 'all .3s'
    ul.style.transform = `translateX(${translatex}px)`
}, 2000);
// 等着过渡完成之后,再去判断。监听过渡完成的事件 transitionend
ul.addEventListener('transitionend', function () {
    // 无缝滚动
    if (index >= 3) {
        index = 0
        ul.style.transition = 'none'
        // 利用最新的索引乘以宽度去滚动图片(回到第一张图片)
        let translatex = -index * w
        ul.style.transform = `translateX(${translatex}px)`
    } else if (index < 0) {
        index = 2
        ul.style.transition = 'none'
        let translatex = -index * w
        ul.style.transform = `translateX(${translatex}px)`
    }
    // 3.小圆点跟随变化
    // remove .current
    ol.querySelector('li.current').classList.remove('current')
    // add .current
    ol.children[index].classList.add('current')
})

// 4.手指滑动轮播图
// 触摸元素 touchstart:获取手指初始坐标
let startX = 0
let moveX = 0 // 后面会使用移动距离
ul.addEventListener('touchstart', function (e) {
    startX = e.targetTouches[0].pageX
    // 手指触摸时就停止定时器
    clearInterval(timer)
})
// 移动手指 touchmove,计算手指滑动距离,并且移动盒子
ul.addEventListener('touchmove', function (e) {
    // 计算移动距离
    moveX = e.targetTouches[0].pageX - startX
    // 移动盒子:盒子原来的位置 - 手指移动的距离
    let translatex = -index * w + moveX
    // 手指拖动的时候,不需要动画效果,所以要取消动画效果
    ul.style.transition = 'none'
    ul.style.transform = `translateX(${translatex}px)`
})
2
3
4
5
6
7
8
9
10
11
12
13
14
15
16
17
18
19
20
21
22
23
24
25
26
27
28
29
30
31
32
33
34
35
36
37
38
39
40
41
42
43
44
45
46
47
48
49
50
51
52
53
54
55
9.10 轮播图 - 手指滑动播放上一张下一张图片
分析:
- 离开手指 touchend:根据滑动的距离分为不同情况
- 如果移动距离小于某个像素,就回弹原来位置
- 如果移动距离大于某个像素,就上一张下一张滑动
js 代码:
// 1.获取元素
const focus = document.querySelector('.focus')
const ul = focus.children[0]
// 获得 focus 的宽度
let w = focus.offsetWidth
const ol = focus.children[1]
// 2.利用定时器自动轮播图图片
let index = 0
let timer = setInterval(() => {
    index++
    let translatex = -index * w
    ul.style.transition = 'all .3s'
    ul.style.transform = `translateX(${translatex}px)`
}, 2000);
// 等着过渡完成之后,再去判断。监听过渡完成的事件 transitionend
ul.addEventListener('transitionend', function () {
    // 无缝滚动
    if (index >= 3) {
        index = 0
        ul.style.transition = 'none'
        // 利用最新的索引乘以宽度去滚动图片(回到第一张图片)
        let translatex = -index * w
        ul.style.transform = `translateX(${translatex}px)`
    } else if (index < 0) {
        index = 2
        ul.style.transition = 'none'
        let translatex = -index * w
        ul.style.transform = `translateX(${translatex}px)`
    }
    // 3.小圆点跟随变化
    // remove .current
    ol.querySelector('li.current').classList.remove('current')
    // add .current
    ol.children[index].classList.add('current')
})

// 4.手指滑动轮播图
// 触摸元素 touchstart:获取手指初始坐标
let startX = 0
let moveX = 0 // 后面会使用移动距离
let flag = false
ul.addEventListener('touchstart', function (e) {
    startX = e.targetTouches[0].pageX
    // 手指触摸时就停止定时器
    clearInterval(timer)
})
// 移动手指 touchmove,计算手指滑动距离,并且移动盒子
ul.addEventListener('touchmove', function (e) {
    // 计算移动距离
    moveX = e.targetTouches[0].pageX - startX
    // 移动盒子:盒子原来的位置 - 手指移动的距离
    let translatex = -index * w + moveX
    // 手指拖动的时候,不需要动画效果,所以要取消动画效果
    ul.style.transition = 'none'
    ul.style.transform = `translateX(${translatex}px)`
    flag = true // 如果用户手指移动过再去判断,否则不做判断
    e.preventDefault() // 阻止滚动屏幕的行为
})
// 手指离开,根据移动距离去判断是回弹还是播放上一张下一张
ul.addEventListener('touchend', function (e) {
    if (flag) {
        // (1) 如果移动距离大于 50 像素就播放上一张或下一张
        if (Math.abs(moveX) > 50) {
            // 如果是右滑,播放上一张 moveX 是正值
            if (moveX > 0) {
                index--
            } else {
                index++
            }
            let translatex = -index * w
            ul.style.transition = 'all .3s'
            ul.style.transform = `translateX(${translatex}px)`
        } else {
            // (2) 如果移动距离小于某个像素,就回弹原来位置
            let translatex = -index * w
            ul.style.transition = 'all .1s'
            ul.style.transform = `translateX(${translatex}px)`
        }
    }
    // 手指离开的时候就重新开启定时器
    clearInterval(timer)
    timer = setInterval(() => {
        index++
        let translatex = -index * w
        ul.style.transition = 'all .3s'
        ul.style.transform = `translateX(${translatex}px)`
    }, 2000);
})
2
3
4
5
6
7
8
9
10
11
12
13
14
15
16
17
18
19
20
21
22
23
24
25
26
27
28
29
30
31
32
33
34
35
36
37
38
39
40
41
42
43
44
45
46
47
48
49
50
51
52
53
54
55
56
57
58
59
60
61
62
63
64
65
66
67
68
69
70
71
72
73
74
75
76
77
78
79
80
81
82
83
84
85
86
87
88
9.11 返回顶部
效果:
- 当页面滚动某某个地方,就显示,否则隐藏
- 点击可以返回顶部
- 如果被卷去的头部(window.pageYOffset)大于某个数值
- 点击,window.scrollTo(0, 0) 返回顶部
代码:
<!DOCTYPE html>
<html lang="en">

<head>
  <meta charset="UTF-8">
  <meta http-equiv="X-UA-Compatible" content="IE=edge">
  <meta name="viewport" content="width=device-width, initial-scale=1.0">
  <title>Document</title>
  <style>
    * {
      margin: 0;
      padding: 0;
    }

    nav {
      width: 100%;
      height: 900px;
      background-color: #bfa;
    }

    section {
      width: 100%;
      height: 300px;
      background-color: gold;
    }

    .goBack {
      display: none;
      position: fixed;
      width: 50px;
      height: 50px;
      line-height: 25px;
      border: 1px solid red;
      font-size: 8px;
      text-align: center;
      border-radius: 10px;
      right: 0;
      bottom: 200px;
    }
  </style>
</head>

<body>
  <section></section>
  <nav></nav>
  <div class="goBack">回到顶部</div>

  <script>
    const goBack = document.querySelector('.goBack')
    const nav = document.querySelector('nav')
    window.addEventListener('scroll', function () {
      if (window.pageYOffset >= nav.offsetTop) {
        goBack.style.display = 'block'
      } else {
        goBack.style.display = 'none'
      }
    })
    goBack.addEventListener('click', function () {
      window.scrollTo(0, 0)
    })
  </script>
</body>

</html>
2
3
4
5
6
7
8
9
10
11
12
13
14
15
16
17
18
19
20
21
22
23
24
25
26
27
28
29
30
31
32
33
34
35
36
37
38
39
40
41
42
43
44
45
46
47
48
49
50
51
52
53
54
55
56
57
58
59
60
61
62
63
64
9.12 移动端 click 事件 300ms 延时问题
如题的问题,原因是移动端屏幕双击会缩放(double tap to zoom)页面
**方案一:**浏览器禁止默认的双击缩放行为并去掉 300ms 的点击延时
<meta name="viewport" content="user-scalable=no"></meta>
**方案二:**利用 touch 事件自己封装这个事件解决 300ms 延迟
原理:
- 当手指触摸屏幕,记录当前触摸时间
- 当手指离开屏幕,用离开的事件减去触摸的事件
- 如果事件小于 150ms,并且没有滑动过屏幕,name就定义为点击
**方案三:**fastclick 插件使用
<!DOCTYPE html>
<html lang="en">

<head>
  <meta charset="UTF-8">
  <meta http-equiv="X-UA-Compatible" content="IE=edge">
  <meta name="viewport" content="width=device-width, initial-scale=1.0">
  <title>Document</title>
  <style>
    div {
      width: 200px;
      height: 200px;
      background-color: #bfa;
    }
  </style>
  <script src="./js/fastclick.js"></script>
</head>

<body>
  <div></div>

  <script>
    if ('addEventListener' in document) {
      document.addEventListener('DOMContentLoaded', function () {
        FastClick.attach(document.body);
      }, false);
    }
    const div = document.querySelector('div')
    div.addEventListener('click', function () {
      alert(11)
    })
  </script>
</body>

</html>
2
3
4
5
6
7
8
9
10
11
12
13
14
15
16
17
18
19
20
21
22
23
24
25
26
27
28
29
30
31
32
33
34
35
9.13 Swiper 插件的使用
9.14 视频插件 zy.media.js 的使用
zyMedia/video.html at master · ireaderlab/zyMedia (github.com)open in new window
9.15 window.sessionStorage
特点:
- 生命周期为关闭浏览器窗口
- 在同一个窗口(页面)下数据可以共享
- 以键值对形式进行存储使用
存储数据:
sessionStorage.setItem(key, value)
获取数据:
sessionStorage.getItem(key)
删除数据:
sessionStorage.removeItem(key)
清空数据:
sessionStorage.clear()
代码:
<!DOCTYPE html>
<html lang="en">

<head>
  <meta charset="UTF-8">
  <meta http-equiv="X-UA-Compatible" content="IE=edge">
  <meta name="viewport" content="width=device-width, initial-scale=1.0">
  <title>Document</title>
</head>

<body>
  <input type="text" aria-label="data">
  <button class="set">存储数据</button>
  <button class="get">获取数据</button>
  <button class="remove">删除数据</button>
  <button class="del">清空所有数据</button>

  <script>
    const ipt = document.querySelector('input')
    const set = document.querySelector('.set')
    const get = document.querySelector('.get')
    const remove = document.querySelector('.remove')
    const del = document.querySelector('.del')
    set.addEventListener('click', function () {
      // 点击后把表单值存储起来
      let val = ipt.value
      sessionStorage.setItem('uname', val)
    })
    get.addEventListener('click', function () {
      // 获取表单值
      console.log(sessionStorage.getItem('uname'))
    })
    remove.addEventListener('click', function () {
      // 移除表单数据
      sessionStorage.removeItem('uname')
    })
    del.addEventListener('click', function () {
      // 清空数据
      sessionStorage.clear()
    })
  </script>
</body>

</html>
2
3
4
5
6
7
8
9
10
11
12
13
14
15
16
17
18
19
20
21
22
23
24
25
26
27
28
29
30
31
32
33
34
35
36
37
38
39
40
41
42
43
44
9.16 window.localStorage
特点:
- 生命周期永久生效,除非手动删除,否则关闭页面也会存在
- 可以多窗口(页面)共享(同一浏览器可以共享)
- 以键值对形式存储使用
存储数据:
localStorage.setItem(key, value)
获取数据:
localnStorage.getItem(key)
删除数据:
localStorage.removeItem(key)
清空数据:
localStorage.clear()
代码与上面同!
9.17 记住用户名
分析:
- 使用本地存储
- 打开页面,先判断是否有此用户名,若有,就在表单中显示用户名,并且勾选复选框
- 当复选框改变的时候 change 事件
- 若勾选就存储,否则就移除
代码:
<body>
  <input type="text" id="username" aria-label="username">
  <input type="checkbox" name="remember" id="remember"><label for="remember">记住用户名</label>

  <script>
    const username = document.querySelector('#username')
    const remember = document.querySelector('#remember')
    if (localStorage.getItem('username')) {
      username.value = localStorage.getItem('username')
      remember.checked = true
    }
    remember.addEventListener('change', function () {
      if (this.checked) {
        localStorage.setItem('username', username.value)
      } else {
        localStorage.removeItem('username')
      }
    })
  </script>
</body>
2
3
4
5
6
7
8
9
10
11
12
13
14
15
16
17
18
19
20